Choosing the Right A-Frame Coop Design
Building an A-frame chicken coop can be a rewarding DIY project, offering a cozy and secure shelter for your feathered friends. However, the success of your coop hinges on careful planning and design. This guide will walk you through the essential considerations and provide design secrets to ensure your A-frame chicken coop is both functional and aesthetically pleasing. From selecting the right materials to implementing predator-proofing measures and ensuring proper ventilation, every aspect is crucial for the health and happiness of your chickens. We’ll explore various design aspects to help you build a coop that meets your needs and exceeds your expectations. The A-frame design, known for its simplicity and efficiency, provides excellent protection from the elements and is relatively easy to construct, making it a popular choice for backyard chicken keepers.
Assess Your Needs
Before you start building, it’s essential to assess your specific needs and the needs of your chickens. This includes considering factors like the number of chickens you plan to house, the climate in your area, and the available space in your backyard. Planning ahead will save you time, money, and potential headaches down the line. Proper planning ensures that your coop provides a comfortable, safe, and functional environment for your chickens, promoting their health and well-being. Consider every detail and ensure a well-designed, suitable chicken coop that fits your needs perfectly.
Space Requirements

Chickens need adequate space to move around, roost, and nest. A general rule of thumb is to provide at least 4 square feet of floor space per chicken inside the coop. The run, where they can roam during the day, should offer a minimum of 8 square feet per bird. Consider the breed of chickens you plan to raise, as some breeds are larger and require more space. Crowding can lead to stress, pecking order issues, and health problems. Providing ample space is crucial for the chickens’ welfare and productivity, allowing them to forage, exercise, and interact comfortably. Additionally, consider the height of the coop to ensure your chickens have enough headroom, especially for roosting.
Number of Chickens
The number of chickens you intend to keep directly influences the size of your A-frame coop. Starting with a small flock allows you to learn the basics of chicken keeping and gradually expand as needed. Ensure you have enough space to accommodate the maximum number of chickens you anticipate raising. Underestimating your space needs can lead to overcrowding, while overestimating might lead to wasted space and resources. Always plan for future growth, and consider the potential addition of new birds to your flock. Planning allows for the best living conditions for your hens and their overall health and happiness.
Climate Considerations
Your local climate plays a significant role in the design of your coop. In colder climates, insulation is critical to keep the coop warm during winter. Consider using materials like plywood or rigid foam insulation to line the walls and roof. In hot climates, ventilation is crucial to prevent overheating. Ensure adequate airflow and consider adding shade to the run. The placement of the coop is also vital. Choose a location that provides both sunlight and shade, depending on the season. Adapt your coop design to the specific environmental conditions to ensure your chickens remain comfortable and healthy year-round. Your coop needs to be adaptable to ensure your chickens have the best possible living conditions.
Material Selection for Durability

Selecting the right materials is critical for building a durable and long-lasting A-frame chicken coop. The materials you choose will impact the coop’s structural integrity, resistance to the elements, and its ability to deter predators. Quality materials also contribute to the overall appearance and longevity of your coop, saving you money and effort on repairs and replacements. Choosing materials designed for outdoor use will ensure the longevity of your coop and will give your chickens a safe and secure place to live.
Wood Types
Wood is the most common material for chicken coops. Choose weather-resistant wood species like cedar, redwood, or pressure-treated lumber. Cedar and redwood offer natural resistance to rot and insects, while pressure-treated lumber is designed to withstand moisture and decay. Avoid using wood treated with harmful chemicals that could leach into the coop and affect your chickens’ health. When selecting wood, consider its cost, availability, and ease of working with it. Plan for the future by choosing wood designed to last and withstand any climate or weather you may face.
Wire Mesh and Hardware
Use heavy-duty, galvanized hardware cloth (wire mesh) for the run and any openings in the coop to prevent predators from entering. The mesh size should be small enough to keep predators out but large enough to allow for good ventilation. Galvanized hardware is resistant to rust and corrosion, ensuring a longer lifespan. When selecting hardware, choose screws, nails, and hinges designed for outdoor use to resist rust and corrosion. Ensuring all hardware is installed correctly and securely will help protect your chickens. Always use the right tools and hardware to create the safest possible coop.
Predator-Proofing Strategies

Protecting your chickens from predators is essential. Predators such as foxes, raccoons, coyotes, and even neighborhood dogs can pose a threat. Implementing robust predator-proofing measures is crucial for your chickens’ safety and your peace of mind. This requires careful planning and construction to eliminate any potential entry points. Secure the coop’s structure and reinforce vulnerable areas to prevent unwanted intrusions. Prevention is key, and a well-designed coop will significantly reduce the risk of attacks.
Burial of Wire Mesh
Burying the wire mesh around the perimeter of the run is a highly effective way to prevent predators from digging under the coop. Extend the wire mesh outward from the base of the coop and bury it at least 12 inches deep. This creates an underground barrier that deters predators from tunneling into the coop. Make sure that all ground-level access points are securely reinforced to create an impregnable defense. This crucial step is often overlooked but is vital for predator control. Proper ground-level protection is essential to keeping your chickens safe and secure.
Securing Doors and Latches
Use sturdy latches and locks on all doors and access points. Ensure the latches are designed to prevent predators from opening them. Consider using carabiner clips or barrel bolts to secure the doors and access points. Regular inspection of the latches is also essential to ensure they remain in good working order. If possible, use multiple latches on doors for extra security. Regular maintenance and upgrades ensure that your coop remains secure and safe. Checking your coop frequently will ensure that your chickens are safe at all times.
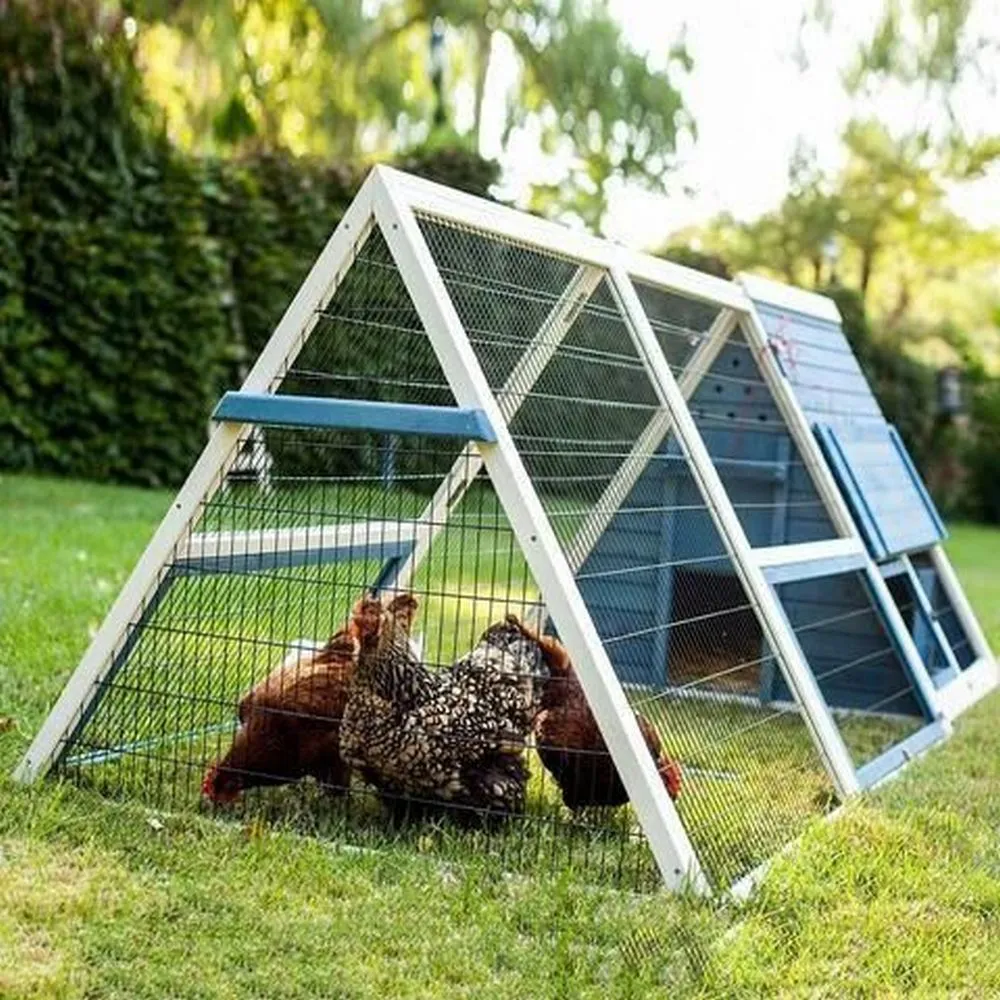
Building the A-Frame Structure

Building the A-frame structure is the core of your chicken coop construction. This design is known for its simplicity and efficiency, making it relatively easy to construct. Precise measurements and sturdy assembly are crucial for the coop’s stability and longevity. Taking your time and following the plans carefully will ensure a structurally sound coop. This stage involves cutting and preparing the wood, assembling the frame, and attaching the walls and roof. These steps lay the foundation for a secure and comfortable home for your chickens, offering shelter from the elements and protection from predators. A solid foundation is the start of a safe home for your chickens.
Cutting and Preparing the Wood
Accurate cutting is essential for a well-built A-frame coop. Follow your plans carefully and use a saw appropriate for the wood you’ve chosen. Measure twice and cut once to avoid wasting materials and ensure a precise fit. Sand down any rough edges to prevent splinters and ensure a smooth finish. Pre-drill holes for screws and nails to prevent the wood from splitting. Taking the time to prepare the wood properly will make the assembly process smoother and more efficient. Accurate measurements ensure the coop will fit together perfectly.
Assembling the Frame
Assemble the A-frame by connecting the side pieces at the top to form the peak of the roof. Ensure the angles are correct, and the frame is square. Use screws or nails to securely fasten the joints. Consider using corner braces for added stability. The frame provides the skeleton of your coop. Double-check your measurements throughout the process to ensure your frame is the correct size. This frame will support the walls, roof, and other features. Correct assembly is essential for the coop’s overall strength and longevity.
Attaching the Walls and Roof

Attach the walls and roof to the assembled frame. Use screws or nails to secure the walls to the frame. Overlap the roof panels to prevent water from leaking into the coop. Ensure the roof is properly sealed to protect your chickens from the rain and sun. Consider adding an overhang to the roof to provide shade and prevent water from dripping directly onto the walls. A well-sealed roof is essential for keeping the coop dry and comfortable. Using the correct building techniques will ensure your coop lasts for a long time.
Adding Ventilation
Adequate ventilation is essential for a healthy chicken coop environment. Good airflow prevents the buildup of ammonia, reduces moisture, and regulates the coop’s temperature. Poor ventilation can lead to respiratory problems and other health issues for your chickens. Designing your coop to include proper ventilation is crucial for maintaining their well-being. Proper ventilation helps to prevent the build-up of moisture and odors, promoting a cleaner, healthier environment. Make sure there’s good airflow in and out of the coop to keep your chickens happy and healthy.
Placement of Vents
Place vents high on the walls and near the roofline to allow warm, stale air to escape. Ensure that vents are protected from rain and snow. Position vents opposite each other to create cross-ventilation. This will maximize airflow and help to keep the coop fresh. The correct placement of vents is essential to promote effective ventilation, while also protecting the coop from the weather. Consider incorporating adjustable vents so that you can control airflow in different weather conditions. Proper placement is a key to a good design.
Ventilation Design

There are several ways to design ventilation into your A-frame coop. You can use vents, windows, or a combination of both. Ensure that the openings are covered with hardware cloth to prevent predators from entering. Consider adding a ridge vent along the top of the roof to allow for continuous airflow. The size of the ventilation openings should be sufficient to allow for adequate airflow without creating drafts. Balance ventilation and insulation to create the ideal environment for your chickens. A properly ventilated coop provides optimal living conditions.
Creating Comfortable Interior Features
Making the interior of your A-frame coop comfortable and functional is key to keeping your chickens happy and productive. The interior should include essential elements such as nesting boxes and roosting bars. These features provide a safe and comfortable space for chickens to sleep, nest, and lay eggs. These features should be designed to be easily accessible for cleaning and maintenance. A well-designed interior will contribute to the overall health and well-being of your chickens and make your chicken-keeping experience more enjoyable. Well designed features make your chickens feel safe.
Nesting Boxes
Provide one nesting box for every 3-4 hens. Nesting boxes should be placed in a quiet, secluded area of the coop. They should be large enough for the chickens to comfortably turn around in and lined with soft bedding such as straw, wood shavings, or shredded paper. The placement of nesting boxes is important for privacy and comfort, and the chickens should feel safe when laying their eggs. Make sure to monitor nesting boxes regularly and replace soiled bedding to maintain hygiene and prevent the spread of parasites. Your chickens deserve a comfortable place to lay their eggs.
Roosting Bars

Install roosting bars at a height that is comfortable for your chickens. The bars should be wide enough for the chickens to comfortably perch on. Place the roosting bars away from the nesting boxes to prevent droppings from contaminating the nests. Provide enough roosting space for all of your chickens, allowing them to sleep comfortably. Roosting bars provide a safe and secure place for your chickens to sleep at night. Proper spacing ensures that all chickens have enough space to rest.
Easy Cleaning and Maintenance
Regular cleaning and maintenance are essential for maintaining a healthy and hygienic chicken coop. A clean coop will prevent the buildup of diseases and parasites and provide a comfortable environment for your chickens. Make cleaning and maintenance as easy as possible by designing your coop with these considerations in mind. Implementing a regular cleaning routine will ensure your chickens remain healthy, and your coop lasts for a long time. Easy cleaning makes your job easier and makes it more likely that your coop stays clean.
Cleaning the Coop
Clean the coop regularly, ideally weekly or bi-weekly. Remove droppings, soiled bedding, and any spilled food or water. Scrape the floors and walls to remove any buildup. Use a poultry-safe disinfectant to clean the surfaces and kill bacteria. Allow the coop to dry thoroughly before replacing the bedding. A clean coop keeps your chickens healthy and happy. Make sure your coop is always clean to ensure a safe place for your chickens to live.
Preventative Maintenance
Inspect your A-frame coop regularly for any signs of damage or wear and tear. Check for loose nails, cracks in the wood, or any other potential issues. Repair any damage promptly to prevent further deterioration. Apply a sealant or paint to protect the wood from the elements. Regularly check the latches, hinges, and other hardware to ensure they are in good working order. Proactive maintenance extends the lifespan of your coop and prevents more serious problems. Maintenance will ensure your coop lasts.