Building a chicken coop can seem daunting, but with the right planning and execution, it’s a rewarding project that provides fresh eggs and a delightful hobby. This guide simplifies the process, breaking down the steps into easy-to-follow instructions. Whether you’re a seasoned DIY enthusiast or a complete beginner, you’ll find the information and guidance you need to build a safe, comfortable, and functional home for your chickens. From the initial planning stages to the final finishing touches, we’ll cover everything you need to know to bring your chicken coop dreams to life.
Planning Your Chicken Coop Build
Careful planning is the foundation of any successful chicken coop build. This initial phase sets the stage for a smooth construction process, ensuring your chickens’ safety and comfort while adhering to local regulations. Taking the time to plan thoroughly will save you time, money, and potential headaches down the road. Consider all the relevant factors before you start gathering materials or swinging a hammer.
Determine Coop Size
One of the first considerations is the size of your coop. The number of chickens you intend to house will dictate the dimensions. As a general rule, aim for at least 4 square feet of floor space per chicken inside the coop. This allows adequate room for roosting, nesting, and moving around comfortably. Consider the breed of chickens you plan to keep, as larger breeds require more space.
Consider Your Flock’s Needs

Think about the specific needs of your chickens. Do they need a lot of space to roam, or are they relatively content with a smaller area? Consider also the climate in your region. In colder climates, you might want a more insulated coop to help regulate temperature. Also, plan for the future. Will you eventually want to expand your flock? If so, design your coop with potential expansion in mind, either in the initial build or as a future project.
Local Regulations and Codes
Before starting construction, research your local ordinances and building codes. Many areas have specific regulations regarding chicken coops, including size restrictions, setback requirements (how far the coop must be from property lines), and permitted materials. You may need to obtain a permit before you begin construction. Contact your local zoning department or building inspector to obtain this information and avoid potential fines or legal issues.
Choosing the Right Location
The location of your coop is critical for both the chickens’ well-being and your convenience. Choose a spot that is relatively flat, well-drained, and easily accessible for cleaning and maintenance. Consider proximity to your house for ease of access and to monitor the flock. Also, ensure the location is away from areas where strong winds, heavy rain, or excessive sun exposure are prevalent.
Sunlight and Shade

Chickens need both sunlight and shade. The coop should ideally receive some sunlight, especially during the colder months, for warmth and vitamin D production. However, it must also have shaded areas to protect the chickens from the harsh summer sun. Consider the path of the sun throughout the day when selecting your location. Trees, fences, or strategically placed shade structures can help provide the necessary balance.
Predator Protection
Predator protection is paramount. Select a location that minimizes the risk of predators such as foxes, coyotes, raccoons, and dogs. Ensure the coop is built with strong materials and secure against digging, climbing, and entry through gaps. Consider surrounding the coop and run with hardware cloth buried underground to prevent predators from digging under the structure.
Gathering Your Chicken Coop Building Materials
Once you’ve finalized your plans and chosen a location, it’s time to gather your materials. A well-stocked supply of materials will keep your project on track, reducing delays and frustration. Create a detailed materials list based on your chosen coop design, and don’t forget to account for any waste or extra materials needed for unforeseen circumstances. Careful selection of materials ensures durability and longevity.
Essential Materials List

Your materials list will vary depending on the complexity of your design, but some essential items are always needed. Wood, hardware, roofing materials, and wire mesh are critical components. Consider the climate and the local availability of materials when making your selections. Prioritize durability and safety when choosing materials that will be exposed to the elements and the chickens themselves.
Wood
Wood is the primary building material for most chicken coops. Choose rot-resistant lumber such as cedar, redwood, or pressure-treated wood. Pressure-treated wood is especially good for ground contact areas but avoid using it for nesting boxes or where chickens will frequently come into direct contact, as the chemicals can be harmful. Select wood that is straight, free of knots, and of the appropriate dimensions for your design. Determine the thickness of the wood, considering the climate.
Hardware
You’ll need a variety of hardware items, including nails, screws, hinges, latches, and wire mesh. Use exterior-grade screws and nails to prevent rust and corrosion. Choose sturdy hinges and latches to secure doors and windows. Hardware cloth or welded wire mesh is essential for the run to keep predators out, and it is also used for ventilation. Consider the gauge (thickness) of the wire mesh to prevent predators from gaining access.
Tools You’ll Need

Having the right tools will make the construction process much easier. A basic tool kit should include a saw (circular saw, hand saw, or reciprocating saw), a drill, a level, a measuring tape, a hammer, a screwdriver, and safety glasses and gloves. Additional tools that can be helpful include a staple gun (for attaching wire mesh), a post-hole digger (if you’re building a run), and a miter saw (for making precise cuts).
Construction Phase How-To
With your plans finalized and materials gathered, you’re ready to begin building your chicken coop. This phase involves the actual construction of the coop frame, walls, roof, and run. Follow your plans carefully, taking your time to ensure that all measurements are accurate and that the structure is sturdy and secure. Don’t hesitate to seek assistance if you’re unsure about any steps. Building a solid foundation is the most important part to achieve a successful project.
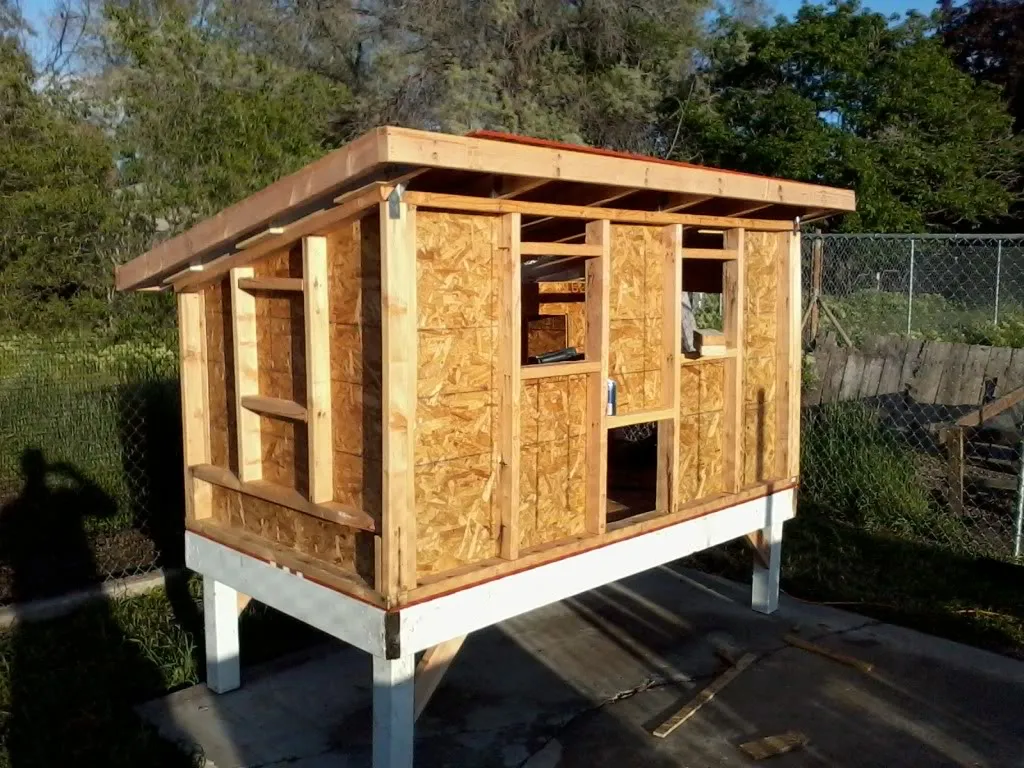
Building the Coop Frame
The frame provides the structural support for your coop. Start by constructing the base frame, ensuring it is square and level. Then, build the wall frames and attach them to the base. Use screws or nails to secure the frame components together. Consider adding corner bracing to provide additional stability. Make sure the frame is the correct dimensions.
Constructing the Walls

Once the frame is complete, you can begin attaching the walls. If you’re using wooden siding, attach it to the frame using nails or screws, ensuring that the boards are flush and properly aligned. For simpler walls, consider using plywood or OSB (oriented strand board). Ensure that all gaps and cracks are sealed to prevent drafts and predator entry. Consider the insulation needs for your climate.
Roofing the Coop
Choose a roofing material that is durable, weather-resistant, and suitable for your climate. Asphalt shingles, metal roofing, and corrugated plastic are all common options. Install the roofing according to the manufacturer’s instructions, ensuring that it is properly sealed and securely attached to the frame. Make sure the roof overhangs the walls to protect the coop from rain and snow. A well-constructed roof is essential for protecting your chickens.
Building the Chicken Run
The chicken run provides a safe and secure outdoor space for your chickens to roam and forage. The run should be large enough to allow the chickens to move around freely. It must be constructed with predator protection in mind. Careful planning and construction of the run ensures the safety and health of your flock.
Design Considerations for the Run

The size of your run should be proportionate to the size of your coop and the number of chickens. As a general rule, provide at least 8-10 square feet of space per chicken in the run. Consider the shape of the run and how it will integrate with your coop. Include features like a covered area for shade, perches for roosting, and a dust bathing area. The design is important for the chickens’ overall well-being.
Securing the Run from Predators
Predator-proofing is critical for the run. Bury hardware cloth or welded wire mesh around the perimeter of the run, extending at least 12 inches underground, to prevent digging predators from entering. Use sturdy materials for the walls and roof of the run, such as welded wire mesh or hardware cloth. Ensure that all gaps and openings are securely sealed. Cover the top of the run with wire mesh or netting to protect against aerial predators.
Adding the Finishing Touches
With the main structure complete, it’s time to add the finishing touches that will make your chicken coop functional and comfortable for your flock. This includes installing doors and windows, creating a comfortable interior, and ensuring proper ventilation and lighting. These final steps will contribute to the long-term success of your coop.
Installing Doors and Windows

Install doors that provide easy access for you to clean the coop and for the chickens to enter and exit. Make sure the doors are sturdy and secure and that they close properly. Consider adding a ramp for the chickens to easily access the coop. Install windows to provide natural light and ventilation. Ensure that the windows are screened to prevent predators from entering and chickens from escaping. The doors and windows are important for the chicken’s comfort.
Creating a Comfortable Interior
Provide nesting boxes for laying hens. One nesting box for every three to four hens is a good rule of thumb. Place the nesting boxes in a secluded and protected area of the coop. Provide roosting bars for the chickens to sleep on at night. The roosts should be elevated and located away from the nesting boxes. Provide a flooring material that is easy to clean, such as linoleum or wood shavings. Keep the interior clean.
Ventilation and Lighting
Proper ventilation is essential to remove moisture, ammonia, and other harmful gases from the coop. Install vents or windows that allow for good airflow. However, avoid drafts that can chill the chickens. Provide adequate lighting, especially during the winter months. Consider using a timer to regulate the amount of light. Adequate lighting helps with egg production and chicken health.
Maintaining Your Chicken Coop
Regular maintenance is essential to keep your chicken coop clean, safe, and in good condition. This will help ensure the health of your chickens and prolong the life of the coop. A well-maintained coop minimizes health risks and ensures a long-term investment. Consistent upkeep and attention will provide a healthy environment.
Regular Cleaning and Maintenance
Clean the coop regularly, at least once a week, and more often if necessary. Remove droppings, soiled bedding, and any spilled food or water. Replace bedding materials such as wood shavings, straw, or sand. Wash the nesting boxes and roosting bars. Disinfect the coop periodically with a poultry-safe disinfectant. Inspect the coop regularly for any signs of damage or wear and tear, and make repairs promptly.
Seasonal Adjustments
Make adjustments to the coop as the seasons change. In the winter, provide extra insulation and ensure that the coop is well-ventilated to prevent moisture buildup. In the summer, provide shade and ensure that the coop has good airflow to keep the chickens cool. Provide fresh water daily, and consider adding a heater in the winter to prevent water from freezing. Be proactive with your maintenance.
Building a chicken coop is a rewarding project that can provide you with fresh eggs and a connection to nature. By following these steps, you can build a safe, comfortable, and attractive home for your chickens. Remember to plan carefully, choose quality materials, and take your time during construction. Enjoy the process, and enjoy the fruits (and eggs) of your labor!