Building your own chicken coop can be a rewarding project, providing a safe and comfortable home for your feathered friends while offering you the satisfaction of a DIY accomplishment. This easy, step-by-step guide will walk you through the entire process, from initial planning to the finishing touches, ensuring you create a functional and attractive coop. With clear instructions and helpful tips, you’ll be well on your way to raising happy, healthy chickens in your own backyard. Let’s get started on how to build a chicken coop step by step with pictures.
Planning Your Chicken Coop
Before you even think about picking up a hammer, careful planning is crucial. This stage involves assessing your needs, considering local regulations, and designing a coop that meets both your chickens’ requirements and your aesthetic preferences. Proper planning saves time, money, and potential headaches down the road. It allows you to visualize the finished product and anticipate challenges before they arise. Consider the number of chickens you plan to house, as this will significantly impact the size and features of your coop. Research local ordinances regarding coop size, setback requirements, and permitted materials. A well-planned coop is the foundation for a successful chicken-keeping experience.
Choosing the Right Location for Your Coop
The location of your chicken coop is paramount to the well-being of your flock and the ease of your daily chores. Opt for a spot that provides both sun and shade, allowing chickens to regulate their body temperature throughout the day. Ensure the area is well-drained to prevent standing water, which can attract pests and create unsanitary conditions. Proximity to your house is also a factor; a coop closer to your home makes it easier to collect eggs, provide food and water, and monitor your chickens’ health. Furthermore, consider prevailing winds, as you’ll want to position the coop to minimize drafts. Accessibility for cleaning and maintenance is another key factor; the easier it is to access the coop, the more consistently you will be able to care for your chickens.
Size Requirements & Space Considerations

Providing adequate space is fundamental to the health and happiness of your chickens. A general guideline is to allow at least 4 square feet of floor space per chicken inside the coop and 8-10 square feet per bird in the enclosed run. Overcrowding can lead to stress, increased disease transmission, and behavioral problems such as feather pecking. Consider the breed of chickens you plan to raise, as some breeds are larger and require more space. Think about future growth; it’s often wise to build a coop slightly larger than your current flock size to accommodate potential additions. Providing ample space not only benefits the chickens, but also makes cleaning and maintenance much easier for you.
Gathering Your Materials & Tools
Once you have finalized your plans, it’s time to gather the necessary materials and tools. A well-prepared work area will streamline the building process and ensure your project’s success. Making a comprehensive list of all required materials, including lumber, hardware, roofing, and other components, is essential. Don’t forget the smaller items like nails, screws, and hinges. Taking the time to assess your existing tools and supplementing with any missing items will save time and prevent frustration during construction. Proper preparation eliminates unexpected delays and makes the entire experience more enjoyable. A well-stocked workshop will also allow you to adapt to any unexpected challenges.
Essential Building Materials
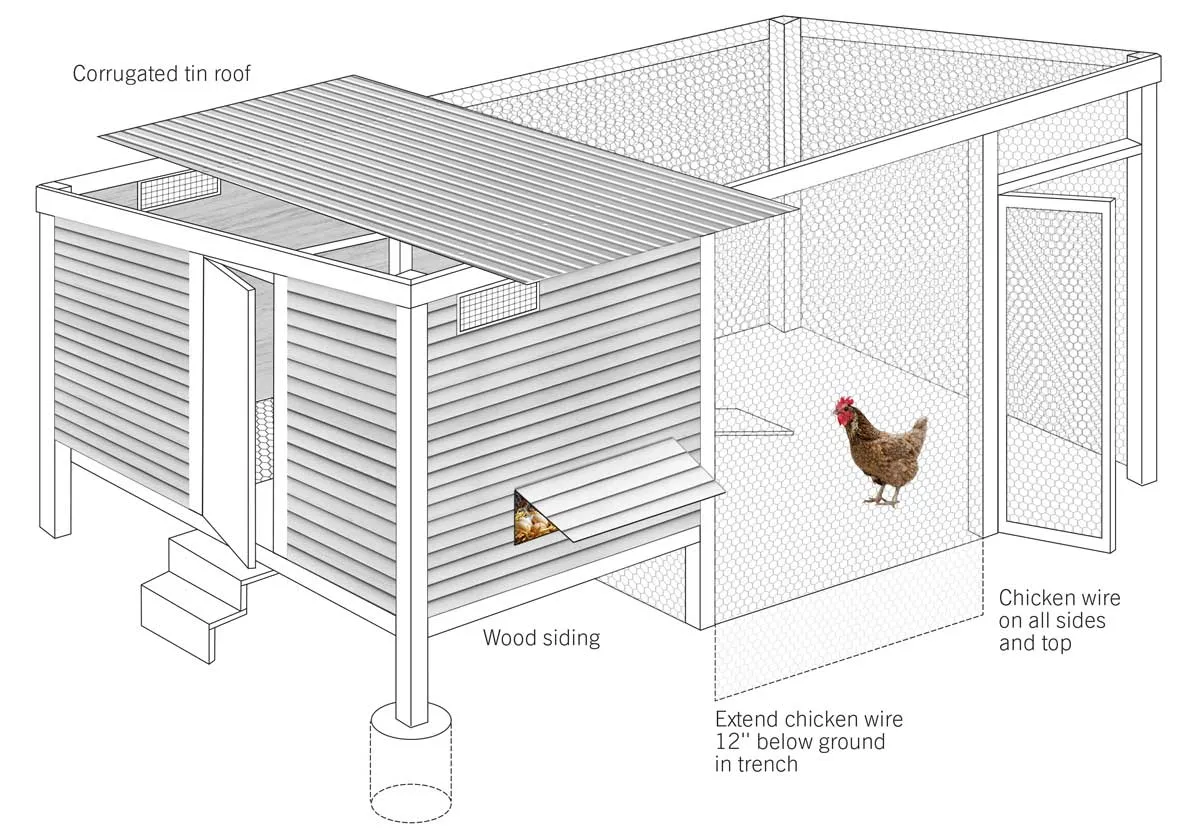
The materials you choose will significantly impact the durability, safety, and overall appearance of your chicken coop. Pressure-treated lumber is ideal for the coop’s frame, as it resists rot and insect damage. For the walls and roof, consider using exterior-grade plywood, wood siding, or corrugated metal. Hardware cloth or welded wire mesh is essential for the run, providing protection from predators while allowing for ventilation. Roofing materials should be weather-resistant and durable; asphalt shingles, metal roofing, or cedar shakes are all viable options. Ensure that all materials are non-toxic and safe for your chickens, and choose materials that are readily available and within your budget. A thoughtful selection of materials is an investment in the long-term health and security of your flock.
Required Tools for Construction

Having the right tools is crucial for a smooth and efficient construction process. Basic tools such as a measuring tape, level, saw (circular saw, hand saw, or jigsaw), drill, hammer, and screwdriver are essential. A staple gun will be needed for attaching wire mesh. Safety equipment, including safety glasses, gloves, and a dust mask, is also non-negotiable. Depending on your design, you might need a post-hole digger, a wheelbarrow, or other specialized tools. It’s wise to inspect your tools before you start, ensuring they are in good working order and that you have all the necessary accessories, like drill bits and saw blades. Proper tools will enable you to execute each step with accuracy and precision.
Step-by-Step Construction Guide
With your plans finalized and materials gathered, it’s time to begin building your chicken coop. This is where your planning and preparation pay off, as you systematically assemble the various components of the coop. Follow the steps carefully, and don’t hesitate to double-check measurements and levels as you go. Building the coop in stages allows you to break down the project into manageable tasks, reducing overwhelm and increasing the likelihood of a successful outcome. Taking your time and paying attention to detail will result in a sturdy and safe home for your chickens. Remember to take photos along the way to document your progress and serve as a helpful reference.
Building the Coop’s Frame
The frame is the skeletal structure of your coop, providing support and defining its shape. Start by cutting the lumber to the dimensions specified in your plans. Assemble the frame by connecting the corner posts, using screws or nails, ensuring all joints are square and level. Add horizontal supports, such as studs and rafters, to create a sturdy structure for the walls and roof. Consider adding bracing to enhance the frame’s stability. If you are building a coop with a sloped roof, make sure to account for the angle when cutting and attaching the rafters. Carefully check the frame for plumb and level before moving on to the next step. A well-built frame is essential for the longevity and safety of your coop, ensuring it can withstand the elements and protect your chickens.
Adding Walls and Roofing

Once the frame is complete, it’s time to enclose the coop with walls and a roof. Attach the wall sheathing, such as plywood or siding, to the frame, ensuring that it is securely fastened and flush. If using siding, follow the manufacturer’s instructions for installation. For the roof, install the sheathing (usually plywood) and then add the roofing material of your choice. Make sure to overlap the roofing material correctly to prevent water leaks. Pay attention to details such as ensuring proper overhangs and sealing any gaps. Walls and roofing provide protection from the weather, predators, and the elements, creating a comfortable and secure environment for your chickens. Proper installation is crucial for preventing leaks and ensuring the coop’s longevity. (See chicken-coop-walls.webp and chicken-coop-roofing.webp)
Constructing the Chicken Door and Run
The chicken door and run are essential components of your coop, providing access to the outside and a safe space for your chickens to roam. Build the door according to your plans, ensuring it is sized appropriately for your chickens and equipped with a secure latch to prevent predators from entering. For the run, frame it with pressure-treated lumber or sturdy posts and cover it with hardware cloth or welded wire mesh. Bury the mesh several inches underground to prevent digging predators from entering. The run should be large enough to allow your chickens to exercise and forage. Consider adding a roof to the run to protect your chickens from the sun and rain. Secure the door and run structures carefully to prevent breaches and ensure your chickens’ safety.
Finishing Touches
With the structural elements complete, it’s time to add the finishing touches that will make your coop a comfortable and functional home for your chickens. These include ventilation, insulation, interior features, and predator-proofing measures. The finishing touches are not just cosmetic; they contribute significantly to the chickens’ health, comfort, and security. Paying attention to these details will enhance the overall functionality and aesthetics of your coop.
Ventilation & Insulation

Proper ventilation and insulation are vital for maintaining a healthy environment inside the coop. Ventilation helps to remove moisture, ammonia, and stale air, while insulation helps to regulate temperature. Install vents near the roofline to allow air to circulate. Avoid placing vents directly above roosts, as this can cause drafts. Insulate the walls and roof with appropriate materials, such as rigid foam or fiberglass insulation, to keep the coop cool in the summer and warm in the winter. Ventilation and insulation are essential for maintaining the comfort and well-being of your chickens, reducing the risk of respiratory problems and other health issues.
Adding Interior Features & Accessories
Equipping your coop with the right interior features will make it a more functional and user-friendly space for both you and your chickens. Install roosting bars, typically made of wood or metal, where your chickens can comfortably perch at night. Provide nesting boxes, one box for every 3-4 hens, in a secluded area of the coop. Include feeders and waterers, ensuring they are easily accessible and protected from the elements. Consider adding a dust bath area for your chickens to clean themselves. These interior features will make the coop a comfortable and inviting place for your chickens, encouraging them to lay eggs and stay healthy.
Protecting Your Coop from Predators
Protecting your chickens from predators is a critical aspect of coop construction. Use hardware cloth or welded wire mesh with small openings for the walls and run, burying it at least 12 inches underground to prevent digging predators. Secure all doors, windows, and latches with strong hardware. Consider adding additional security measures such as an automatic coop door that opens and closes at set times. Inspect your coop regularly for any signs of damage or potential vulnerabilities. Predator-proofing is an ongoing process; vigilance and maintenance are crucial to keep your chickens safe. (See chicken-coop-predator-proof.webp)
By following these steps, you’ll have successfully built a chicken coop step by step with pictures that provides a safe and comfortable home for your chickens. Enjoy the process, and remember that a well-built coop is an investment in the health and happiness of your flock. Happy building!