Building a cheap chicken coop doesn’t have to be a daunting task. With a little planning and some DIY spirit, you can create a safe and comfortable home for your feathered friends without breaking the bank. This guide simplifies the process into 7 straightforward steps, ensuring a successful and budget-friendly coop build. Whether you’re a seasoned homesteader or a beginner, this guide will provide you with the necessary information to get started. This project is a great way to start your backyard chicken journey.
Planning Your Cheap Chicken Coop
Before you even think about hammering a nail, proper planning is crucial. This initial step involves assessing your available space and determining the right size for your coop, ensuring both the chickens’ well-being and your project’s feasibility. Careful planning saves you time and money in the long run. Consider the local climate conditions such as the amount of sunlight, average rainfall, and wind exposure, as these factors can affect the coop design and material choices.
Assess Your Space
The location of your cheap chicken coop is important. Choose a level spot in your yard that offers good drainage and protection from the elements. Ensure the area receives a mix of sun and shade. Avoid areas prone to flooding or standing water. Consider the proximity to your house for easy access and the distance from neighbors to minimize noise and potential odor issues. Consider the accessibility for feeding, watering, and cleaning the coop. Keep the space away from any potential predators.
Determine Coop Size

The size of your cheap chicken coop directly impacts the comfort and health of your chickens. A general rule of thumb is to provide at least 4 square feet of floor space per chicken inside the coop, and 8-10 square feet per chicken in the run area. Overcrowding leads to stress, disease, and reduced egg production. Consider how many chickens you plan to keep now, and factor in space for future expansion. Ensure the coop is large enough for comfortable movement, nesting, and roosting. Proper space allows your chickens to thrive.
Gather Essential Tools and Materials
Having the right tools and materials is essential for a successful and cheap chicken coop build. Make a detailed list of everything you’ll need before you start, and consider where you can save money. Comparing prices at various hardware stores or online retailers can help you find the best deals. Look for reclaimed or recycled materials where possible, such as pallets for the base or walls. This can significantly reduce your costs. Careful planning and sourcing of materials will save you money.
Tools You’ll Need
Common tools include a hammer, saw (hand saw or circular saw), drill, measuring tape, level, staple gun, and safety glasses. You may also need a shovel, post-hole digger, and a wheelbarrow for preparing the ground. Consider renting tools you don’t own, such as a circular saw. Always prioritize safety by wearing appropriate protective gear during construction, including gloves and a dust mask. Ensure your tools are in good working condition to ensure a smooth building process and safe coop building.
Materials Checklist

Materials needed include wood (such as lumber, plywood, or reclaimed wood), roofing materials (corrugated metal or shingles), wire mesh for the run, hardware (nails, screws, hinges, latches), and nesting box materials. Consider using pressure-treated lumber for the base to protect against rot. Choose durable, weather-resistant materials. When buying hardware, consider the cost and the quality of the hardware. Ensure to choose chicken-friendly mesh to avoid injury.
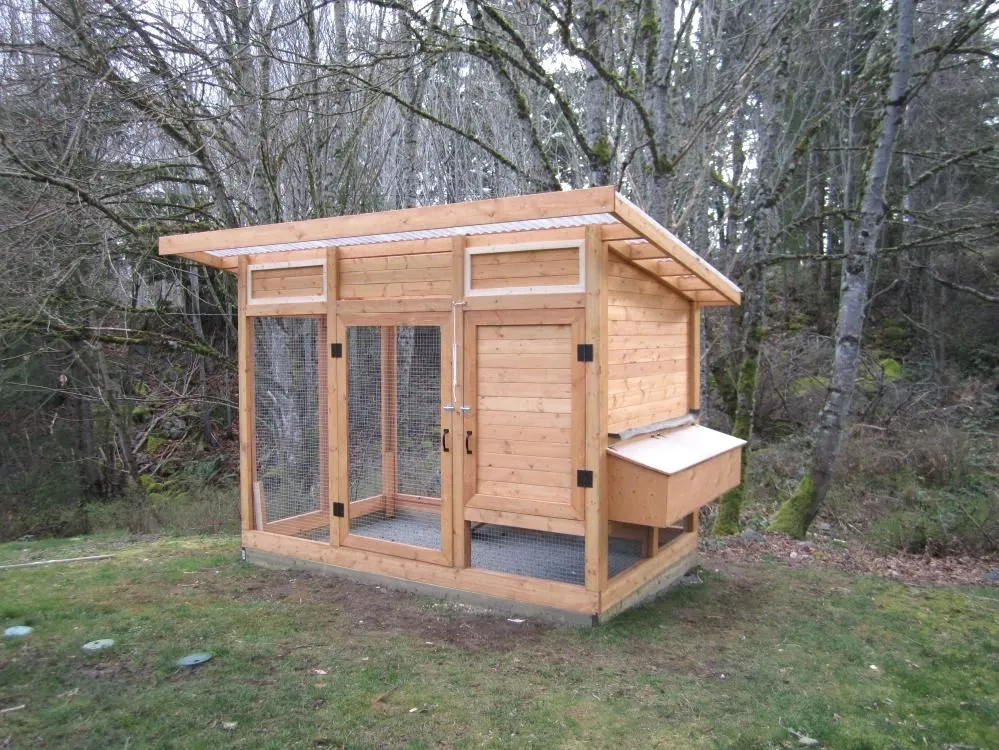
Building the Coop Frame
The frame provides the structural integrity of your cheap chicken coop. A sturdy frame ensures the coop can withstand the elements and provide protection for your chickens. This step involves constructing the base, walls, and roof of the coop. Careful measurements and precise cuts are essential for a square and stable structure. Ensure all joints are secure and well-supported to prevent movement over time. A well-built frame is the foundation of a secure chicken home.
Constructing the Base and Walls
Start by building a sturdy base, ensuring it’s level. Use pressure-treated lumber if the coop sits directly on the ground. Construct the walls by attaching vertical studs to the base frame. Ensure the walls are plumb (perfectly vertical) before securing them. Consider the placement of windows and doors during this step. Use screws instead of nails for a stronger, more lasting build. Ensure all your corners are square and secure.
Adding the Roof

There are various roof designs, from simple shed roofs to more complex gable roofs. Choose a design that suits your climate and skill level. Attach rafters to the top of the walls to form the roof frame. Cover the frame with plywood or other sheathing material. Then, apply roofing materials such as shingles or corrugated metal. Ensure the roof is properly sealed to prevent water from entering the coop. Overhang the roof to protect the walls from rain.
Creating the Chicken Run
The chicken run provides a safe, enclosed outdoor space for your chickens to roam and forage. A well-designed run protects your chickens from predators while allowing them to enjoy fresh air and exercise. The size of the run should be proportional to the number of chickens. Consider incorporating different features into the run, such as a dust bathing area and access to sunlight and shade. This structure provides them with an area for playing and other activities. Secure the run and build a robust structure.
Designing a Secure Run
The most important aspect of the run is security. Bury wire mesh around the perimeter to prevent predators from digging under the fence. Extend the mesh at least 12 inches underground, or consider using hardware cloth to keep predators out. Ensure the mesh is securely attached to the frame, with no gaps or weak points. Use a sturdy gate with a secure latch. Regular inspections of the run can identify and prevent any weaknesses in the construction. Make sure the run is covered to keep them safe.
Choosing the Right Wire Mesh

Use hardware cloth or welded wire mesh with small openings (e.g., 1/2 inch) to keep predators out while allowing your chickens access to the outside. Chicken wire is not recommended for the run as it offers less protection. The wire mesh should be strong enough to withstand digging and clawing. Make sure the mesh is securely attached to the frame. Galvanized wire mesh is the most resistant to rust and weather conditions. Consider the spacing between the wires to keep the chickens in and the predators out.
Installing Doors and Ventilation
Proper ventilation is vital for a healthy coop environment, and well-designed doors ensure ease of access and security. These two features work together to create a comfortable and safe space for your chickens. Proper ventilation and easy access are essential for your chickens. By investing time in these areas, you improve the comfort and health of your chickens.
Building the Coop Door
Build a sturdy door that is easy for you to open and close, and also secure enough to deter predators. Use strong hinges and a reliable latch. Consider an automatic door opener for convenience. The door should be sized appropriately for your chickens. The door should be big enough for you to easily access the coop for cleaning and maintenance. Ensure the door fits snugly to prevent drafts and unwanted entry.
Ensuring Proper Ventilation

Provide adequate ventilation to remove moisture and ammonia, which can build up inside the coop. Install vents near the roofline to allow air to circulate. Avoid drafts that can chill your chickens, but ensure sufficient airflow. The ventilation system will help to regulate the temperature and humidity within the coop. Good ventilation also helps to prevent respiratory issues in your chickens.
Adding Interior Features
The interior features provide comfort, safety, and functionality. Interior elements like nesting boxes and roosting bars make your chickens more comfortable and will improve the chances of egg production. With proper planning, you can efficiently provide your chickens with a comfortable, safe, and productive environment. Adding these features will significantly improve the quality of life of your chickens.
Installing Nesting Boxes
Provide at least one nesting box for every 3-4 hens. Place the boxes in a quiet, dimly lit area of the coop. Use comfortable bedding material like straw, wood shavings, or hay. The boxes should be easy to access for egg collection. Size the boxes appropriately for your chickens to encourage egg-laying. Regular cleaning will keep the nesting boxes clean and hygienic.
Adding Roosting Bars

Install roosting bars where your chickens can comfortably perch and sleep at night. Position the bars at varying heights. Provide enough space on the bars for all your chickens. Ensure the bars are sturdy and made of a material that is easy to clean. Roosting bars give the chickens an elevated space, which promotes their health and well-being. Position them away from the nesting boxes.
Finishing Touches and Maintenance
This final step involves weatherproofing the coop and establishing a regular maintenance routine to ensure your coop’s longevity. These measures will keep your chickens healthy and your coop in good condition for years to come. Taking the time for these final steps will save you money and effort in the long run.
Weatherproofing Your Coop
Seal any gaps or cracks in the coop to prevent drafts and keep the coop dry. Apply a weather-resistant sealant or paint to protect the wood from the elements. Ensure the roof is properly sealed and that water drains away from the coop. Weatherproofing is important for the longevity and durability of your cheap chicken coop and will protect your chickens. Ensure you select the right paint or sealant to protect the structure.
Regular Cleaning and Maintenance
Clean the coop regularly, removing droppings and replacing bedding. A clean coop is essential for your chickens’ health and hygiene. Inspect the coop and run for damage or wear and tear. Repair any damage promptly. Check for pests and take steps to control them. Regular cleaning, proper maintenance, and prompt repair will prevent problems and extend the life of your coop. This is essential for creating a clean environment.
Building a cheap chicken coop in 7 simple steps is an achievable project that brings the joy of raising chickens to your backyard. By following this guide, you can create a functional, safe, and affordable home for your flock. Enjoy the journey, and savor the fresh eggs and companionship that your chickens will provide. With careful planning, you can now build a cheap chicken coop that provides your chickens with a safe and secure environment.