Planning Your Chicken Coop Build
Embarking on a chicken coop build can be a rewarding project, providing fresh eggs and engaging in a fulfilling hobby. However, before you even pick up a hammer, careful planning is crucial. This initial stage sets the foundation for a successful and functional coop. Consider the number of chickens you plan to house, local regulations regarding coop size and placement, and your budget. Research different coop designs to determine the best fit for your space and your chickens’ needs. Think about the coop’s location in relation to your house, ensuring it’s convenient for daily care but also situated to minimize noise and odor. This initial planning phase will save you time, money, and headaches down the road, making the entire building process smoother and more enjoyable. A well-thought-out plan is the cornerstone of a thriving backyard chicken operation.
Choosing the Right Location for Your Coop
The location of your chicken coop is a critical decision that impacts the health and happiness of your flock, as well as your own convenience. Choose a spot that offers a balance of sunlight and shade, protecting chickens from extreme temperatures. Ensure the area is well-drained to prevent standing water, which can attract pests and breed diseases. Proximity to a water source and electrical outlet can simplify daily chores. Consider prevailing wind direction to minimize odors affecting your living spaces. Access for cleaning and maintenance should be easy, and the location should be secure from predators. A level surface simplifies construction and ensures stability. Careful consideration of these factors in the coop’s placement sets the stage for a thriving and healthy chicken environment.
Consider Sunlight and Shade

Sunlight and shade play a crucial role in the well-being of your chickens. Provide both to ensure your flock is comfortable and protected from the elements. A coop that receives ample sunlight can help to keep the coop dry and reduce the risk of certain diseases. However, excessive direct sunlight, especially during hot summer months, can lead to overheating. Strategically position your coop to benefit from both. Utilize shade from trees, structures, or incorporate shade cloth or awnings to provide relief during peak sun hours. Proper ventilation, discussed later, is also key to regulating temperature within the coop. Balancing sunlight and shade creates a healthy and comfortable environment for your chickens throughout the year. This balance is crucial for the chickens’ health and productivity.
Evaluating the Space for Chicken Coop
Before you start building, carefully evaluate the space where you intend to build your chicken coop. Measure the area to ensure it’s large enough to accommodate the coop’s dimensions and provide adequate space for your chickens to roam comfortably. Consider the surrounding landscape, including existing structures, vegetation, and potential obstacles. Factor in the need for access to the coop for cleaning and maintenance. Ensure the area is relatively level to simplify construction. Think about potential drainage issues and how they might affect the coop’s foundation. A well-planned space assessment ensures the coop fits seamlessly into your yard, providing enough space for your chickens to thrive and minimizing potential construction challenges. Clear assessment of available space is paramount.
Coop Size Based on Chicken Count
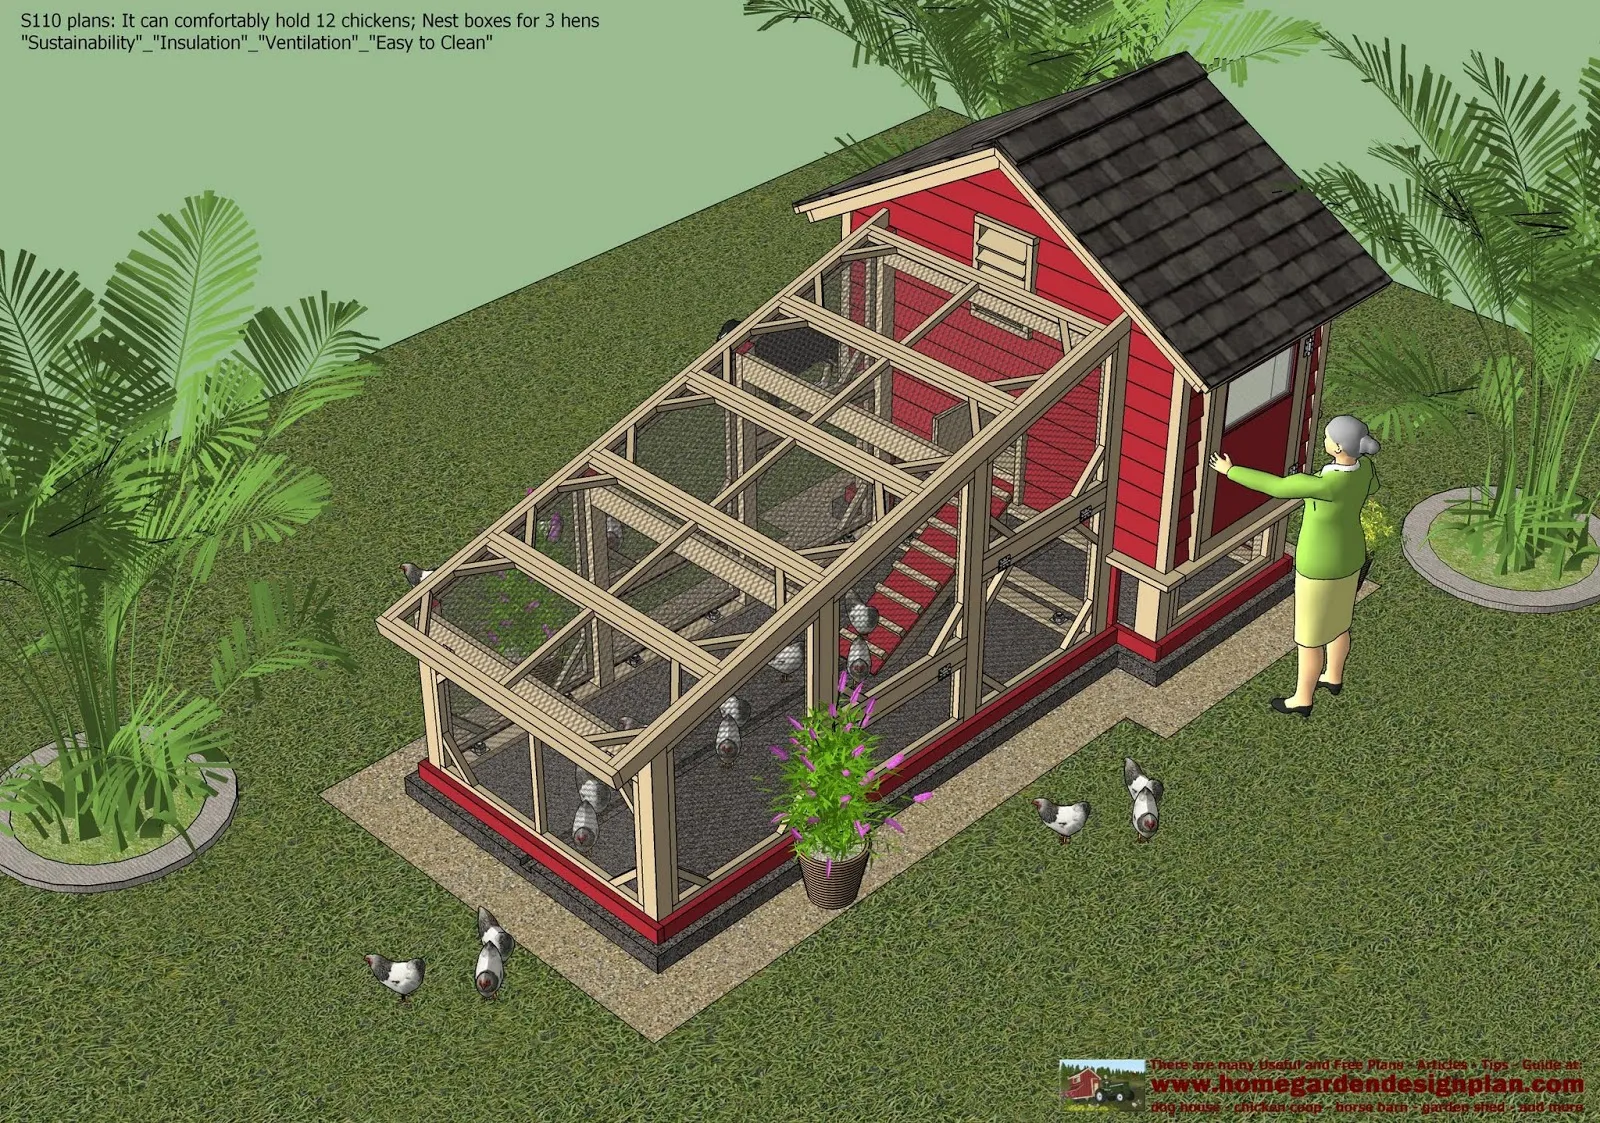
Determining the appropriate size of your chicken coop is critical to the well-being of your flock. Overcrowding can lead to stress, disease, and reduced egg production. As a general guideline, allow at least four square feet of floor space per chicken inside the coop, and provide even more space for larger breeds. This allows for comfortable movement, reduces the risk of pecking order issues, and helps maintain a healthy environment. The size of your run, or outdoor enclosure, is also important. Aim for at least eight to ten square feet of outdoor space per chicken. Remember that the more space you provide, the happier and healthier your chickens will be. Consider future growth and plan accordingly, ensuring your coop can comfortably accommodate your desired flock size for years to come. Proper planning prevents overcrowding.
Gathering Essential Materials

Once you’ve finalized your coop plans, it’s time to gather the necessary materials. Creating a detailed materials list is crucial to avoid delays and ensure you have everything you need before you start building. This list should include lumber for the frame, roofing materials, siding, hardware, and components for doors, windows, and ventilation. Consider the climate in your area when choosing materials, opting for weather-resistant options. Don’t forget essential items like screws, nails, hinges, latches, and wire mesh for the run. It’s often helpful to overestimate quantities slightly to account for waste or unexpected needs. Organizing your materials before you start building will streamline the construction process and prevent frustrating trips to the hardware store in the middle of the project. Accurate measurements are key to avoid extra trips.
Building Materials for Chicken Coop
The choice of building materials significantly impacts the durability, longevity, and overall aesthetic of your chicken coop. Pressure-treated lumber is often used for the foundation and any parts that will be in contact with the ground due to its resistance to rot and pests. For the frame and siding, consider using cedar or redwood, which are naturally weather-resistant and attractive. Alternatively, you can opt for standard lumber and apply a weather-resistant sealant or paint. Roofing options include asphalt shingles, metal roofing, or corrugated panels. Ensure that all materials are safe for chickens and do not contain any toxic substances that could be harmful if ingested. Select materials based on your budget, the local climate, and your desired aesthetic. Choosing the correct materials ensures the coop’s durability.
Essential Tools for Coop Construction
Having the right tools is essential for a smooth and efficient chicken coop construction process. A basic toolkit should include a circular saw for cutting lumber, a drill/driver for attaching screws, a level to ensure everything is straight, and a measuring tape for accurate measurements. Other helpful tools include a hammer, a square, a utility knife, and safety glasses. Depending on your coop design, you may also need a sawzall for cutting through wood or metal, a staple gun for attaching wire mesh, and a post-hole digger if you’re building a larger coop with a more complex foundation. Make sure all tools are in good working order before you start, and always prioritize safety by wearing appropriate protective gear. Proper tools make the job easier.
Constructing the Coop Frame

The frame is the skeleton of your chicken coop, providing structural support and defining its overall shape. Begin by constructing the base frame, ensuring it’s square and level. Use pressure-treated lumber for the base to resist moisture and rot. Next, build the wall frames, cutting lumber to the appropriate lengths and assembling them according to your plans. Ensure that the corners are square and that the walls are plumb. Attach the wall frames to the base frame, using screws or nails. Reinforce the corners with corner braces or gussets for added stability. This process forms the basic structure of the coop, setting the stage for adding walls, a roof, and other components. A sturdy frame is the foundation of a durable coop.
Building the Foundation of the Chicken Coop
The foundation of your chicken coop is crucial for stability, pest control, and longevity. Depending on your design and local conditions, you have several options. A simple skid foundation involves placing the coop directly on skids made of pressure-treated lumber. For a more permanent foundation, you can build a concrete slab or use concrete blocks or piers. Regardless of the chosen method, ensure the foundation is level and provides adequate drainage. Consider adding a layer of gravel beneath the coop to further improve drainage and deter pests. A well-constructed foundation prevents the coop from settling unevenly, protects it from moisture damage, and makes cleaning easier. A good foundation will extend the life of your coop.
Framing the Walls
Once the foundation and frame are complete, the next step is to frame the walls. This involves attaching the siding to the frame, providing weather protection and defining the coop’s exterior. Choose siding materials that are durable and weather-resistant, such as wood siding, plywood, or composite materials. Ensure that the siding is properly attached to the frame, using screws or nails. Overlap the siding panels to prevent water from penetrating the coop. When using wood siding, consider applying a protective sealant or paint to further protect it from the elements. Framing the walls correctly will create a weatherproof enclosure and contribute to the coop’s overall structural integrity. Proper wall framing is very important.
Adding the Roof

The roof protects your chickens from the elements and is a critical part of the coop’s design. Choose roofing materials that are durable, weather-resistant, and appropriate for your climate. Asphalt shingles are a common and affordable option, while metal roofing offers superior longevity. Ensure that the roof is properly framed, with rafters and sheathing that provide adequate support for the chosen roofing material. Overlap the roofing materials to prevent water from seeping in. Consider adding an overhang to the roof to provide additional protection from rain and sun. Proper roof construction is essential for keeping your chickens dry and comfortable, and for protecting the coop from the elements. A proper roof design is crucial.
Installing Chicken Coop Components
With the basic structure of the coop in place, it’s time to install the various components that make it functional for your chickens. This includes doors, windows, ventilation systems, nesting boxes, and perches. Choose doors and windows that are secure and easy to open and close. Ensure that the windows provide adequate ventilation while also protecting your chickens from the elements. Ventilation is particularly important for controlling moisture and preventing the buildup of harmful gases. Nesting boxes should be placed in a dark, quiet area and be easily accessible for both chickens and their keepers. Perches should be placed at a comfortable height, allowing chickens to roost comfortably. Each component plays a role in creating a healthy environment.
Creating Secure Doors and Windows
Secure doors and windows are essential for protecting your chickens from predators and the elements. Doors should be sturdy and fitted with secure latches or locks to prevent unwanted entry. Consider using hardware cloth or welded wire mesh over windows for added security while still allowing for ventilation. Position doors and windows strategically to allow easy access for cleaning and collecting eggs, while still providing protection from the wind and rain. Ensure that all openings are properly sealed to prevent drafts and the entry of pests. Strong, secure doors and windows are fundamental to chicken coop design.
Adding Ventilation Systems

Adequate ventilation is crucial for maintaining a healthy environment inside your chicken coop. Poor ventilation can lead to the buildup of moisture, ammonia, and other harmful gases, which can cause respiratory problems and other health issues in your chickens. Install vents or windows strategically to allow for proper airflow. Consider using a combination of high and low vents to promote cross-ventilation. Avoid placing vents directly above roosting areas, as this can create drafts. Ensure that the ventilation system is protected from rain and snow. Proper ventilation is essential for preventing disease.
Building Nesting Boxes and Perches
Nesting boxes and perches provide essential comforts for your chickens. Nesting boxes should be placed in a quiet, dimly lit area to encourage egg-laying. Provide one nesting box for every three to four hens. Line the boxes with soft bedding, such as straw, hay, or wood shavings. Perches allow chickens to roost comfortably at night. Place perches at a comfortable height, allowing for easy access. Ensure that the perches are sturdy and wide enough for the chickens to grip easily. Properly designed nesting boxes and perches are important to the wellbeing of your flock.
Securing and Protecting Your Coop
Protecting your chickens from predators is a top priority. Take measures to secure the coop and the surrounding run, using techniques that prevent predators from gaining entry. Bury wire mesh around the perimeter of the run to prevent digging predators. Use sturdy hardware cloth or welded wire mesh for the walls of the coop and run, and ensure that all openings are properly sealed. Secure the doors and windows with robust latches and locks. Consider adding an automatic door opener to the coop, which can help to keep your chickens safe from nocturnal predators. Regular inspections of the coop and run can identify and address any potential vulnerabilities. Predator-proofing is an ongoing process.
Preventing Predators from Entering

Preventing predators from entering your chicken coop requires a multi-layered approach. Bury hardware cloth or welded wire mesh at least 12 inches deep around the perimeter of the coop and run to deter digging predators. Use heavy-duty latches and locks on all doors and windows. Securely attach the hardware cloth or wire mesh to the frame of the coop, ensuring there are no gaps. Regularly inspect the coop and run for any signs of damage or potential entry points. Consider using predator-resistant materials, such as hardware cloth instead of chicken wire. The goal is to eliminate any opportunity for predators to enter the coop and harm your chickens. Constant vigilance is important.
Weatherproofing the Chicken Coop
Weatherproofing your chicken coop ensures your chickens are protected from the elements and helps to maintain a comfortable and healthy environment. Seal any gaps or cracks in the walls, roof, and around windows and doors to prevent drafts and water from entering. Apply a weather-resistant sealant or paint to protect the wood from moisture damage. Ensure proper drainage around the coop to prevent standing water, which can attract pests and contribute to rot. The roof should be properly sealed to prevent leaks. Weatherproofing helps keep the chickens dry and warm.
Final Touches and Interior Setup
Once the structure of your coop is complete, it’s time for the final touches and interior setup. This includes adding bedding, feeders, waterers, and other accessories. Ensure that the interior is clean and well-organized to facilitate daily care and cleaning. Consider adding a dust bath area to help chickens maintain their feathers and control parasites. Provide adequate lighting and ventilation to create a comfortable and healthy environment. The final touches make the coop a home. Proper planning makes coop life easier.
Setting Up the Coop Interior
Setting up the coop interior involves arranging essential elements to ensure the well-being and comfort of your chickens. Place nesting boxes in a quiet, dimly lit area, providing soft bedding like straw or wood shavings. Position perches at a comfortable height, allowing easy access for roosting. Install feeders and waterers, ensuring they are easily accessible and protected from the elements. Consider adding a dust bath area, using a container filled with sand or wood ash, to help chickens maintain their feathers and control parasites. Ensure all areas are easy to clean and maintain to promote a healthy living environment. Make it a great home for the chickens.
Adding Bedding and Feeders
Choosing the right bedding and feeders is essential for creating a comfortable and healthy environment inside your chicken coop. Opt for absorbent bedding materials, such as straw, wood shavings, or hemp bedding, to help absorb moisture and control odors. Avoid using cedar shavings, as they can be harmful to chickens. Provide feeders and waterers that are designed to prevent spillage and contamination. Consider using automatic feeders and waterers to simplify daily chores. Regularly clean and replenish the bedding and feeders to maintain a clean and sanitary environment. Good bedding is the foundation of coop hygiene.
Maintaining Your Chicken Coop
Regular maintenance is key to ensuring the longevity of your chicken coop and the health of your flock. Implement a regular cleaning schedule, removing droppings, cleaning feeders and waterers, and replenishing bedding. Inspect the coop regularly for signs of damage or wear, and make repairs promptly. Check for pests and predators, and take measures to control them. Maintain proper ventilation to prevent the buildup of moisture and harmful gases. By consistently maintaining your coop, you provide a safe and healthy environment.
Regular Cleaning and Maintenance
Regular cleaning and maintenance are crucial for keeping your chicken coop in optimal condition. Remove droppings regularly, ideally daily or at least several times a week, to prevent the buildup of ammonia and reduce odors. Clean feeders and waterers regularly to prevent the growth of bacteria and mold. Replenish the bedding as needed, removing soiled portions and adding fresh material. Inspect the coop for any signs of damage or wear, such as loose boards or damaged wire mesh, and make repairs promptly. Regular cleaning ensures the health of your chickens.