Building a chicken coop from pallets is an excellent way to create a functional and cost-effective home for your chickens. This guide will walk you through the entire process, from planning and material selection to construction and maintenance. Not only is this a sustainable project that reuses materials, but it also allows you to customize the coop to perfectly suit your flock’s needs and your backyard space. Get ready to embark on a rewarding DIY adventure!
Planning Your Pallet Chicken Coop
Before you start building, thoughtful planning is crucial. Consider the number of chickens you plan to house, as this will dictate the size of your coop. A general rule is to provide at least 4 square feet of floor space per chicken inside the coop, and more space for the run. Also, think about the location of your coop. Choose a level spot that offers good drainage, protection from the wind, and easy access for you to collect eggs and maintain the coop. Check local zoning regulations and homeowner association rules to ensure your chicken coop plans comply with all requirements. Consider the direction of sunlight, prevailing winds, and potential predator access when selecting your location. Consider also the ease of access for cleaning and feeding, ensuring a balance of convenience and safety for your chickens.
Choosing the Right Pallets
Selecting the right pallets is paramount for the safety and longevity of your coop. Not all pallets are created equal. Look for pallets stamped with an ‘HT’ (Heat Treated) marking, which indicates they have been treated with heat and are generally safe for use. Avoid pallets marked with ‘MB’ (Methyl Bromide), a toxic fumigant. Pallets in good condition will be easier to work with and will provide a more structurally sound coop. Inspect each pallet carefully for any signs of damage, such as splintering, missing boards, or protruding nails. Discard any pallets that appear unstable or compromised. Remember, the quality of the pallets directly impacts the durability and safety of your chicken coop.
Pallet Types to Avoid

It is essential to avoid certain types of pallets due to the potential for chemical contamination. Pallets marked with ‘MB’ (Methyl Bromide) are a definite no-go, as this chemical is extremely harmful. Also, be wary of pallets that have a strong odor or show signs of chemical spills. These may have been used to transport hazardous materials. Pallets that appear heavily weathered or have loose nails or staples should also be avoided as they can pose safety hazards. When in doubt, it is always best to err on the side of caution and choose pallets that are clearly marked as safe, such as those with the ‘HT’ stamp.
Pallet Preparation and Cleaning
Once you have selected your pallets, proper preparation is vital. Begin by thoroughly cleaning the pallets to remove any dirt, debris, or potential contaminants. A pressure washer can be very effective for this, but be careful not to damage the wood. After cleaning, let the pallets dry completely. Next, inspect each pallet for loose nails or staples and remove or secure them. You may need to dismantle some pallets to obtain individual boards for your coop’s design. Use a pry bar and hammer to carefully disassemble the pallets, being cautious not to split the wood. Sand any rough edges or splinters to ensure a smooth and safe surface for your chickens and yourself. This careful preparation will not only improve the aesthetic appeal of your coop but also enhance its safety and longevity.
Gathering Your Tools and Materials
Having all the necessary tools and materials before you start building will streamline the construction process and save you time and frustration. Make a detailed list of everything you need, from the pallets themselves to the screws, nails, and hardware. Consider the specific design of your coop and the features you want to include, such as a door, windows, nesting boxes, and a roosting bar. Accurate measurements are crucial for the correct sizing of the structure and its components. A well-organized workspace and a clear understanding of the tools and materials required will contribute to a smoother and more enjoyable building experience. Safety is also paramount, so ensure you have the necessary safety gear, such as gloves, safety glasses, and a dust mask.
Essential Tools for the Build

The right tools can make all the difference in the ease and quality of your chicken coop build. A circular saw or reciprocating saw will be essential for cutting the pallets to the desired size and shape. A drill with a variety of drill bits will be needed for pre-drilling holes and driving screws. A hammer, pry bar, and measuring tape are also essential. Other useful tools include a level to ensure the coop is plumb, a square to ensure accurate angles, and safety glasses and work gloves for protection. Consider also a staple gun for attaching hardware cloth or other materials, and a sander for smoothing rough edges. Having these tools readily available will significantly ease the construction process and result in a more professional-looking finished product.
Materials Checklist
Create a detailed checklist to ensure you have all the necessary materials. This should include the pallets (quantity depending on the size of the coop), wood screws (various sizes), nails, hinges for the door and nesting boxes, latches for doors and windows, and hardware cloth or wire mesh for the windows and run. You will also need roofing material, such as shingles or corrugated metal sheets, and possibly plywood or OSB for the floor and walls. Don’t forget to include materials for the nesting boxes, such as wood or pre-made boxes, and roosting bars. Other materials that you might need are exterior-grade wood glue for added strength and paint or sealant to protect the wood from the weather. Having a complete checklist will prevent last-minute trips to the hardware store and keep your project on track.
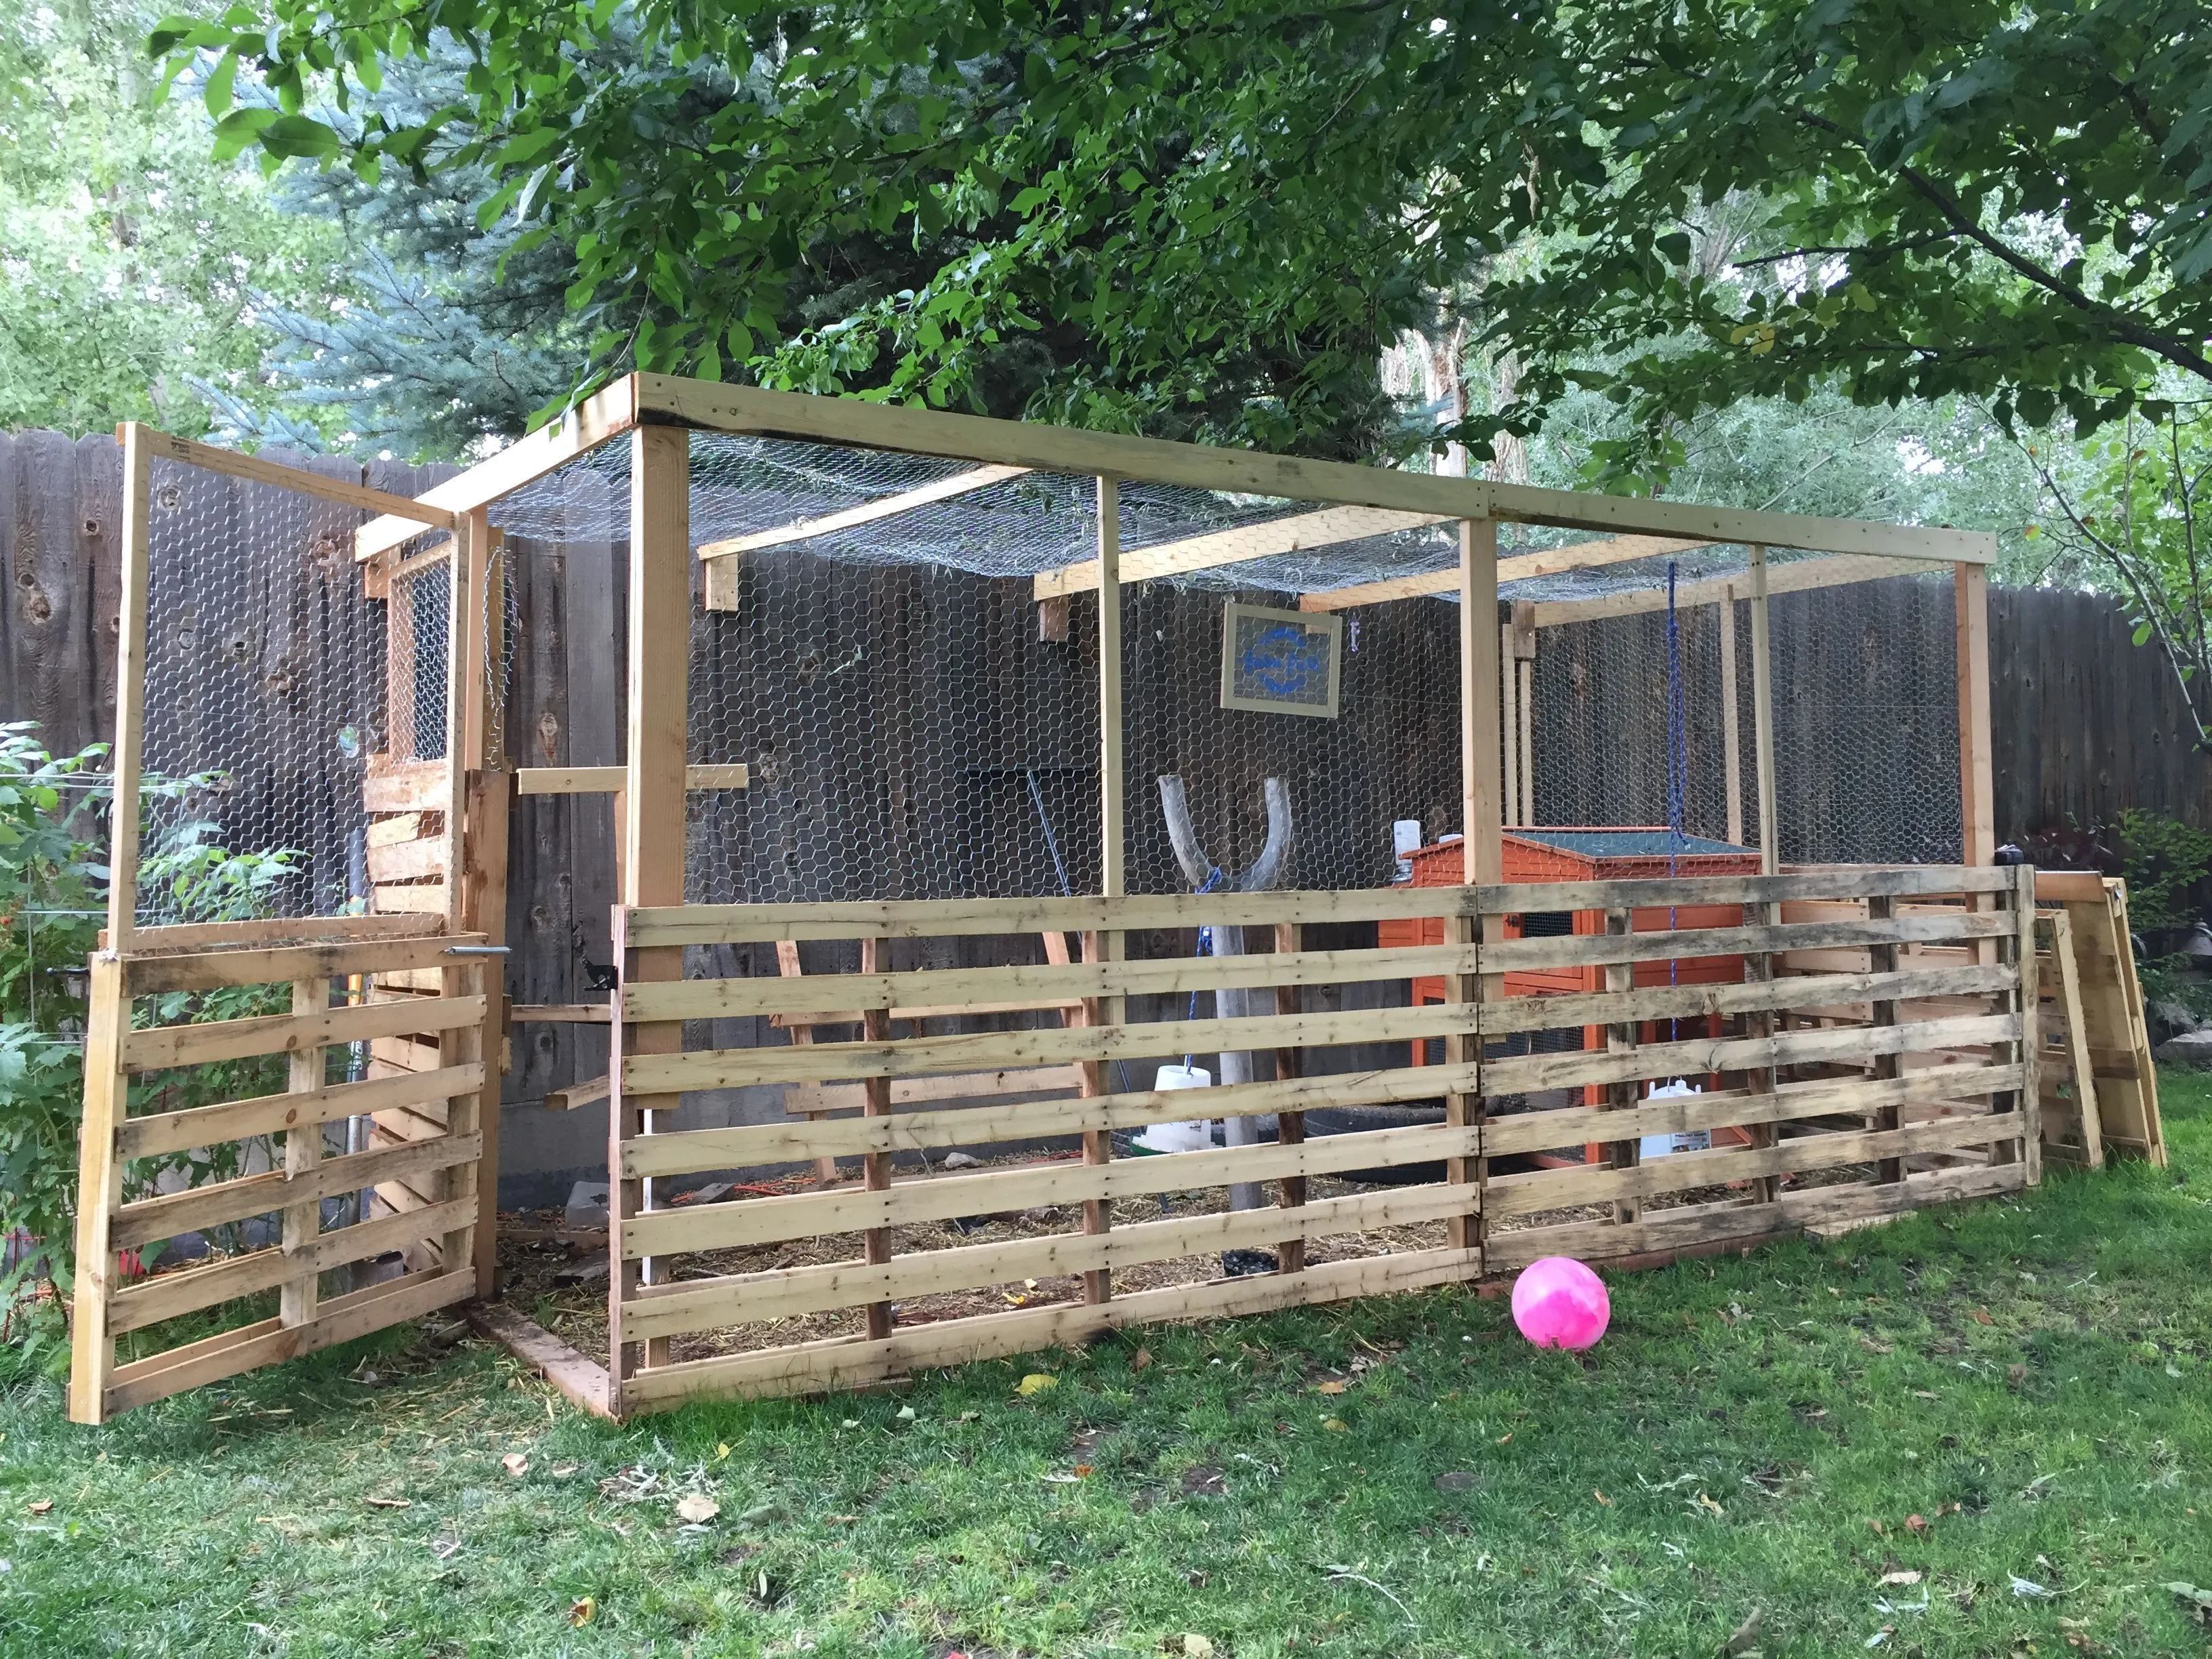
Building the Chicken Coop Frame
The frame forms the skeletal structure of your coop, so accurate construction is critical. This will involve assembling the base, walls, and roof. The method will vary depending on your coop design. You can use the pallets intact or deconstruct them to obtain individual boards. Ensure all the joints are sturdy and that the frame is square and level. Take your time during this phase, as any errors here will be magnified later. If you are using a pre-designed plan, carefully follow the instructions. Otherwise, be sure to take accurate measurements and cut the wood precisely. A well-constructed frame provides a solid foundation for the rest of the coop and ensures its stability and longevity. It is also an excellent time to consider any special design features, like a ramp.
Assembling the Base

The base of your coop provides the foundation and support. Decide whether you want the coop directly on the ground or raised slightly. If you are using pallets for the base, ensure they are level and securely joined. You may need to cut the pallets to size or add additional framing for structural integrity. If building directly on the ground, consider adding a layer of gravel or paving stones to help with drainage and prevent moisture from damaging the wood. The base should be sturdy enough to support the weight of the coop, the chickens, and any additional materials like bedding. Secure the base by screwing the pallets together or adding corner braces. Proper construction of the base is vital for ensuring the stability and longevity of the coop.
Constructing the Walls
Constructing the walls involves attaching the pallet sections to the frame. Depending on your design, you may be using whole pallets or individual boards. If using whole pallets, ensure they are securely fastened to the base and to each other. Reinforce the corners with additional framing for added stability. If deconstructing the pallets, cut the boards to the required lengths and attach them to the frame, overlapping them for weather protection. Ensure that there are no gaps that could allow drafts or predators to enter. Windows can be incorporated into the walls, and it is vital to create a secure and predator-resistant structure. Maintain a consistent level throughout the wall construction for a professional finish.
Building the Roof
The roof protects your chickens from the elements, so a properly constructed roof is essential. You can build a simple sloped roof using the pallet boards as a base, or use more complex designs with trusses. Ensure the roof overhangs the walls to provide additional protection from rain and sun. Cover the roof with a waterproof material such as shingles, corrugated metal, or a heavy-duty tarp. Make sure the roofing material is securely attached and that the seams are sealed to prevent leaks. Consider ventilation when designing your roof, as good airflow is crucial for maintaining a healthy environment inside the coop. Proper roof construction ensures your chickens are protected from the weather and helps extend the life of your coop.
Adding the Chicken Coop Door

A secure door is critical for the safety of your chickens. Construct a door frame that fits securely within the opening and attach the door using hinges. The door should be made from sturdy materials that can withstand the elements and potential predator attacks. Use a secure latch or bolt system that is easy for you to operate but difficult for predators to manipulate. The door should fit snugly against the frame to prevent drafts and keep out unwanted visitors. Consider adding a ramp for easy access for your chickens. Place the door in a location that is accessible for you but also offers protection from the weather. Ensuring that the door is well-built and properly secured contributes to the safety and well-being of your flock.
Installing Windows for Ventilation
Proper ventilation is essential for maintaining a healthy environment inside the coop, and windows are a great way to achieve this. Cut openings in the walls for windows, and frame them for added support. Cover the openings with hardware cloth or wire mesh to keep predators out while still allowing for airflow. You can use pre-made window frames or build your own. Consider adding a hinged flap or a sliding window to control airflow. Position the windows to promote good air circulation, avoiding drafts that could be harmful to the chickens. Ensure the windows are securely attached and covered with a sturdy mesh. Good ventilation helps to prevent the build-up of ammonia, reduces moisture, and keeps the coop fresh and healthy for your chickens.
Flooring and Interior Setup
The interior setup is vital for creating a comfortable and functional space for your chickens. This includes choosing the right flooring material, building nesting boxes, and adding roosting bars. Providing a well-designed interior will promote the health and happiness of your flock. It will also make cleaning and maintenance easier for you. The interior setup has a direct impact on the overall success of your coop. Ensure the materials are safe, durable, and easy to clean.
Choosing the Right Flooring Material

The flooring material should be durable, easy to clean, and resistant to moisture. Plywood or OSB (Oriented Strand Board) are good choices. Consider covering the floor with a layer of linoleum or rubber matting for easier cleaning. Avoid using materials like untreated wood, as they can absorb moisture and become a breeding ground for bacteria. Ensure the flooring is securely attached to the frame and that there are no gaps where pests could enter. Consider also adding a layer of bedding, such as straw or wood shavings, to absorb moisture and provide insulation.
Building Nesting Boxes
Nesting boxes provide a safe and comfortable place for your chickens to lay their eggs. Build nesting boxes that are large enough for your chickens but not too large, as this could encourage multiple hens to lay in the same box, leading to broken eggs. A good size for a nesting box is about 12x12 inches, and 14-16 inches deep, adjust accordingly to the size of your hens. Place the boxes in a quiet, dimly lit area of the coop. Line the boxes with soft bedding, such as straw or hay. Build the boxes in a way that is easy for you to access the eggs for collection. Ensuring that the nesting boxes are comfortable and accessible will encourage your chickens to lay their eggs in the correct place and will make egg collection easier.
Adding Roosting Bars
Roosting bars provide a place for your chickens to sleep at night. Place the roosting bars at a comfortable height from the floor, allowing plenty of space for the chickens to jump up and down. Make sure the bars are sturdy and wide enough for the chickens to grip comfortably. You can use 2x4 lumber, with the 4-inch side facing up, or rounded dowels. Position the roosting bars away from the nesting boxes to prevent droppings from contaminating the eggs. Space the roosting bars apart to allow for each chicken to have enough room. Consider placing a droppings board beneath the roosting bars to make cleaning easier. Providing comfortable roosting bars will improve the health and comfort of your chickens and make your coop more user-friendly.
Securing and Finishing the Coop

This step involves making your coop predator-proof and adding any finishing touches to improve its appearance and functionality. Preventing predator access is paramount, and this includes reinforcing the coop structure, adding secure latches, and using hardware cloth on windows and vents. Finishing touches might include painting or staining the wood, adding decorative elements, and installing accessories such as feeders and waterers. Attention to detail in this phase will contribute to the safety of your chickens and enhance the overall appeal of your coop. Secure your coop by using proper hardware and ensuring that all openings are protected.
Securing the Coop Against Predators
Protecting your chickens from predators is essential. Bury hardware cloth or wire mesh around the perimeter of the coop to prevent digging under the walls. Ensure all openings, including windows and vents, are covered with hardware cloth, not chicken wire. Use sturdy latches and bolts on the door, and consider adding additional security measures such as a predator-proof latch. Regularly inspect the coop for any signs of damage or potential entry points. Keep the area around the coop clear of any brush or tall grass that could provide cover for predators. By taking these precautions, you can minimize the risk of predator attacks and keep your chickens safe.
Adding Exterior Features
Consider adding exterior features that improve the functionality and aesthetics of your coop. This might include a covered run to provide your chickens with a safe outdoor space. You could also add a ramp for easy access to the coop. A decorative paint job or a personalized sign can add visual appeal. Consider adding gutters to direct rainwater away from the coop. Exterior features can improve the usability of your coop and also enhance its visual appeal. The best exterior features should be weather-resistant to ensure that the coop lasts for many years.
Finishing Touches and Painting

Once construction is complete, add the finishing touches. This could include painting or staining the wood to protect it from the elements and improve its appearance. Choose exterior-grade paint or stain that is safe for animals. Add any decorative elements, such as trim or a personalized sign. Ensure that all hardware is securely fastened and that the coop is clean and tidy. Finalize the interior setup by adding bedding to the nesting boxes and setting up the feeders and waterers. Finishing touches transform the coop from a construction project into a functional and attractive home for your chickens. Consider painting the coop with bright colors to make it more attractive.
Maintenance and Care for Your Coop
Regular maintenance and care are crucial for ensuring the longevity of your coop and the health of your chickens. This includes regular cleaning, pest control, and protection from the elements. By following a consistent maintenance schedule, you can prevent many problems and keep your coop in top condition. It will also improve the health of your chickens by providing them with a clean and safe living environment. A well-maintained coop not only looks better but also provides a safer and healthier environment for your chickens.
Cleaning and Hygiene Practices
Regular cleaning is essential for maintaining a healthy coop environment. Remove droppings regularly, and clean the nesting boxes weekly. Replace the bedding frequently, especially during wet weather. Deep clean the coop at least once a month, removing all bedding and washing the floor and walls with a suitable disinfectant. Ensure that the coop is dry before adding fresh bedding. Good hygiene practices prevent the build-up of ammonia and the spread of diseases. Cleaning your coop regularly is one of the most important things you can do to care for your chickens.
Winterizing and Summer Protection
Prepare your coop for seasonal changes. In winter, ensure the coop is well-insulated to protect the chickens from the cold. Seal any drafts, and consider adding a heat lamp if necessary, but be careful with fire safety. In summer, provide shade and good ventilation to prevent overheating. Consider adding a fan to improve airflow. Make sure your chickens have access to fresh water at all times. These seasonal adjustments help maintain the health and comfort of your chickens. Protecting the coop from extreme weather conditions can extend its lifespan and make it a more comfortable environment for your flock.
Building a chicken coop from pallets is a rewarding project that offers a sustainable and cost-effective way to provide a home for your chickens. By following the steps outlined in this guide, you can create a sturdy, safe, and attractive coop that will serve your flock for years to come. Remember to prioritize safety, planning, and consistent maintenance to ensure a happy and healthy environment for your chickens. Happy building!