What is Chicken Coop Insulation
Chicken coop insulation is the process of adding materials to the walls, roof, and sometimes the floor of a chicken coop to regulate its internal temperature. Its primary function is to reduce heat transfer, keeping the coop warmer in the winter and cooler in the summer. Proper insulation creates a stable and comfortable environment for chickens, which is crucial for their health, productivity, and overall well-being. It’s essentially creating a barrier that minimizes the effects of the external climate. This can be achieved using various materials, each with different properties and benefits, which we will discuss further in this guide. Effective insulation contributes to a more energy-efficient coop, as the chickens’ body heat helps maintain the internal temperature during colder months, reducing the need for supplemental heating. It is one of the most important aspect of preparing your coop for harsh weather.
Why is Chicken Coop Insulation Important
Insulating a chicken coop is vital for several reasons, primarily relating to the health and productivity of your chickens. Chickens are sensitive to extreme temperatures. Cold temperatures can lead to frostbite, decreased egg production, and increased susceptibility to diseases. Conversely, extreme heat can cause heat stress, leading to reduced egg laying and even death. Insulation acts as a thermal buffer, maintaining a more consistent and comfortable temperature inside the coop, regardless of the external weather conditions. A well-insulated coop promotes better health by minimizing temperature fluctuations and reducing the risk of respiratory illnesses, which are common in poorly insulated environments. Moreover, it helps conserve energy by reducing the need for supplemental heating during winter, resulting in lower utility bills. The key benefits include optimized egg production, disease prevention, and overall welfare of your flock.
How to Choose the Right Chicken Coop Insulation

Selecting the right insulation material involves considering several factors to ensure optimal performance and suitability for your coop. Firstly, assess your local climate. If you live in an area with severe winters, prioritize insulation with high R-values (a measure of its resistance to heat flow). For hot climates, consider materials that reflect heat and provide good ventilation. Secondly, think about your coop’s construction and existing materials. The type of framing, wall thickness, and available space will influence the type and thickness of insulation you can use. Consider the ease of installation, as some materials are more DIY-friendly than others. Safety is another critical factor; choose non-toxic and fire-resistant materials to protect your chickens. Finally, the cost of the insulation material, as well as the ongoing maintenance it requires, should be taken into account within your budget. Comparing several options based on these factors guarantees the best outcome for your coop and flock.
Insulation Materials for Chicken Coops
Several insulation materials can be used for chicken coops, each with unique advantages and disadvantages. Understanding these options will help you make an informed decision based on your coop’s needs and your preferences. The best materials provide high thermal resistance, are durable, and are safe for both chickens and the environment. They should also be resistant to moisture and pests to maintain their effectiveness over time. Proper installation is as important as the choice of material. Following the manufacturer’s instructions and ensuring a tight fit around the coop structure will maximize its performance. Remember, the combination of materials can often enhance the overall insulation effect, so consider the full range of options available before making your final choice.
Fiberglass Insulation
Fiberglass insulation is a popular choice for chicken coops due to its affordability and effectiveness. It comes in batts or rolls and is relatively easy to install between wall studs and roof rafters. Fiberglass offers good thermal resistance, helping to keep the coop warm in winter and cool in summer. However, fiberglass can be sensitive to moisture and should be protected from water damage. When using fiberglass, ensure proper ventilation to prevent moisture buildup and mold growth. It’s essential to wear protective gear, including gloves, a mask, and eye protection, during installation to avoid irritation from the fibers. Fiberglass is an efficient solution that requires careful installation to maintain its performance over time. Remember to seal any gaps and provide adequate ventilation to maximize its effectiveness and the health of your chickens.
Foam Board Insulation
Foam board insulation, available in various types like expanded polystyrene (EPS) and extruded polystyrene (XPS), provides excellent thermal resistance and is easy to handle and install. It comes in rigid sheets that can be cut to size and fit snugly within the coop’s framing. Foam board is also resistant to moisture, making it a durable choice. It offers an airtight seal and minimizes air leaks, which improves overall insulation efficiency. When installing foam board, consider its fire resistance properties, and ensure that it is protected from direct sunlight, which can degrade some types of foam. Foam boards are very easy to clean and are a great option in terms of durability and ease of use. Check for the R-value appropriate for your climate when selecting foam board insulation to ensure that it meets your coop’s needs.
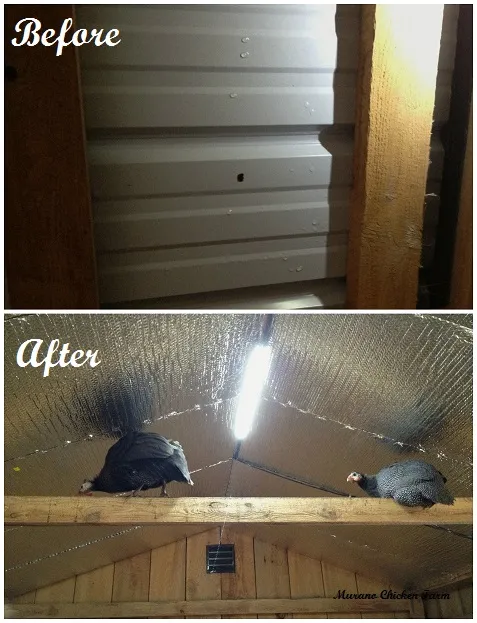
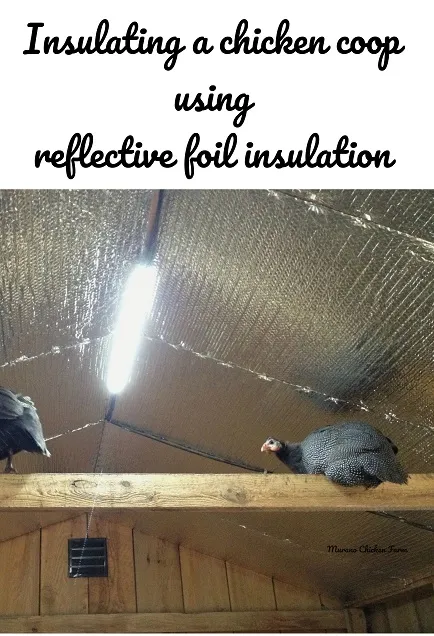
Reflective Insulation
Reflective insulation, often made of foil-faced materials, works by reflecting radiant heat. This type of insulation is particularly effective in hot climates, as it helps to keep the coop cooler by reflecting the sun’s heat away from the structure. It is also relatively easy to install, often stapled or glued to the inside of the coop’s walls and roof. For optimal performance, reflective insulation requires an air gap on one or both sides to function correctly. Ensure that there are no obstructions that could block the reflective surface. While effective at reflecting heat, reflective insulation may not provide as much insulation in cold climates as other options. The combination of reflective insulation with other materials can often offer a balanced approach, maximizing both insulation and heat reflection capabilities. It’s important to choose quality materials and install them properly to ensure the long-term performance.
Spray Foam Insulation
Spray foam insulation offers exceptional thermal resistance and an airtight seal, making it a highly effective option for chicken coops. Applied as a liquid, spray foam expands to fill every nook and cranny, providing complete coverage and eliminating air leaks. This type of insulation is excellent for irregularly shaped coops or those with complex designs, as it conforms to any surface. However, spray foam installation requires specialized equipment and professional expertise. The process can be more expensive than other methods. It also requires the area to be completely sealed off during application. Once cured, spray foam provides a durable, long-lasting insulation barrier. Consider this option if you prioritize maximum insulation efficiency and are willing to invest in professional installation. Its superior sealing properties make it an excellent choice for creating a stable and comfortable environment for your chickens.
Insulation Installation Best Practices

Proper installation is key to ensuring that your chicken coop insulation performs effectively. Before beginning, thoroughly inspect your coop for any existing damage, such as cracks or leaks, and repair them. Ensure that the coop is clean and dry, as moisture can compromise the effectiveness of insulation materials. Always wear appropriate safety gear, including gloves, eye protection, and a dust mask, especially when working with materials like fiberglass. When installing insulation, make sure to tightly fit the material between studs and rafters, avoiding gaps or compression, which can reduce its effectiveness. Seal any seams or gaps with tape or caulk to prevent air leaks. Pay special attention to areas around windows, doors, and vents, as these are common points for heat loss. Remember that proper installation is as crucial as choosing the right material to maximize its performance.
Preparing the Coop for Insulation
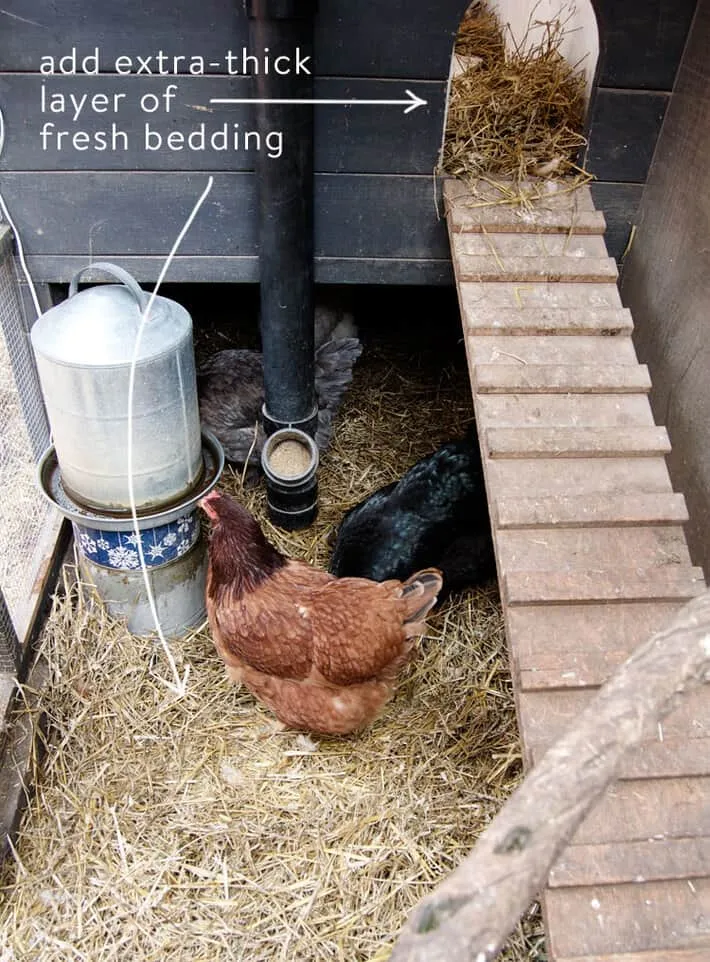
Preparing the chicken coop is a critical step before starting insulation. First, thoroughly clean the coop to remove any dirt, debris, or existing nesting materials. This ensures that the insulation is applied to a clean surface and prevents contamination. Inspect the coop for any structural issues, such as cracks, rot, or damage, and make the necessary repairs before proceeding. Seal any potential entry points for pests, such as rodents, who can damage the insulation and pose a health risk to your chickens. Ensure the coop is adequately ventilated to allow for moisture to escape, which can compromise the insulation’s effectiveness. Measure the areas you plan to insulate, and gather all the necessary materials and tools. Planning these steps ahead of time streamlines the insulation process and increases the overall efficiency of your project.
Installing Insulation in Walls and Roof
When installing insulation in the walls and roof of your chicken coop, follow specific techniques to ensure optimal performance. For walls, measure the distance between the studs and cut the insulation material accordingly, making sure it fits snugly without being compressed. Start at the top and work your way down, ensuring that the insulation fills the entire cavity. If using batts or rolls, they should fit flush against the framing, creating a continuous thermal barrier. In the roof, insulation should be installed between the rafters, taking the same care to eliminate gaps and ensure a tight fit. When using materials like fiberglass, be cautious during the installation and wear appropriate protective gear. Proper installation of the roof is critical to prevent heat loss in winter and heat gain in summer. The aim is to establish a continuous insulation layer that minimizes heat transfer.
Ventilation Considerations for Insulation

Adequate ventilation is essential for maintaining the effectiveness of your chicken coop insulation and the health of your chickens. Ventilation helps to remove moisture, which can build up inside the coop due to the chickens’ droppings and respiration. Moisture can compromise the performance of insulation materials and lead to mold growth. Proper ventilation also helps to prevent the buildup of harmful gases like ammonia, which can be detrimental to your chickens’ respiratory health. It is recommended that the coop has vents located at the top of the walls or roof to allow warm, moist air to escape. Ensure there’s enough airflow to prevent condensation without causing drafts that could chill the chickens. Balance insulation with ventilation to ensure that the coop is warm, dry, and well-ventilated, which is crucial for the health and productivity of your flock.
Maintaining Your Chicken Coop Insulation
Maintaining your chicken coop insulation is key to ensuring its long-term effectiveness and the health of your flock. Regular inspection is the first step in maintaining insulation. Inspect the coop at least twice a year, or more frequently if you live in an area with extreme weather conditions. Look for any signs of damage, such as tears, compression, or moisture buildup. Check for pest infestations, as rodents or other animals can damage the insulation and compromise its performance. Clean the coop regularly to remove any droppings and debris. Cleanliness and maintenance are necessary to ensure the insulation’s effectiveness. By regularly checking and maintaining your coop, you extend the life of your insulation and keep your chickens safe and healthy.
Regular Inspection and Maintenance
Regular inspection and maintenance are vital for the longevity and effectiveness of your chicken coop insulation. Inspect the insulation at least twice a year, or more frequently if you live in an area with harsh weather conditions or have observed any issues. Look for any signs of damage, such as tears, compression, or moisture buildup. Check for any pest infestations. Clean the coop regularly to remove any droppings and debris, as these can degrade the insulation over time. Depending on the type of insulation, you might need to perform specific maintenance tasks, such as resealing gaps, replacing damaged sections, or ensuring proper ventilation. Any issues identified during inspection should be addressed promptly to prevent them from escalating. Careful attention and maintenance ensure that your coop’s insulation continues to protect your chickens and maintain a healthy environment.
Troubleshooting Common Issues
Troubleshooting common issues related to chicken coop insulation involves identifying and addressing problems that can reduce its effectiveness. One common issue is moisture buildup, which can be caused by poor ventilation or condensation. To resolve this, ensure proper ventilation to allow for air circulation. Another issue is pest infestations, such as rodents, which can damage the insulation. Prevention steps include sealing any entry points and setting traps. If you notice reduced thermal performance, check for any damage, gaps, or compression in the insulation, and repair or replace the damaged sections as needed. If you experience issues with air leaks, inspect the insulation installation for gaps and cracks. Addressing these common issues promptly will maintain the insulation’s effectiveness and the health of your flock.
Enhancing Coop Insulation Beyond Materials
While choosing the right insulation materials is crucial, you can further enhance your coop’s insulation by implementing additional protective measures and optimizing airflow and ventilation. These strategies work together to create a more efficient and comfortable environment for your chickens. From adding protective barriers to ensuring proper airflow, these additional steps can help to reduce heat transfer and maintain a more stable internal temperature, which will further improve your coop’s thermal performance. The goal is to create a well-rounded system that protects your chickens from extreme temperatures and promotes their health and productivity.
Additional Protective Measures
To further enhance your chicken coop’s insulation, consider implementing additional protective measures. Adding a windbreak around the coop can help reduce heat loss during cold weather by minimizing wind exposure. Planting trees or shrubs around the coop can provide shade in the summer and help block the wind in winter. Using a weather-resistant paint or sealant can help protect the coop’s exterior from moisture and improve its insulation properties. You can also create a double-wall system, especially in very cold climates, by adding a layer of air space between the inner and outer walls. Consider adding a layer of insulation below the coop floor, especially if it’s raised. These additional steps will improve the efficiency of your insulation.
Optimizing Ventilation and Airflow

Optimizing ventilation and airflow is key for maintaining the performance of your chicken coop insulation. Install vents at the top of the walls or roof to allow warm, moist air to escape. The placement of the vents should be strategic to allow for good airflow without creating drafts. Avoid blocking the vents. Regularly inspect the vents to make sure they are not clogged or blocked by debris. Ensure proper ventilation and airflow to remove moisture and prevent the buildup of harmful gases, such as ammonia. This also helps to regulate the coop’s temperature, which promotes a healthier environment for your chickens. You need to balance ventilation with insulation to provide a stable and comfortable environment for your flock.
In conclusion, chicken coop insulation is an essential component of responsible chicken keeping, playing a critical role in the health and productivity of your flock. By understanding the various insulation materials, proper installation techniques, and the importance of maintenance, you can create a comfortable and energy-efficient environment for your chickens, whatever the season. Implementing these insulation secrets not only protects your chickens from extreme weather conditions, but also improves your flock’s health. Regular inspections, proper ventilation, and ongoing maintenance will help ensure your coop provides a safe and comfortable home for your chickens for many years to come.