Planning Your Pallet Chicken Coop
Building a chicken coop from pallets is an excellent way to provide a safe and comfortable home for your chickens while repurposing materials. This beginner’s guide will walk you through the process step by step, ensuring you have a functional and attractive coop. Before you start, careful planning is essential. Consider the number of chickens you plan to house, as this will determine the coop’s size. Research local building codes and regulations for chicken coops in your area. A well-planned coop provides adequate space, ventilation, and protection from the elements and predators, contributing to your chickens’ health and happiness.
Choosing the Right Pallets
The foundation of your chicken coop is the pallets you choose. Not all pallets are created equal, and selecting the right ones is crucial for the safety and longevity of your coop. Pallets come in various sizes, materials, and conditions. The best pallets are made of untreated wood, free from chemicals and pesticides. They should be sturdy and in good condition, with no broken boards or significant damage. Before acquiring any pallets, it is important to understand where they come from and if they are safe for reuse. The condition of the pallets greatly affects the overall quality of the coop.
Inspecting Pallets for Safety

Safety should be your top priority when choosing pallets. Always inspect the pallets thoroughly. Look for the IPPC (International Plant Protection Convention) stamp, which indicates whether the pallet has been treated for pest control. Avoid pallets marked with ‘MB’ (methyl bromide), a toxic fumigant. Pallets marked ‘HT’ (heat-treated) are generally safe. Check for any signs of chemical spills, mold, or pests. If a pallet has a strong odor or appears to be contaminated, do not use it. Ensure all nails and staples are secure or remove them before starting the construction.
Finding Free Pallets
One of the biggest advantages of using pallets is the cost savings. Often, you can find free pallets. Check local businesses, such as hardware stores, grocery stores, and construction sites. They frequently discard pallets, and you may be able to take them for free. You can also search online marketplaces or social media groups. Always ask for permission before taking any pallets, and ensure that the pallets are safe and suitable for your project. Remember that the quality and safety of the pallets are more important than the cost.
Gathering Your Tools and Materials
Once you have your pallets, it’s time to gather the necessary tools and materials. Having everything prepared before you begin will streamline the construction process and make it more efficient. Make a detailed list of the tools and materials you will need, and gather them in a well-organized workspace. This preparation will contribute to a smoother and more enjoyable building experience. Consider the size of the coop you are building when estimating the materials needed. Proper planning will save you time and prevent unnecessary trips to the hardware store.
Essential Tools for Coop Construction

Building a chicken coop requires several essential tools. A circular saw or reciprocating saw is vital for cutting pallets to size. A drill with various drill bits and a driver for screws is essential for assembly. A hammer and pry bar are useful for disassembling pallets and removing nails. A measuring tape, level, and square ensure accurate measurements and a straight structure. Safety glasses and gloves are mandatory to protect yourself during the process. Other useful tools include a staple gun for attaching hardware cloth and a sander to smooth rough edges.
Required Materials List
Besides pallets, you will need additional materials. Screws of various sizes are necessary for joining the pallets together. Hardware cloth with small mesh openings is crucial for predator protection, especially for the walls, floor, and windows. Roofing materials, such as asphalt shingles or corrugated metal, are needed to protect the coop from weather. Hinges, latches, and handles are required for doors and windows. Paint or stain (optional) will protect the wood and enhance the coop’s appearance. Nesting boxes, perches, and a water and feed system are essential for the chickens’ comfort.
Building the Chicken Coop Frame
The frame is the skeleton of your chicken coop, and building it correctly is crucial for its stability and durability. This stage involves preparing the pallets, cutting them to size, and assembling them to create the basic structure. The frame must be sturdy enough to withstand the elements and protect the chickens from predators. Accuracy in this phase will guarantee that the coop is well-built and lasts for years. Take your time and make precise measurements before cutting or assembling the pallets. A well-constructed frame facilitates the subsequent steps.
Preparing the Pallets

Before cutting and assembling, prepare your pallets. Clean the pallets thoroughly to remove any dirt, debris, or loose splinters. If the pallets have any loose boards or nails, secure or remove them. Measure and mark the pallets according to your plan. Remember to account for the thickness of the pallet boards when calculating your dimensions. Disassemble any parts of the pallets if necessary, using a pry bar and hammer. Removing extra wood or nails will facilitate the building process.
Cutting and Assembling Pallets
Cut the pallets to the required sizes using a circular saw or reciprocating saw. Make sure your cuts are straight and accurate. Assemble the frame by joining the pallet sections. Use screws to secure the pallets together. Consider the overall shape and dimensions of your coop. Start with the base, then build the walls, ensuring the frame is square and level. Reinforce the corners and joints for added stability. Proper assembly guarantees structural integrity.
Constructing the Coop Walls
Once the frame is built, you can start constructing the walls. Use the pallets as the primary material for the walls. Attach the pallets to the frame using screws. Ensure the walls are securely fastened to prevent predators from entering. You may need to cut and fit the pallets to create windows or doors. Consider the placement of the walls concerning ventilation and sunlight. Ensure the walls are flush and straight for a clean and professional appearance.
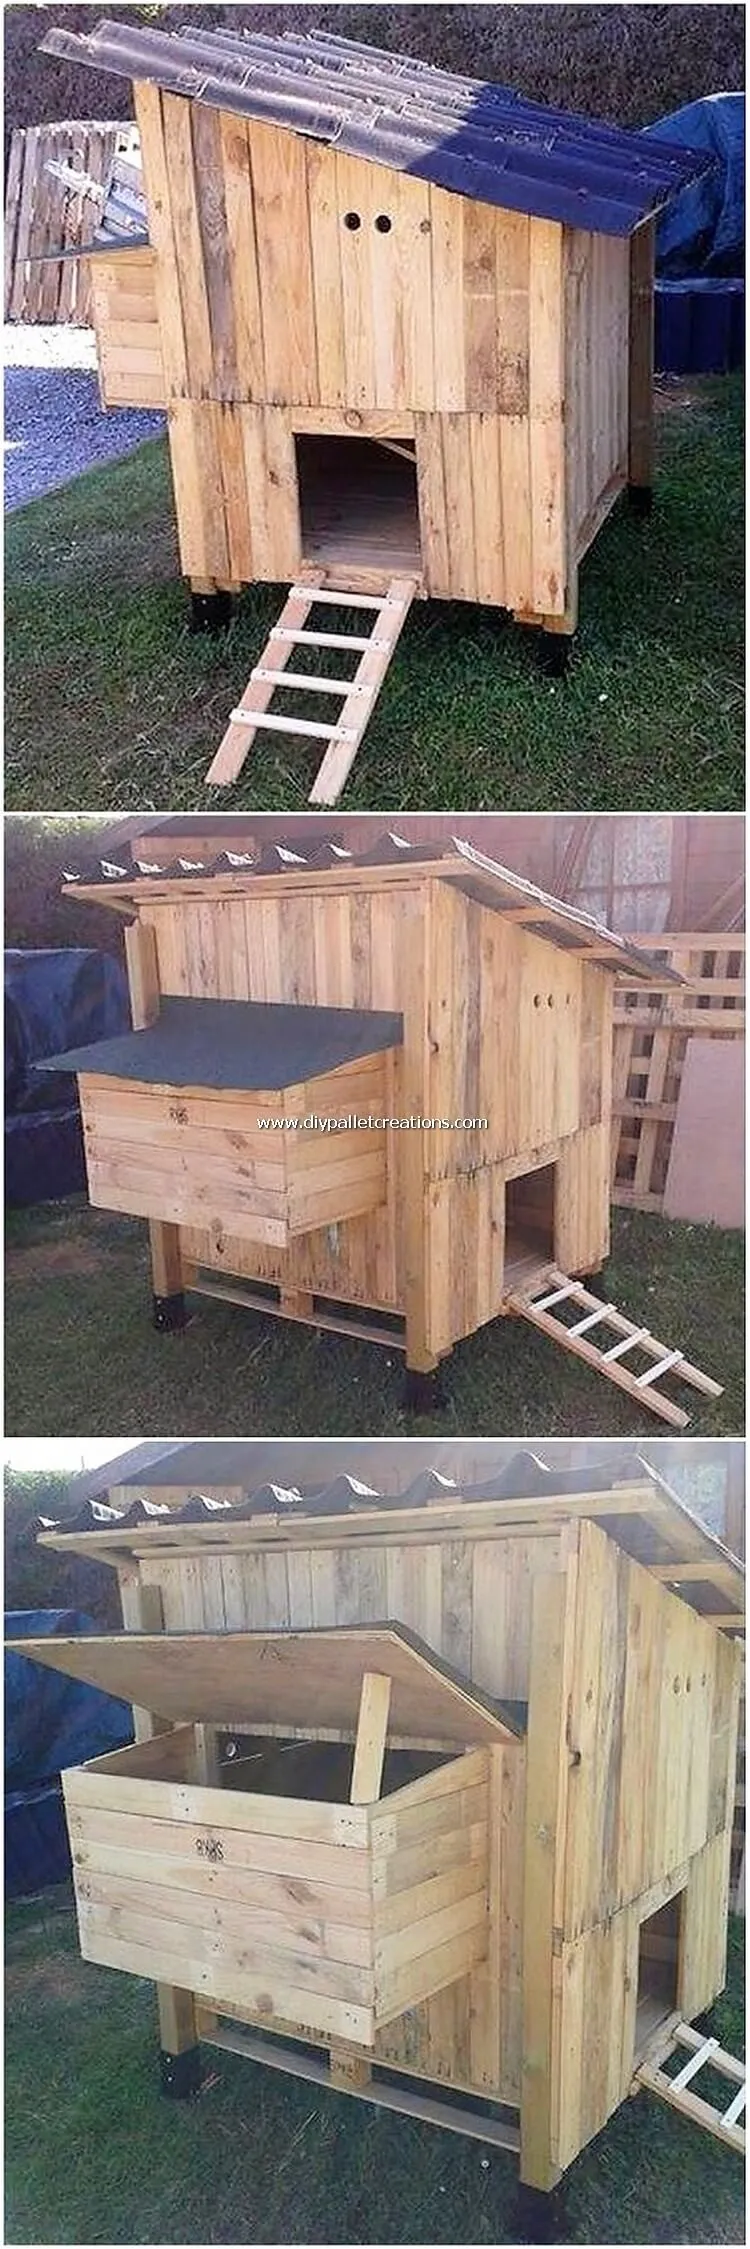
Creating the Chicken Coop Roof

A well-designed roof protects your chickens from the elements. You can choose from several roof designs, such as a sloped roof, a flat roof, or a gable roof. The roof design impacts the coop’s aesthetics and functionality. Ensure the roof is waterproof and well-ventilated to maintain a healthy environment inside the coop. Proper roofing will prevent water damage and contribute to the longevity of your coop. Carefully plan the roof construction to ensure it aligns with your coop’s overall design.
Choosing a Roof Design
The roof design you choose will affect your coop’s appearance and functionality. A sloped roof is an excellent option, as it allows water to run off easily. A flat roof is simpler to build but needs excellent waterproofing. A gable roof provides more space and is suitable for areas with heavy snowfall. Consider your local climate and aesthetic preferences when selecting a roof design. Ensure your chosen design is sturdy, weatherproof, and allows for proper ventilation. Choose a design that complements the overall style of your coop.
Attaching the Roof to the Frame
Once you have chosen your roof design, attach the roof to the frame. Install a frame for the roof, if needed, according to your chosen plan. Secure the roof materials, such as roofing felt and shingles or corrugated metal, to the roof frame. Make sure the roof is properly sealed to prevent leaks. Overlap the shingles or panels correctly to ensure proper water runoff. Proper installation will make your roof waterproof and durable. Regular inspection of the roof is crucial to maintain its effectiveness.
Adding Doors and Windows

Doors and windows are essential for the functionality and comfort of your chicken coop. The door allows access for you to clean the coop and gather eggs, while windows provide ventilation and natural light. Proper placement and design are critical. The door should be sturdy and predator-proof, while windows should be protected with hardware cloth. Consider the size and location of both the door and windows to maximize airflow and make maintenance easier. Creating functional doors and windows will enhance the overall usability of your chicken coop.
Building the Chicken Coop Door
The chicken coop door must be durable, secure, and easy to open and close. Construct the door from wood or pallets. Attach sturdy hinges and a reliable latch to prevent predators from entering. Place the door in a convenient location for access. Make sure the door fits snugly in the frame to prevent drafts and predator access. Consider adding a ramp for easy access. Regular checks are important to maintain the door’s functionality and security.
Adding Windows for Ventilation
Windows provide ventilation and natural light, which are crucial for the chickens’ health. Cut openings in the coop walls for the windows. Cover the openings with hardware cloth to prevent predators. The hardware cloth should be securely attached to the frame. Add a frame around the window openings to add stability. Consider the direction of the prevailing winds when placing the windows to optimize ventilation. Regularly check the hardware cloth to ensure that it is still securely in place.
Securing the Coop Against Predators

Protecting your chickens from predators is a top priority. Secure the coop using several methods, focusing on the walls, floor, and windows. This ensures that your chickens are safe from predators like foxes, raccoons, and other animals. Consider the common predators in your area and how they might try to access the coop. A well-secured coop provides peace of mind and contributes to the chickens’ well-being.
Reinforcing the Walls and Floor
Reinforce the walls by covering them with hardware cloth, as predators can chew through wood. If the coop floor is made of pallets, consider covering it with hardware cloth as well. Make sure the hardware cloth is attached securely to the frame and any other surfaces. Bury the hardware cloth extending outwards from the base of the coop to prevent digging. This reinforcement will deter predators from entering. Regularly check the walls and floor for any signs of damage or wear.
Choosing and Installing Hardware Cloth
Hardware cloth is the most effective way to protect your chickens from predators. Choose hardware cloth with small mesh openings (1/2 inch or smaller). Attach the hardware cloth securely to all vulnerable areas. Overlap the seams of the hardware cloth for extra protection. Use staples or screws to firmly attach the hardware cloth to the frame, walls, and floor. Make sure there are no gaps where predators could squeeze through. Regular inspections will help maintain the integrity of the predator-proofing.
Finishing Touches and Customization

Once the basic structure is complete, add finishing touches to improve the coop’s appearance and functionality. This can include painting or staining the coop, adding nesting boxes, and installing perches. Customization will make your coop look great and provide the chickens with a comfortable living space. Take time to finish your coop, as it reflects your attention to detail and creates a more pleasant environment for your chickens.
Painting or Staining the Coop
Painting or staining your chicken coop is an excellent way to protect the wood from the elements and enhance its appearance. Choose a paint or stain that is safe for animals and designed for outdoor use. Consider a color that complements your yard and provides a cohesive look. Prepare the surface by sanding the wood. Apply paint or stain according to the manufacturer’s instructions. Regular maintenance will increase the lifespan of your coop and preserve its appearance.
Adding Nesting Boxes and Perches
Nesting boxes and perches are important for the comfort and well-being of your chickens. Add nesting boxes in a dark, quiet, and easily accessible area of the coop. Make sure the nesting boxes are large enough for the chickens to comfortably nest. Install perches at various heights to allow the chickens to roost at night. Consider the number of chickens you have when determining the number and size of the nesting boxes and perches. Adequate space for nesting and roosting encourages healthy chickens.
Frequently Asked Questions
Building a chicken coop using pallets is a rewarding project, but it’s common to have questions along the way. Here are some frequently asked questions:
- How long will it take to build a coop?
- What size coop do I need?
- Are pallet coops safe for chickens?
- How can I clean a chicken coop?
- How do I prevent predators from entering the coop?
Building a chicken coop with pallets is a practical and budget-friendly option for providing a safe and comfortable home for your chickens. By following these steps, you can create a coop that meets your chickens’ needs while utilizing recycled materials. From planning and gathering materials to building the frame, adding doors and windows, and securing the coop, each step is essential. Remember to prioritize safety, predator protection, and the well-being of your chickens. Enjoy the process, and appreciate the satisfaction of creating a functional and attractive chicken coop.