Understanding Chicken Coop Essentials
Building a chicken coop is a rewarding project that can provide you with fresh eggs and a charming addition to your backyard. Before diving into the construction, it’s crucial to understand the essentials. This involves considering the needs of your chickens, the local climate, and the available space. A well-designed coop provides shelter from the elements, protection from predators, and a comfortable environment for your flock. The foundation of a successful coop project lies in careful planning and adherence to best practices. You’ll need to think through ventilation, ease of cleaning, and overall durability. Furthermore, understanding local regulations regarding coop construction is essential to avoid any legal issues.
Choosing the Right Coop Size
Determining the correct size of your chicken coop is one of the most important decisions you’ll make. A coop that is too small will lead to overcrowded conditions, stress, and potential health problems for your chickens. Conversely, a coop that is too large can be more expensive to build and may not provide adequate warmth in colder climates. The ideal size depends on the number of chickens you plan to keep and their breed, as some breeds are larger than others. Consider future expansion of your flock, allowing for some extra space to accommodate additional chickens if needed. Always aim for a balance between providing enough space for your chickens to thrive and managing your resources efficiently.
Factors Influencing Coop Size

Several factors influence the size of your chicken coop. The climate you live in plays a significant role. Chickens need more space in warmer climates for proper ventilation, while in colder climates, the coop needs to be insulated and appropriately sized to retain heat. The breed of your chickens also matters; larger breeds need more space than smaller ones. Consider the amount of time your chickens will spend inside the coop versus outside in a run. If your chickens will be confined to the coop for extended periods, you will need to provide more interior space. Also, think about how much time you want to spend cleaning and maintaining the coop. A larger coop requires more effort in this regard.
Space Requirements per Chicken
A general guideline for space requirements is about 4 square feet of floor space per chicken inside the coop. However, this is a minimum, and more space is always better. Providing more room reduces stress, allowing chickens to move freely, which promotes better health and egg production. For the chicken run, a minimum of 8-10 square feet per chicken is recommended, but again, the more space, the better. When calculating the space needs, consider the chickens’ roosting space, nesting boxes, and overall mobility within the coop and run. If you are unsure, it is always best to err on the side of providing more space to ensure your flock’s comfort and well-being.
Selecting the Perfect Location
Choosing the right location for your chicken coop is a critical step in the planning process. The location affects not only the comfort and safety of your chickens but also the convenience for you. Consider the prevailing winds, sunlight exposure, and drainage when selecting the site. A well-drained location is essential to prevent the coop from becoming damp and muddy, which can attract pests and cause health issues for your chickens. Also consider local zoning regulations and any homeowner association rules that may restrict coop placement. A location that is easily accessible for cleaning, feeding, and egg collection will make your daily tasks much easier. Lastly, consider the proximity to your house and neighbors, balancing convenience with noise and odor concerns.
Sunlight and Shade Considerations

Sunlight and shade are crucial elements for the health and well-being of your chickens. The coop should receive a balance of both. Direct sunlight provides warmth, helps dry the coop, and can assist in vitamin D production. However, excessive sunlight can overheat the coop, especially in warmer climates, so ensuring adequate shade is also important. Consider the path of the sun throughout the day when choosing your coop location. Providing shade through trees, shrubs, or a covered run can help regulate the coop’s temperature. Make sure to provide enough sunlight for the chickens to get through, while ensuring there is enough shade to prevent them from overheating during the hottest part of the day.
Accessibility and Convenience
The convenience of accessing your coop is essential for your daily chores and maintenance. A location that is easy to reach, with a clear path, makes cleaning, feeding, and collecting eggs much less of a hassle. Think about the route you’ll take to the coop with supplies and tools. Placing the coop close to a water source and electricity can also simplify tasks. Consider how you will remove waste and the proximity to your compost pile or disposal area. Design your coop with doors and access points that make it easy to reach all areas for cleaning and maintenance. The more convenient the coop is to access, the more likely you are to consistently perform the necessary upkeep, ensuring a healthy and happy flock.
Gathering Your Materials and Tools
Once you’ve finalized your coop plans, it’s time to gather your materials and tools. This step involves creating a detailed shopping list, which should include all the lumber, hardware, roofing materials, and any additional items needed. It’s often more cost-effective to purchase materials in bulk. Look for quality lumber that is weather-resistant and suitable for outdoor use. Hardware includes screws, nails, hinges, latches, and any other fasteners needed. Roofing materials should be durable and provide good weather protection. Consider the longevity and maintenance requirements of your chosen materials. Don’t forget the little details such as paint, sealant, and any decorative elements. Careful planning in this step will help you avoid delays and ensure a smooth building process.
Essential Tools for Coop Construction

Having the right tools is essential for a successful chicken coop build. You’ll need a variety of tools, including a saw for cutting lumber (circular saw, hand saw, or miter saw), a drill for screwing, a hammer, a measuring tape, a level, and a square. A staple gun will be helpful for attaching wire mesh or hardware cloth. Safety glasses, work gloves, and hearing protection are essential. If you are planning a more complex design, you might also need a jigsaw, a sander, and a router. Ensure your tools are in good working condition before you start. Investing in quality tools will make the building process easier and more enjoyable and ensure the longevity of your coop.
Common Materials Used in Coops
The most common materials for building a chicken coop include lumber (pine, cedar, or treated wood), plywood for the walls and roof, and roofing materials such as asphalt shingles or metal. Hardware cloth or wire mesh is necessary for the run and ventilation openings, providing security against predators. Consider using non-toxic paint or sealant to protect the wood from the elements. Ensure the materials you choose are safe for chickens and free from harmful chemicals. Recycled materials can be a cost-effective option. Choose materials that are readily available and suit your local climate and the aesthetic you desire for your coop. Selecting durable and weather-resistant materials will significantly extend the lifespan of your coop and reduce maintenance requirements.
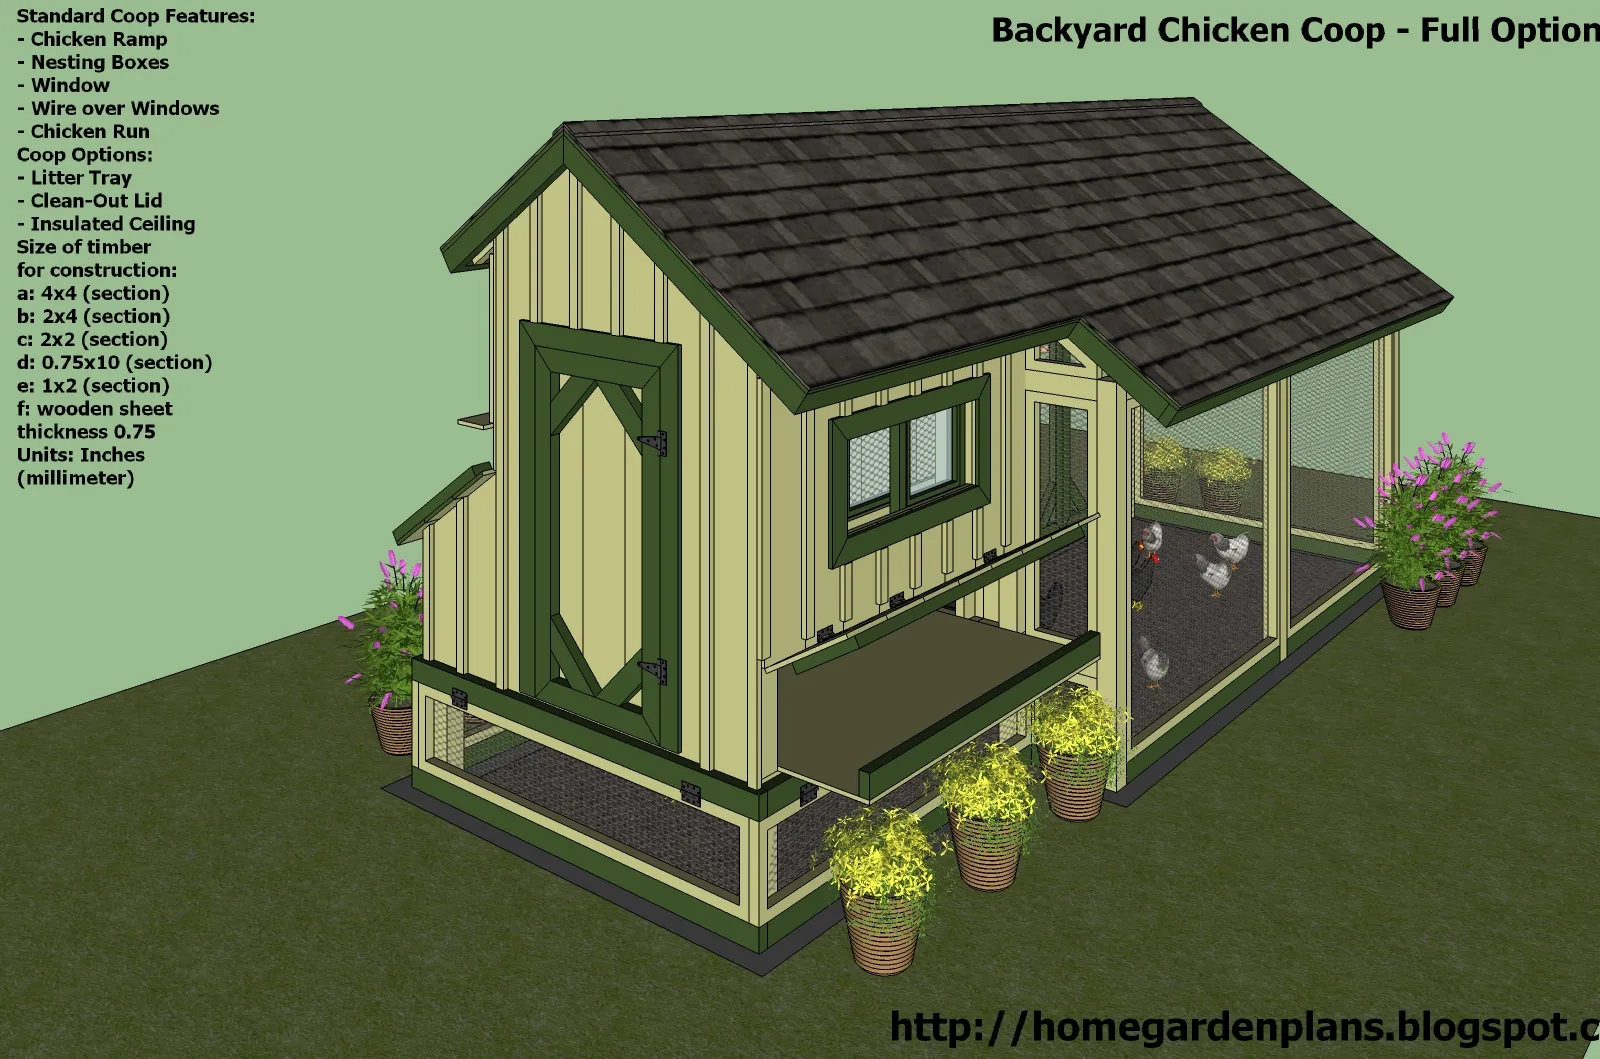
Step 1 Drafting Free Chicken Coop Plans
Before you start building, create or use free chicken coop plans. Numerous resources provide detailed plans with step-by-step instructions and material lists. Choose plans that match your skill level, the number of chickens you have, and the available space. Take the time to understand the plans thoroughly, identifying all components and ensuring they align with your specific needs. Modify the plans if necessary to incorporate any special features or adjust the dimensions. Review the material list carefully and make any substitutions needed based on your local availability and budget. Having clear, well-defined plans will help you stay organized throughout the construction process, preventing errors and reducing waste.
Step 2 Building the Coop Frame

The frame is the skeleton of your coop, providing structural support. Assemble the base frame first, making sure it’s level and square. Use the plans to cut the lumber to the correct lengths. Secure the corners and joints with screws or nails. Once the base is complete, build the walls, attaching them to the base frame. Ensure all walls are plumb (perfectly vertical). Add any necessary supports, such as corner braces or crossbeams, to enhance the frame’s stability. Check your measurements throughout the process. A well-built frame is essential for the overall durability and longevity of your chicken coop. A sturdy frame will withstand the elements and protect your chickens from predators.
Step 3 Adding Walls and Roofing
Once the frame is complete, you can begin adding the walls and roofing. Attach the wall panels to the frame, ensuring they are flush and properly aligned. If using plywood or other sheet materials, consider adding a moisture barrier to protect the walls from weather damage. Install any necessary windows or ventilation openings during this stage. For the roof, ensure it has a proper slope for water runoff. Install the roofing materials according to the manufacturer’s instructions, making sure they are securely attached. Seal any seams or gaps to prevent leaks. Well-constructed walls and roofing will protect your chickens from rain, wind, and extreme temperatures. Proper sealing also prevents unwanted pests from entering the coop.
Step 4 Incorporating Doors and Windows
Doors and windows provide access, ventilation, and natural light. Install the doors with sturdy hinges and latches, ensuring they fit properly. Ensure the door is secure against predators. Consider adding a ramp to the door for easy access for your chickens. For windows, choose materials that are durable and can withstand the elements. Cover windows with hardware cloth to provide ventilation while keeping predators out. Position windows strategically to maximize natural light and airflow. Install windows and doors correctly to prevent drafts and ensure a secure environment for your flock. Proper placement of doors and windows will improve the usability and functionality of your coop.
Step 5 Installing Nesting Boxes and Perches

Nesting boxes and perches are essential for your chickens’ comfort and egg-laying needs. Place the nesting boxes in a quiet, sheltered area of the coop. Provide enough nesting boxes for the number of chickens you have, allowing for at least one box for every three to four hens. Use comfortable and non-toxic materials, such as wood shavings or straw, as bedding in the nesting boxes. Install perches at a comfortable height, typically 18-24 inches off the ground, and away from the nesting boxes. Ensure the perches are the right size for your chickens’ feet. Proper placement of nesting boxes and perches encourages healthy laying habits and provides a comfortable environment for your flock.
Ensuring Coop Security and Safety
Securing your chicken coop is vital to protect your chickens from predators. Predators can include foxes, raccoons, dogs, hawks, and many other animals. Start with a sturdy frame and solid construction. Use hardware cloth or wire mesh instead of chicken wire for the run and any ventilation openings, as it is much more resistant to chewing and ripping. Bury the wire mesh at least 12 inches underground around the perimeter of the run to prevent predators from digging under. Install strong latches and locks on all doors and windows. Regularly inspect the coop for any potential entry points and make repairs as needed. A secure coop gives you peace of mind and protects your valuable flock.
Predator-Proofing Your Coop
Predator-proofing your coop involves several key steps. Ensure there are no gaps or openings where predators can enter. Use hardware cloth instead of chicken wire, and reinforce any weak spots. Bury the wire mesh around the run. Install a predator apron. This is an outward-extending section of wire mesh buried underground. This prevents digging predators from tunneling under your coop. Use heavy-duty latches and locks on all doors and windows. Consider adding an automatic door opener and closer to the coop to prevent leaving the door open overnight. Check for any holes or gaps that need to be patched or sealed regularly. A well-predator-proofed coop keeps your chickens safe and healthy.
Ventilation and Airflow

Proper ventilation is essential for maintaining a healthy environment inside your chicken coop. Good airflow helps to remove moisture, ammonia fumes (from droppings), and excess heat, preventing respiratory problems and other health issues. Provide ventilation through vents, windows, or a combination of both. Ensure the ventilation openings are covered with hardware cloth to prevent predators from entering. Position the vents strategically, so they promote good airflow without creating drafts directly on the chickens. Consider using a ridge vent or a gable vent to allow hot air to escape. Good ventilation helps to keep the coop dry, fresh, and comfortable for your flock, preventing many health problems.
Maintaining Your Coop
Regular maintenance is essential for the longevity and hygiene of your chicken coop. Create a cleaning schedule and stick to it. Remove droppings and soiled bedding frequently, ideally every day or two. Clean the nesting boxes regularly and replace the bedding. Regularly inspect the coop for any damage or wear and tear and make repairs promptly. Keep the coop clean and dry by providing good ventilation. Performing routine maintenance prevents the buildup of harmful bacteria and parasites, ensuring a healthy and comfortable environment for your chickens. Regular maintenance will also extend the life of your coop.
Cleaning and Hygiene Practices
Maintain good hygiene practices to ensure your chickens stay healthy and productive. Remove droppings and soiled bedding regularly. Clean the nesting boxes weekly and replace bedding with fresh materials. Perform a deep cleaning of the coop at least once a month. Remove all bedding, wash the coop with a pet-safe disinfectant, and let it dry thoroughly before adding fresh bedding. You can use a pressure washer for more effective cleaning. Consider adding a layer of diatomaceous earth to the coop floor to control parasites. Proper cleaning and hygiene reduce the risk of disease and create a healthy environment for your flock.
Routine Inspections and Maintenance

Regularly inspect your coop for any damage or wear and tear. Check for loose boards, broken latches, or any signs of predator activity. Look for signs of pests, such as mites or lice, and take appropriate action to control them. Inspect the roof and walls for leaks or damage. Perform regular maintenance tasks, such as tightening screws, lubricating hinges, and painting or sealing the wood. By taking these proactive measures, you can prevent small problems from turning into major issues, ensuring your coop remains a safe and secure home for your chickens. Consistent maintenance saves time and resources and keeps your chickens healthy and happy.
Building a chicken coop can be a rewarding project that provides fresh eggs and adds charm to your backyard. With the right planning, materials, and a little bit of effort, you can create a safe and comfortable home for your flock. Remember to prioritize security, ventilation, and cleanliness to ensure the well-being of your chickens.