Dreaming of fresh eggs and the delightful clucking of chickens in your backyard? Building your own chicken coop is a rewarding project that allows you to provide a safe and comfortable home for your feathered friends. This guide on simple chicken coop plans will walk you through the process, ensuring you can build an easy and functional coop, perfect for beginners. We will cover everything from choosing the right plan to the final touches, with tips to make your coop a haven for your chickens and a source of pride for you.
Choosing the Right Chicken Coop Plan
Before you even pick up a hammer, carefully selecting the right chicken coop plan is crucial. This foundational step will influence the success of your project and the well-being of your chickens. Consider several factors before committing to a design.
Assess Your Needs
The number of chickens you plan to keep is the primary factor. Different breeds have different space requirements, and overcrowding can lead to stress and disease. Also, consider your climate, the space you have available, and your budget to determine the best plan for your situation.
Determine Coop Size

A general rule is to allow at least 4 square feet of coop space per standard-sized chicken. This ensures they have enough room to move around comfortably, especially during inclement weather. For the chicken run, aim for at least 8-10 square feet per chicken to allow for foraging and exercise. Consider the mature size of your chosen breed(s) when making your size estimations. (Image: chicken-coop-size.webp)
Consider Local Regulations
Check with your local zoning ordinances and homeowner’s association (HOA) to understand any restrictions on keeping chickens. Some areas have limitations on the number of chickens allowed, coop size, or specific design requirements. Ignoring these regulations can lead to fines or, in the worst case, the need to dismantle your coop, so it’s important to do your homework upfront.
Select a Design
Once you know your needs and local rules, you can start exploring different coop designs. There are countless free and paid plans available online, varying in complexity and style. Consider your carpentry skills and available time when selecting a design. A simple, well-designed coop is often better than a complex one you can’t complete. (Image: chicken-coop-design.webp)
Pre-built vs DIY Kits

Pre-built coops offer convenience, but they may be more expensive and less customizable. DIY kits provide pre-cut materials and instructions, making them a good option for beginners. Building from scratch gives you the most control over the design and materials, which is a great option if you are looking to build from scratch to your needs.
Simple Coop Designs
Look for plans that focus on simplicity and functionality. A basic design includes a sheltered coop area for roosting and laying eggs, a secure run for exercise, and easy access for cleaning and collecting eggs. A-frame coops, raised coops, and coops with attached runs are popular choices due to their ease of construction.
Gathering Materials
Once you have a plan, it’s time to gather your materials. Accurate measurements and high-quality materials are essential for a durable and long-lasting coop. Create a detailed list based on your chosen plan and purchase everything you need before you begin construction. This prevents delays and ensures you have all the necessary components on hand.
Essential Tools

The tools you need will depend on the complexity of your plan, but the basics include a saw (circular saw, hand saw, or jigsaw), a drill, a measuring tape, a level, a hammer, a screwdriver, and safety glasses. Consider renting any specialized tools you don’t own, such as a nail gun or a miter saw, which can streamline the building process. (Image: chicken-coop-tools.webp)
Lumber and Hardware
Choose rot-resistant lumber, such as cedar or pressure-treated wood, for the frame and exterior. Opt for exterior-grade plywood or oriented strand board (OSB) for the walls and roof. Use galvanized hardware (nails, screws, hinges, latches) to prevent rust and ensure the coop’s longevity. Don’t skimp on the hardware, as it’s critical to the coop’s structural integrity and security.
Step-by-Step Construction Guide
Building a chicken coop involves several key steps, each of which must be completed accurately for a successful outcome. Always refer to your chosen plan for specific measurements and instructions, and follow safety precautions throughout the construction process. Take your time, and don’t be afraid to ask for help if you get stuck.
Building the Frame

Begin by constructing the frame of your coop, which forms the structural foundation. Cut the lumber according to your plan and assemble the frame using screws and nails. Ensure the frame is square and level before moving on. This is a crucial step, so take your time and double-check your measurements. (Image: chicken-coop-frame.webp)
Constructing the Walls and Roof
Once the frame is complete, attach the walls and roof. Cut the plywood or OSB to the appropriate size and attach it to the frame using screws or nails. For the roof, consider using shingles, corrugated metal, or other weather-resistant materials. Ensure proper overlap and sealing to prevent water damage.
Installing the Doors and Windows
Install doors and windows for access and ventilation. Make sure the doors fit snugly and are securely latched to keep predators out. Place windows high enough so that they do not become escape routes for your chickens, but also provide good ventilation. Consider using hardware cloth or wire mesh over the windows for added security.
Creating the Chicken Run

The chicken run is the outdoor enclosure where your chickens will spend most of their day, foraging, scratching, and enjoying the sunshine. A secure and well-designed run is essential for protecting your chickens from predators. Consider the space available and the need to protect your chickens against external factors.
Run Design and Materials
The run should be enclosed on all sides and the top with sturdy wire mesh or hardware cloth. Bury the wire mesh a few inches underground or add an apron of wire extending outward to prevent digging predators from entering. Consider the type of soil you have, as some areas have animals more prone to digging than others. You can also place a gravel floor inside the run to make cleaning easier.
Securing the Run
The run must be securely attached to the coop and built with materials that can withstand predator attacks. Ensure that there are no gaps where predators can enter. Use strong wire mesh, heavy-duty staples, and secure latches on all doors and access points. Regular inspections are vital to identify and repair any potential weak points.
Adding Interior Features

Once the basic structure of the coop and run is complete, it’s time to add interior features that provide comfort and functionality for your chickens. The interior design plays a vital role in providing the birds a secure and comfortable environment.
Nesting Boxes
Provide at least one nesting box for every 3-4 hens. Nesting boxes should be placed in a sheltered, dark, and easily accessible area within the coop. Line the boxes with soft, absorbent bedding materials like straw or wood shavings. Make sure the nesting boxes are easy to clean, and consider the accessibility for collecting eggs. (Image: chicken-coop-nesting-box.webp)
Roosts
Roosts provide a comfortable place for chickens to sleep at night. Install roosts at varying heights to accommodate the chickens’ natural preferences. Use smooth, rounded lumber, such as a 2x4 with the edges rounded, or tree branches of varying diameters. Provide enough roost space for each chicken, allowing for about 8-12 inches per bird.
Ventilation and Lighting
Adequate ventilation is essential for removing moisture and ammonia, which can harm your chickens’ respiratory systems. Install vents near the roofline, and ensure proper airflow. Natural light is beneficial for egg production, so include windows or skylights in your design. Consider adding a small amount of artificial light in the winter to extend the laying season, but don’t overdo it.
Coop Maintenance and Upkeep
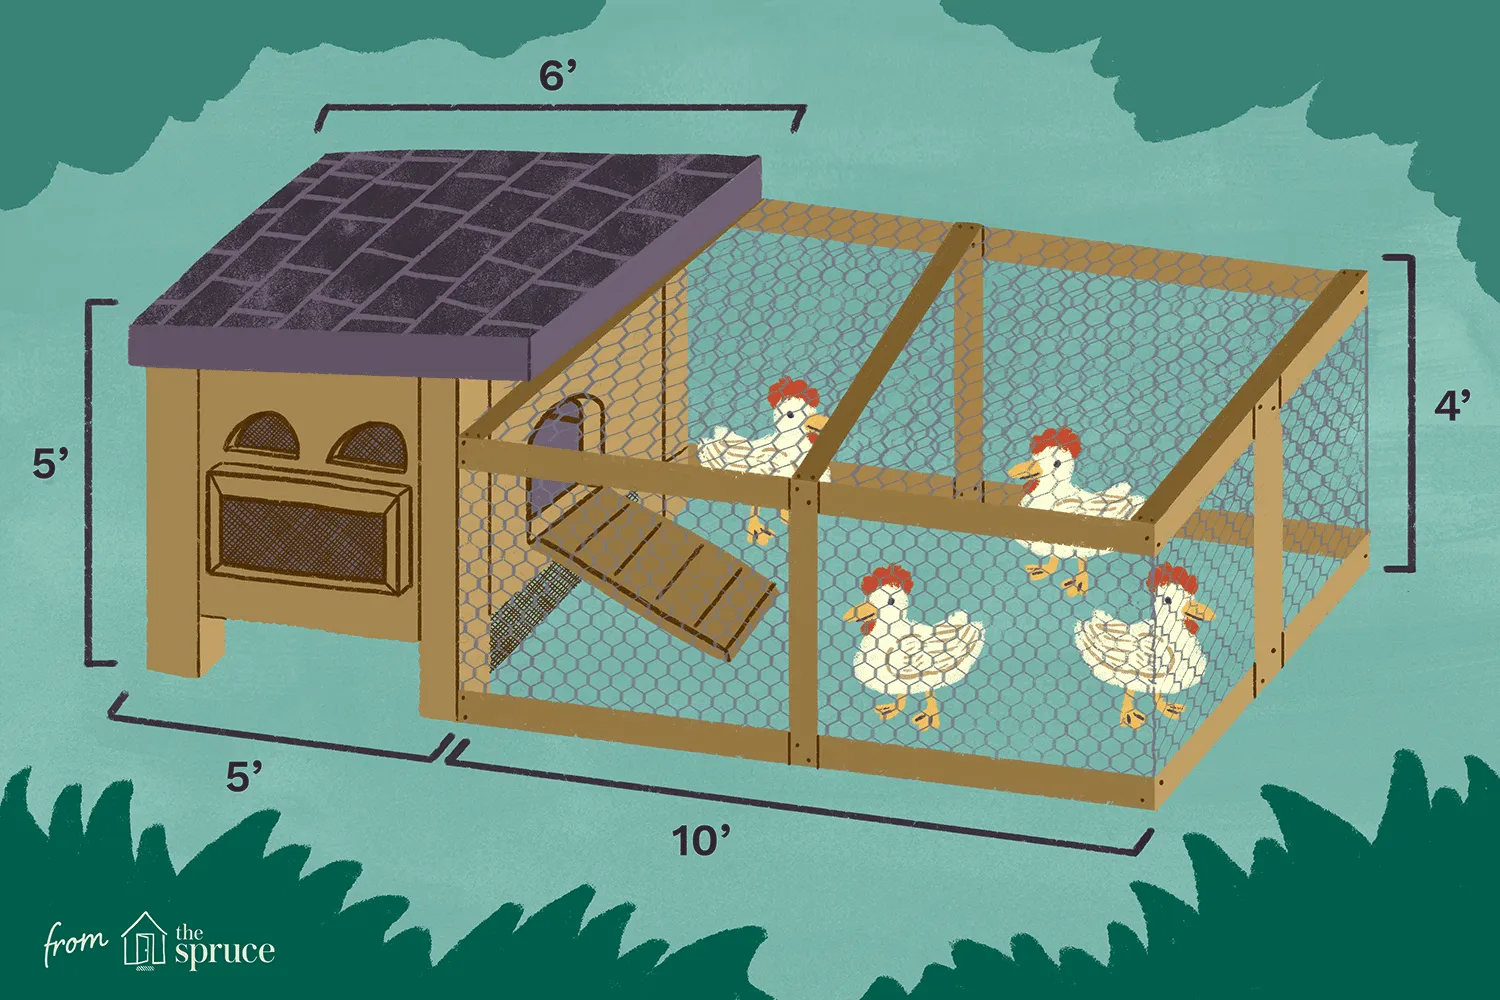
Once your coop is complete, regular maintenance is crucial for keeping your chickens healthy and your coop in good condition. Following a routine for cleaning and minor fixes will extend the life of your coop and keep your chickens happy. (Image: chicken-coop-plans.webp)
Building a chicken coop is a rewarding project that provides fresh eggs and the pleasure of raising your own flock. By following these simple chicken coop plans and guidelines, you can create a safe, comfortable, and attractive home for your chickens. Enjoy the process, and get ready to welcome your new feathered friends to their new home!