Choosing the Right Chicken Coop Windows
Choosing the right windows for your chicken coop is a crucial step in ensuring the health and happiness of your flock. Windows play a vital role in providing natural light, ventilation, and protection from the elements. The design and selection of these windows can significantly impact the comfort and safety of your chickens. Understanding the key considerations, from size and placement to materials and screening, will help you create a functional and secure coop. This article will guide you through seven essential tips for selecting and installing chicken coop windows, guaranteeing a comfortable and safe environment for your birds, and also providing you with the best methods for successful chicken keeping.
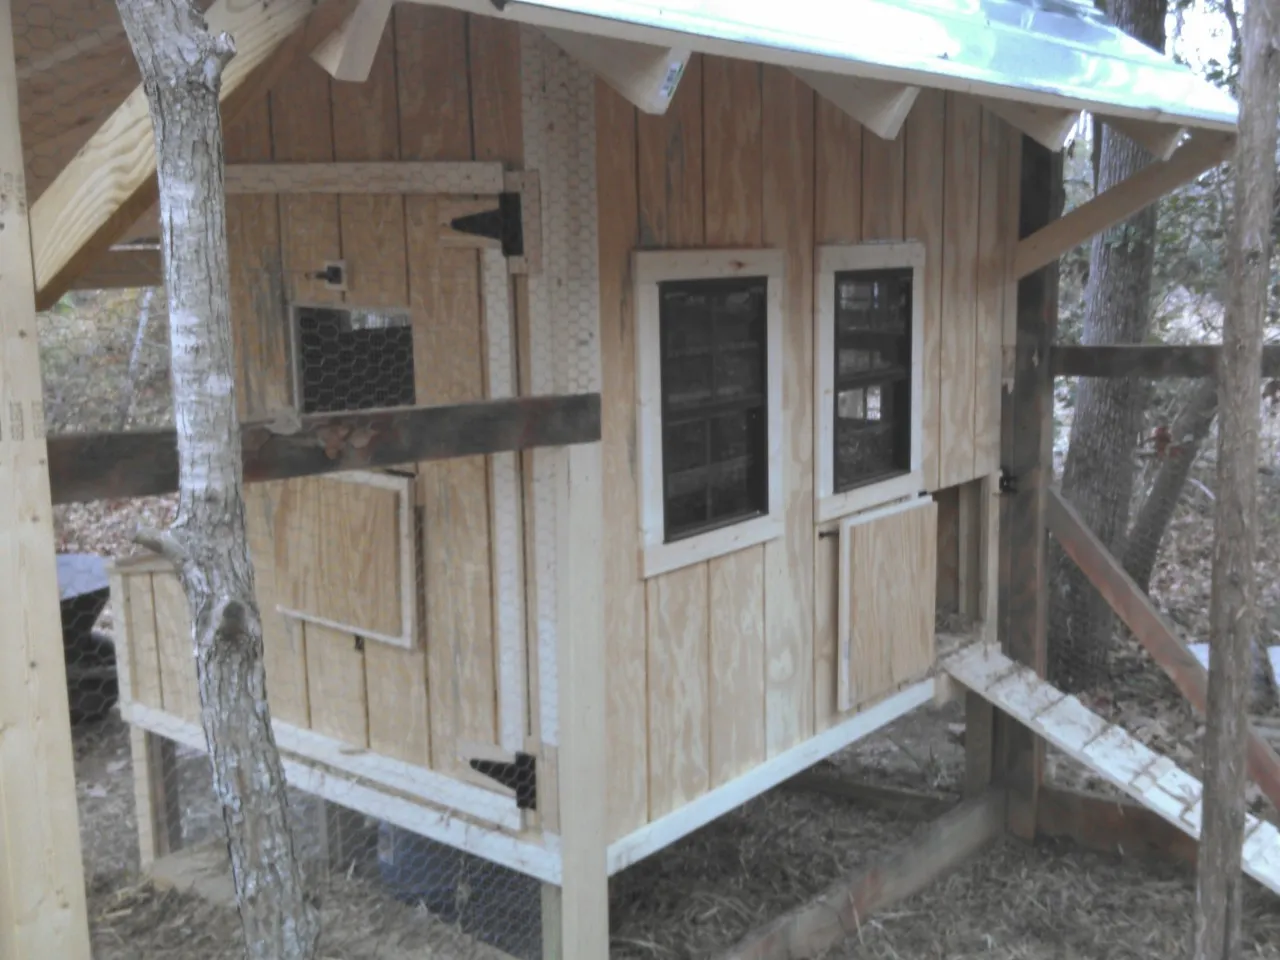
Considerations for Window Size and Placement
The size and placement of your chicken coop windows are vital to achieve a balance between light and ventilation. Windows should be strategically positioned to maximize natural light while avoiding direct sunlight, which can overheat the coop in the warmer months. Consider the prevailing wind direction and the coop’s orientation when deciding where to place the windows. Ensure that windows are placed high enough to prevent drafts at ground level, where chickens spend most of their time. The size of the windows should be proportionate to the coop’s size, with larger coops requiring more window area to ensure adequate lighting and ventilation. Proper window sizing and placement will play a significant role in the success of your chicken keeping.
Ventilation and Airflow

Adequate ventilation is critical for maintaining a healthy environment inside your chicken coop. Proper airflow helps to remove ammonia odors, reduce humidity, and prevent the build-up of harmful bacteria and respiratory issues. Windows should be designed to promote good ventilation, with the ability to open and close easily to adjust to changing weather conditions. Consider installing windows on opposite sides of the coop to create a cross-breeze, improving air circulation. Furthermore, combining windows with other ventilation solutions, such as vents or a roof ridge vent, will further improve air quality and reduce the risk of respiratory illnesses in your flock. Effective ventilation is fundamental for the health and well-being of your chickens.
Materials and Durability
The materials used for your chicken coop windows should be durable and able to withstand the elements and the potential abuse from your chickens. Consider using materials like wood, metal, or PVC for the window frames, and choose tempered glass or durable plastic for the window panes. Avoid using materials that are prone to rotting, warping, or breaking easily. Select hardware that is resistant to corrosion and rust, as it will be exposed to the elements. The durability of your window materials is essential for withstanding harsh weather conditions and the daily wear and tear that comes with keeping chickens. Consider the longevity and maintenance requirements when selecting materials, to ensure your windows provide long-lasting performance.
Types of Chicken Coop Windows
There are several types of windows suitable for chicken coops, each with its advantages. Sliding windows are easy to open and close, offering good ventilation control. Hinged windows provide a wide opening for increased airflow. Casement windows crank open for controlled ventilation, while fixed windows are simple and secure but offer no ventilation options. Consider your coop’s design, climate, and ventilation needs when choosing the best type of windows. Consider window types that are easy to clean and maintain and that provide effective protection from the elements. Your choice will significantly impact the comfort and safety of your chickens.
Screening for Pest Control

Screening is essential for protecting your chickens from predators and controlling pests. Install sturdy wire mesh or hardware cloth over the windows to prevent unwanted entry. Ensure the screening is securely attached to the window frames, with no gaps that pests can exploit. The mesh size should be small enough to keep out pests such as rodents, snakes, and insects. Regular inspections of the screening are necessary to identify and repair any damage. Proper screening provides an additional layer of security, ensuring the safety of your flock and preventing the spread of diseases. It also contributes to the overall health and well-being of your chickens.
Tip 1 Maximize Natural Light
Natural light is crucial for your chickens’ health and productivity. It helps regulate their natural circadian rhythms, influencing egg-laying cycles and overall well-being. Place windows strategically to allow sunlight to enter the coop, but avoid direct exposure, particularly during the hottest parts of the day. Ensure windows are clean and free from obstructions to maximize the amount of light entering the coop. Proper lighting is essential for the health, productivity, and mood of your flock.
Tip 2 Provide Ample Ventilation
Adequate ventilation is paramount for a healthy coop environment. Open windows whenever possible to allow fresh air to circulate, reducing humidity and removing harmful odors. Ensure good airflow throughout the coop, preventing the buildup of ammonia and other harmful gases. Good ventilation is crucial for respiratory health and overall well-being of your chickens. Make sure you balance ventilation with weather conditions, closing windows when necessary to protect your flock from drafts and extreme temperatures.
Tip 3 Ensure Secure Construction

The safety of your chickens depends on the security of the coop. Windows must be firmly attached to the frame and properly sealed. Ensure all hardware is rust-resistant and durable. Check windows regularly for signs of damage or wear, and repair any issues immediately. A secure coop is essential for protecting your chickens from predators and the elements, ensuring their safety and peace of mind.
Tip 4 Select Durable Materials
Durability is key to the longevity and effectiveness of your windows. Choose high-quality materials resistant to the elements and potential damage. Consider materials such as treated wood, metal, or PVC for frames, and tempered glass or durable plastic for panes. Select hardware that can withstand various weather conditions and regular use. Durable materials minimize the need for repairs and replacements, ensuring the long-term protection of your flock.
Tip 5 Easy Cleaning and Maintenance
Easy cleaning and maintenance will save you time and effort in the long run. Choose window designs and materials that are easy to clean and don’t trap dirt or debris. Regularly clean windows to ensure optimal light and ventilation. Inspect windows periodically and address any maintenance needs promptly. Implementing a regular cleaning and maintenance schedule will extend the lifespan of your windows and support a healthy environment for your chickens.
Tip 6 Pest Control Measures

Protect your chickens from pests by implementing effective control measures. Use fine mesh screens on windows to keep out insects and rodents. Seal any gaps or cracks around the window frames to prevent pest entry. Regularly inspect the coop for signs of pests and take prompt action if any are found. Effective pest control helps to maintain a healthy environment and minimizes the risk of disease and infestation within your coop.
Tip 7 Consider Local Climate
Adapt your window design and placement to the local climate. In hot climates, maximize ventilation and shade the windows from direct sunlight. In cold climates, ensure windows are well-sealed to prevent drafts, and consider adding insulation. In areas with heavy rainfall or snowfall, use weather-resistant materials and designs that prevent water from entering the coop. Tailoring your coop’s window design to your local climate ensures optimal comfort and safety for your flock throughout the year.
Installing Your Chicken Coop Windows
Proper installation is key to the functionality and security of your chicken coop windows. If you’re building a coop from scratch or retrofitting an existing one, follow these steps to ensure a secure and effective window installation.
Step 1 Planning and Preparation

Before you begin, carefully plan the placement and size of your windows. Measure and mark the locations where the windows will be installed. Ensure you have the necessary tools, including a saw, drill, level, measuring tape, and safety gear. Gather all the required materials, including the window frames, panes, screening, hardware, and sealant. Preparing thoroughly will make the installation process much smoother and efficient.
Step 2 Cutting the Openings
Using a saw, carefully cut the openings for your windows according to your pre-planned measurements. Ensure the cuts are straight and accurate for a proper fit. If you are installing the windows into an existing coop, carefully remove any existing material. Clear away any debris from the cut openings to ensure a clean surface for the window frames.
Step 3 Frame Construction and Installation
Construct the window frames if needed, or prepare pre-made frames. Place the frames into the openings, ensuring they are level and square. Secure the frames using screws or nails, ensuring they are flush with the coop walls. Double-check the level and squareness of the frames before fully securing them to the coop structure. Take your time during this step to ensure a stable and secure base for your windows.
Step 4 Window Installation

Carefully insert the window panes into the frames. Secure the panes using appropriate hardware, such as glazing points or screws. Ensure the windows are securely fastened to the frames. For ventilation windows, install hinges or other opening mechanisms. Test the operation of the windows to confirm they open and close properly. Ensure everything is installed with care, so the windows will function well.
Step 5 Sealing and Finishing
Apply sealant around the window frames to create a weatherproof seal. Install screening over the windows, securely attaching it to the frames. Inspect all seals and attachments to make sure they are secure and effective. Finish the installation by painting or treating the window frames for weather protection. Properly sealing and finishing your windows will protect your chickens and extend the life of your coop and windows.
By following these tips and steps, you can create a chicken coop with windows that are safe, functional, and contribute to the overall health and well-being of your flock. Remember to regularly inspect and maintain your windows to ensure they continue to meet the needs of your chickens for years to come.