Hardware Cloth Chicken Coop Design
Designing a hardware cloth chicken coop is an essential first step towards providing a safe and comfortable home for your flock. Hardware cloth, a sturdy wire mesh, is a key component in predator-proofing your coop, and the design should prioritize security, ventilation, and ease of access for both you and your chickens. Consider the size of your flock when determining the coop’s dimensions, ensuring enough space for each bird to move around freely, roost comfortably, and access nesting boxes. The overall design should also take into account the local climate, providing adequate protection from the elements while ensuring proper airflow to prevent the buildup of moisture and ammonia.
Choosing the Right Materials
The materials you select will significantly impact the coop’s durability, longevity, and effectiveness in protecting your chickens. Choosing the right materials involves careful consideration of various factors, including the specific needs of your flock and the environment in which the coop will be built. From the hardware cloth itself to the wood used for the frame and the various fasteners required for construction, the quality of your materials will ultimately determine the success of your project. Prioritizing materials that are weather-resistant, non-toxic, and easy to maintain is crucial to ensuring a healthy and safe environment for your chickens for many years to come.
Selecting Hardware Cloth

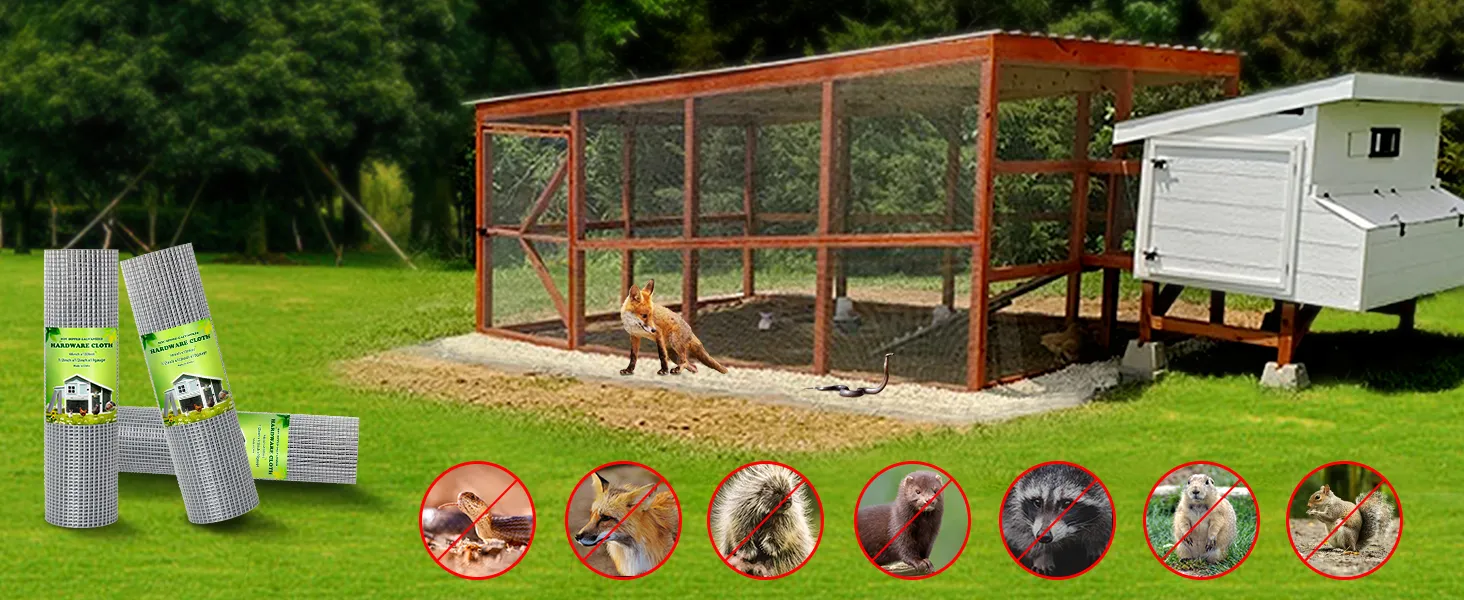
The hardware cloth you choose is the cornerstone of a secure chicken coop, as it provides a physical barrier against predators. The mesh size is a key consideration, with smaller openings offering better protection against smaller predators like snakes and rodents. It is recommended to use hardware cloth with 1/2-inch or smaller openings. Also, consider the gauge of the wire; a heavier gauge will provide greater durability. Ensure the hardware cloth is galvanized or coated to prevent rust and extend its lifespan. Avoid using chicken wire, as it’s not predator-proof and offers minimal protection. Proper selection of hardware cloth is the most important step in protecting your chickens.
Wood and Frame Materials
The frame of your coop should be constructed from sturdy, weather-resistant wood. Pressure-treated lumber is a popular choice for its resistance to rot and insects, especially for areas that will be in contact with the ground. However, ensure the lumber is safe for chickens, as some treatments can be toxic. Cedar and redwood are also excellent choices due to their natural resistance to decay and their aesthetic appeal. The choice of wood will depend on your budget, climate, and aesthetic preferences. Ensure all wood is smooth and free of splinters to prevent injury to your chickens. Always pre-drill holes to prevent the wood from splitting when screwing or nailing the frame together.
Hardware
High-quality hardware is essential for the longevity and security of your coop. Use exterior-grade screws, nails, and hinges that are resistant to rust and corrosion. Stainless steel or galvanized hardware is the best choice. Avoid using staples to attach the hardware cloth, as predators can easily pull it away. Instead, use screws with washers to securely fasten the cloth to the frame. Choose sturdy latches and locks for doors and access points, ensuring they are predator-proof and easy to operate. Consider using hardware cloth on the underside of any exposed wood to prevent rodents from chewing through.
Hardware Cloth Coop Planning & Preparation

Thorough planning and preparation are crucial for a successful coop build. This phase involves determining the appropriate size and dimensions of your coop, selecting the best location on your property, and gathering all the necessary tools and materials. It’s important to consider all aspects of the project, from the initial design to the final touches, to ensure that the finished coop meets the needs of your chickens and your own expectations. Taking the time to plan and prepare will not only streamline the construction process but also help to avoid costly mistakes and ensure a safe and comfortable home for your flock.
Coop Size and Dimensions
The size of your chicken coop is a critical factor that affects the health and well-being of your flock. The general rule of thumb is to provide at least 4 square feet of floor space per chicken inside the coop and 8-10 square feet of outdoor space per chicken in the run. However, these are minimums and more space is always better. Overcrowding can lead to stress, feather pecking, and disease outbreaks. Consider the breed of your chickens, as larger breeds require more space. Plan for future expansion if you intend to increase the size of your flock. Ensure the coop is tall enough for you to comfortably stand and move around inside for cleaning and maintenance.
Location and Placement
Choosing the right location for your chicken coop is essential for the health and safety of your chickens. Select a location that is well-drained to prevent standing water, which can attract pests and cause the coop to deteriorate. The location should also provide protection from prevailing winds and extreme weather conditions, such as direct sunlight in the summer. Consider the proximity to your house for ease of access and monitoring. Ensure the location is also easily accessible for cleaning and maintenance. Check local ordinances and homeowners’ association rules to ensure the coop complies with all regulations.
Tools You’ll Need

Having the right tools on hand will make the construction process much smoother and more efficient. You will need basic carpentry tools, including a measuring tape, level, saw (circular saw, hand saw, or reciprocating saw), drill/driver, hammer, and screwdriver. Other essential tools include wire cutters or tin snips for cutting the hardware cloth, a staple gun (for attaching the hardware cloth if you choose to use staples), and safety glasses and gloves to protect yourself during construction. A post-hole digger or shovel will be needed if you choose to bury the hardware cloth. Ensure all tools are in good working order before you begin.
Hardware Cloth Chicken Coop Construction
The construction phase is where your design comes to life. This section provides a step-by-step guide to building your hardware cloth chicken coop, from constructing the frame to attaching the hardware cloth, creating access points, and providing weather protection. Following these steps carefully will help ensure a sturdy, secure, and functional coop that will protect your chickens from predators and the elements. The key to success is to work methodically, taking accurate measurements, and ensuring all components are properly aligned and secured. Don’t rush the process; the extra effort you put in during construction will pay off in the long run.
Building the Frame
Building a sturdy frame is the foundation of your chicken coop. Begin by cutting the lumber according to your design plans. Assemble the frame on a level surface, ensuring all corners are square. Use screws or nails to securely fasten the frame pieces together. Consider adding corner braces for extra stability. If you plan to elevate the coop, build a base frame and attach legs. Check the frame for levelness and squareness throughout the construction process. The frame should be strong enough to withstand the weight of the roof, hardware cloth, and any potential snow load. Ensure the frame dimensions match your plans to allow for accurate attachment of the hardware cloth.
Attaching the Hardware Cloth

Attaching the hardware cloth correctly is critical for predator-proofing your coop. Cut the hardware cloth to the required size, leaving a few inches of overlap on all sides of the frame. Using screws with washers, securely attach the hardware cloth to the frame, spacing the screws approximately every 4-6 inches. Overlap the hardware cloth at corners and seams to create a continuous barrier. Ensure there are no gaps or weak points where predators could gain entry. Carefully trim any excess hardware cloth with wire cutters to avoid sharp edges. Inspect the entire coop to make sure that the hardware cloth is securely fastened and there are no potential points of entry.
Securing the Hardware Cloth
Properly securing the hardware cloth is crucial for keeping predators out. Ensure the hardware cloth is taut and firmly attached to the frame. Use screws and washers rather than staples, as staples can be easily removed by predators. Overlap the hardware cloth at all seams and corners to create a seamless barrier. Consider burying the hardware cloth around the perimeter of the coop to prevent animals from digging under the walls. Inspect the hardware cloth regularly for any signs of damage or wear and tear, and repair any issues immediately. The more secure you make the hardware cloth, the safer your chickens will be.
Door and Access Construction
The door and access points should be designed for convenience and security. Construct a sturdy door frame using the same materials as the coop frame. Cover the door frame with hardware cloth, ensuring it is securely attached. Use heavy-duty hinges and a reliable latch or lock. The latch should be predator-proof, meaning it cannot be easily opened by animals. Consider adding a secondary latch or bolt for extra security. Construct a ramp for the chickens to easily enter and exit the coop. Position the door so it does not allow rain or snow to enter the coop. Regularly check the door and access points to ensure they are functioning correctly.
Roofing and Weather Protection

Protecting your coop from the elements is essential for the health and comfort of your chickens. The roof should be constructed from a durable, waterproof material, such as asphalt shingles, metal roofing, or corrugated plastic. Ensure the roof has adequate overhang to protect the walls from rain. Proper ventilation is also key; provide vents near the top of the coop to allow for airflow and prevent moisture buildup. Consider adding a rain gutter system to direct rainwater away from the coop. The roof should be securely attached to the frame to withstand strong winds. Regular maintenance of the roof is also necessary to ensure it remains in good condition.
Finishing Touches & Interior
Once the basic structure of your coop is complete, it’s time to add the finishing touches and create a comfortable and functional interior for your chickens. This includes adding roosts, nesting boxes, and ensuring proper ventilation. These additions will not only enhance the chickens’ comfort but also make it easier for you to manage the coop. Taking the time to design and build these elements will create an enjoyable living space for your flock, leading to healthier and happier chickens.
Adding Roosts and Nesting Boxes
Roosts and nesting boxes are essential for the comfort and productivity of your chickens. Provide roosts that are the correct size for your chickens’ feet; a 2x4 board with the edges rounded is a good option. Place the roosts at a comfortable height, allowing easy access for your chickens. Nesting boxes should be placed in a quiet, dimly lit area of the coop. Provide one nesting box for every 3-4 hens. Line the nesting boxes with clean bedding, such as straw or wood shavings. Ensure the nesting boxes are easy to access for both the chickens and yourself for egg collection. Regularly clean and maintain the roosts and nesting boxes to prevent the spread of disease.
Ventilation and Airflow

Proper ventilation is crucial for the health of your chickens. It helps to remove moisture, ammonia, and other harmful gases from the coop. Install vents near the top of the coop, away from direct drafts, to allow for good airflow. Ensure that the vents are covered with hardware cloth to prevent predators from entering. Avoid sealing the coop completely; some airflow is necessary even in cold weather. Proper ventilation will help prevent respiratory illnesses and maintain a healthy environment for your flock. Regularly inspect the vents to ensure they are not blocked and are functioning correctly.
Predator-Proofing Your Coop
Predator-proofing is the most important aspect of building a chicken coop. This section focuses on specific measures you can take to protect your chickens from predators such as foxes, raccoons, coyotes, and hawks. By implementing these strategies, you can significantly reduce the risk of losing your chickens to predators, giving you peace of mind knowing your flock is safe. Remember that predators are persistent, so it’s critical to leave no weak points and regularly inspect the coop for potential vulnerabilities.
Burial of Hardware Cloth
Burying the hardware cloth around the perimeter of your coop is one of the most effective ways to prevent predators from digging under the walls. Dig a trench around the coop, at least 12 inches deep and extend the hardware cloth outward from the base of the walls. Secure the hardware cloth with stakes or landscape staples. Backfill the trench with soil, compacting it firmly. This buried barrier prevents animals like foxes and raccoons from digging under the coop walls to access your chickens. Ensure there are no gaps or openings in the buried hardware cloth.
Securing Weak Points

Identify and reinforce any weak points in your coop design. This includes the door, windows, and any areas where the hardware cloth might not be securely attached. Use sturdy latches and locks on doors and access points. Reinforce the hardware cloth at corners and seams, and ensure all edges are securely fastened to the frame. Check for any gaps or openings where predators could enter, and seal them with additional hardware cloth or sturdy materials. Regularly inspect the coop for any signs of damage or wear and tear, and repair any issues immediately. Consider adding features like a hardware cloth skirt around the base to prevent digging.
Hardware Cloth Chicken Coop Maintenance
Regular maintenance is crucial for the long-term health of your chickens and the durability of your coop. This includes cleaning, sanitation, and regular inspections to identify and address any issues promptly. A well-maintained coop will not only protect your chickens from predators and the elements but also create a healthier and more hygienic environment. Make maintenance a regular part of your routine to keep your coop in top condition.
Cleaning and Sanitation
Regular cleaning is essential to maintain a healthy coop environment. Remove droppings, soiled bedding, and any spilled feed regularly. Clean the roosts, nesting boxes, and floor of the coop at least once a week, or more often if necessary. Use a poultry-safe disinfectant to sanitize the coop regularly, especially after any signs of illness in your flock. Provide fresh, clean bedding in the nesting boxes and on the floor. Good sanitation helps prevent the spread of disease and keeps your chickens healthy. Ensure good ventilation during cleaning to prevent the buildup of harmful fumes.
Regular Inspections
Conduct regular inspections of your coop to identify any potential problems. Check the hardware cloth for any holes or damage. Inspect the frame for any signs of rot or insect infestation. Examine the roof for leaks or damage. Check the door and access points to ensure they are functioning correctly and securely latched. Look for any signs of predator activity around the coop. By performing regular inspections, you can address any issues promptly and prevent them from escalating. Catching issues early can save you a lot of time, money, and stress down the road.
Common Problems and Solutions
Building and maintaining a chicken coop often involves encountering various problems. Identifying these common issues and understanding their solutions is important for any chicken keeper. From dealing with predators and weather-related damage to addressing health concerns and managing pests, knowing how to troubleshoot common problems will help you keep your chickens safe and healthy. This section covers some of the most common issues you might encounter and provides practical solutions to help you overcome these challenges.