
Planning Your Chicken Coop for 10 Chickens
Building a chicken coop for 10 chickens is a rewarding project that allows you to enjoy fresh eggs and the companionship of these delightful birds. Proper planning is crucial to ensure your chickens are safe, comfortable, and healthy. This guide will walk you through every step, from initial design considerations to ongoing maintenance, making the process manageable and enjoyable. Before you start hammering nails, think about the specific needs of your flock and the environment where the coop will be located.
Determining Coop Size and Space Requirements
One of the most important aspects of planning your coop is determining its size. Chickens need enough space to move around, roost comfortably, and escape the elements. Overcrowding leads to stress, which can increase the risk of disease and behavioral problems such as feather pecking. A well-sized coop promotes the overall health and happiness of your flock.
Calculating Square Footage Per Chicken

A general rule of thumb is to provide at least 4 square feet of space per chicken inside the coop. For 10 chickens, this means a minimum of 40 square feet of coop space. However, more space is always better. Consider increasing the coop size to accommodate potential growth or future additions to your flock. Providing ample space minimizes conflicts and ensures that all chickens have access to food, water, and roosting areas.
Considering Run Space and Outdoor Access
In addition to coop space, the chickens need access to an outdoor run. The run provides space for foraging, dust bathing, and exercise. Aim for at least 8-10 square feet of run space per chicken. This allows them to roam and engage in natural behaviors. Consider the climate and local predators when designing your run; ensure it is secure and provides protection from the elements, while allowing the chickens to enjoy the sunlight and fresh air. A well-designed run contributes to the overall well-being and happiness of your flock.
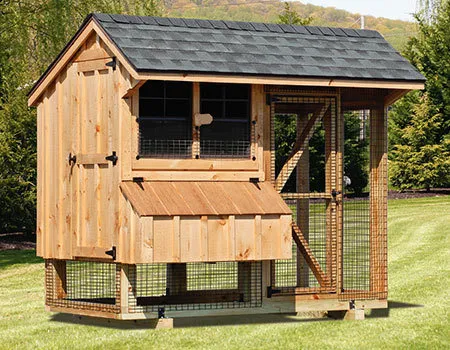
Choosing the Right Chicken Coop Design
Choosing the right coop design involves balancing aesthetics, functionality, and your skills as a builder. There are many designs available, ranging from simple, portable coops to more elaborate, permanent structures. Think about your local climate, the number of chickens you have, and the space available in your backyard. Different designs have varying levels of protection from predators and the elements, so careful consideration is vital for ensuring your chickens’ safety and comfort.
Selecting Pre-Built Coops vs. DIY Options

You have two main choices: buying a pre-built coop or building one yourself. Pre-built coops offer convenience, saving you time and effort. They often come with pre-cut materials and clear instructions. DIY options allow you to customize the coop to your specific needs and preferences. They can be more cost-effective, especially if you use reclaimed materials, and provide a sense of accomplishment. Evaluate your building skills, time constraints, and budget to determine which option suits you best. Consider also the availability of materials in your area.
Exploring Different Coop Styles
Coop styles vary widely. A-frame coops are portable and suitable for smaller flocks. Stationary coops can be built to any size and often include attached runs. Consider designs that incorporate features like predator-resistant hardware cloth, easy-to-clean surfaces, and good ventilation. Some coops are designed to be aesthetically pleasing, blending seamlessly into your landscape, while others prioritize functionality and ease of maintenance. Research different styles and choose one that matches your needs and the chickens’ requirements.
Essential Materials and Supplies for Building
The materials you choose will significantly impact the durability, safety, and longevity of your chicken coop. Selecting the right materials ensures the structure withstands the elements and keeps predators out. Consider the climate where you live, as some materials are more suitable for certain weather conditions. Investing in high-quality materials will result in a coop that lasts for years and provides a safe and comfortable home for your chickens.
Wood Types and Their Suitability

Wood is a primary building material for coops. Choose wood that is rot-resistant and durable, such as cedar or redwood. Pressure-treated lumber is also a good option, especially for the base of the coop, as it is resistant to moisture and insect damage. Avoid using wood treated with chemicals that could be harmful to your chickens. Untreated wood can be painted or sealed to protect it from the elements and extend its lifespan. Consider the local availability and cost of different wood types.
Hardware and Fasteners Needed
Using the right hardware and fasteners is crucial for the structural integrity and security of your coop. Use galvanized screws and nails to prevent rust and corrosion. Heavy-duty hinges and latches are essential to keep predators out. Use hardware cloth with small openings (1/2 inch or less) to cover windows and vents, providing ventilation while keeping pests out. Consider using predator-resistant hardware, such as barrel bolts and hasps, to further secure the coop and run doors.
Tools You’ll Need for Construction
Gathering the right tools will make building your coop easier and more efficient. Essential tools include a saw (circular saw or handsaw), drill, measuring tape, level, hammer, and screwdriver. Other useful tools include a staple gun for attaching hardware cloth and a shovel for preparing the foundation. Safety equipment, such as safety glasses and gloves, is also essential. Make sure you have all the necessary tools before you start building to avoid delays and ensure a smooth construction process.
Step-by-Step Chicken Coop Construction

Building a chicken coop involves several key steps, each of which must be done carefully to create a safe and secure environment for your chickens. Following these steps will help ensure your coop is sturdy, functional, and predator-proof. Remember to double-check measurements and make sure everything is level during each step of the process.
Building the Coop Foundation
The foundation provides a stable base for your coop. The type of foundation you choose will depend on your local climate and the design of your coop. Options include a concrete slab, a gravel base, or skids for a portable coop. Ensure the foundation is level and secure. If using a concrete slab, allow it to cure completely before proceeding. A properly constructed foundation will prevent shifting and ensure the longevity of your coop.
Constructing the Coop Frame
The frame provides the structural support for your coop. Start by building the base frame, ensuring it is square and level. Then, construct the wall frames, attaching them to the base frame. Use screws or nails, depending on your preference. Ensure the frame is sturdy and properly braced. Consider adding corner braces for extra stability. Properly constructed framing is essential for withstanding wind and other environmental factors.
Adding Walls, Roof, and Doors

Once the frame is complete, attach the walls, roof, and doors. Use plywood, siding, or other appropriate materials for the walls. Make sure the roof is waterproof, using roofing felt and shingles or other roofing materials. The doors should be sturdy and secure, with secure latches to prevent predators from entering. Ensure the doors are properly hinged and open and close smoothly. Pay attention to proper sealing to prevent drafts and water damage.
Creating the Chicken Run
The chicken run is a secure outdoor area where your chickens can roam safely. Build a frame for the run, using the same type of wood as the coop. Cover the frame with hardware cloth, burying the bottom edge several inches into the ground to prevent predators from digging underneath. The run should be large enough for your chickens to move around comfortably. Provide shade and protection from the elements within the run. Consider adding a gate for easy access for cleaning and maintenance. A well-constructed run is crucial for keeping your chickens safe from predators.
Ventilation, Lighting, and Insulation
Proper ventilation, lighting, and insulation are crucial for the health and well-being of your chickens. These elements help regulate the coop’s temperature, prevent the build-up of ammonia, and provide a comfortable environment for your flock.
Ensuring Proper Ventilation
Good ventilation is essential for removing moisture, ammonia, and other harmful gases from the coop. Install vents near the roofline to allow air to circulate. Avoid drafts, which can chill your chickens. The vents should be covered with hardware cloth to keep out predators and pests. Ensure proper airflow throughout the coop. Regular ventilation helps maintain a healthy environment and reduces the risk of respiratory illnesses.
Providing Adequate Lighting
Chickens need at least 14-16 hours of daylight to lay eggs. During the winter months, you may need to supplement natural light with artificial lighting. Use a low-wattage LED bulb to provide light without generating excessive heat. Avoid using incandescent bulbs, which can get hot and pose a fire hazard. Place the light in a location that provides even illumination throughout the coop. Proper lighting encourages egg production and keeps your chickens active and healthy.
Insulating for Climate Control
Insulation helps regulate the coop’s temperature, keeping it warmer in the winter and cooler in the summer. Use insulation materials appropriate for coop environments, such as rigid foam board or fiberglass batts. Insulate the walls and roof. Ensure the insulation is protected from moisture and pests. Proper insulation helps maintain a comfortable environment, preventing stress and promoting the health of your chickens. Consider your local climate when deciding how much insulation is necessary.
Feeding, Watering, and Nesting

Providing proper feeding, watering, and nesting facilities is crucial for the health, happiness, and productivity of your chickens. These elements contribute significantly to the overall well-being of your flock. Proper setup and placement of feeders, waterers, and nesting boxes will simplify daily care and encourage egg production.
Choosing the Right Feeders and Waterers
Choose feeders and waterers that are appropriate for the size of your flock and the type of feed you are using. Feeders should be designed to minimize waste and prevent chickens from scratching feed onto the ground. Waterers should be easy to clean and provide fresh water at all times. Consider automatic waterers and feeders for added convenience. Place feeders and waterers in a location that is easy for the chickens to access but protected from the elements. Regularly clean and refill feeders and waterers to maintain hygiene and prevent the spread of disease.
Designing Nesting Boxes
Nesting boxes provide a private and comfortable space for your hens to lay eggs. Provide one nesting box for every 3-4 hens. The boxes should be large enough for the hens to turn around comfortably. Line the boxes with clean bedding, such as straw, wood shavings, or nesting pads. Place the nesting boxes in a dark, quiet area of the coop. Ensure the boxes are easy to access for egg collection. Regularly clean and maintain the nesting boxes to keep them fresh and inviting.
Maintaining and Cleaning Your Coop
Regular maintenance and cleaning are essential for keeping your coop in good condition and ensuring the health of your chickens. Cleaning prevents the build-up of bacteria and parasites. Regular inspections help identify potential problems before they escalate. Proper maintenance will extend the life of your coop and keep your chickens happy and healthy.
Regular Cleaning and Waste Management
Clean your coop regularly to remove droppings and soiled bedding. Remove the bedding and replace it with fresh material, such as straw or wood shavings. Wash the feeders and waterers. Consider using a coop cleaner or disinfectant. Dispose of waste properly, following local regulations. Regular cleaning helps control odors, prevents the build-up of ammonia, and reduces the risk of disease. Establish a regular cleaning schedule to simplify the process.
Pest and Predator Control
Implement measures to control pests and predators. Use hardware cloth to cover all openings and prevent rodents and other pests from entering the coop. Regularly inspect the coop for signs of pests or predators. Store feed in a sealed container to prevent pests from accessing it. Ensure your coop is well-secured to prevent predators such as foxes, raccoons, and dogs from gaining access. Consider using predator-resistant latches and hardware.
Seasonal Coop Maintenance
Perform seasonal maintenance tasks to keep your coop in top condition. In the spring, thoroughly clean the coop and run. In the summer, provide shade and ensure adequate ventilation. In the fall, prepare the coop for winter by insulating it and adding extra bedding. In the winter, check for drafts and ensure the water doesn’t freeze. Regularly inspect the coop for damage and make repairs as needed. Seasonal maintenance helps ensure the long-term durability and functionality of your coop.