Choosing the Right Omelette Chicken Coop
Building your own omelette chicken coop can be a rewarding project. Before you even begin to gather materials or swing a hammer, you need to carefully consider several factors. The right coop provides a safe, comfortable, and secure environment for your chickens, allowing them to thrive and produce those delicious eggs for your omelettes. Consider the size of your flock. How many chickens do you plan to house? A general rule of thumb is to allow at least 4 square feet of space per chicken inside the coop and 8-10 square feet in the chicken run. You also need to factor in the breed of chickens you plan to keep, as some breeds are larger than others. Researching the specific needs of your chosen breed will ensure you have adequate space and features. Consider the climate and weather conditions in your area. The coop needs to protect chickens from extreme temperatures, strong winds, and heavy rainfall. This might influence the materials and design you choose, such as insulation for cold climates or ample ventilation for warmer ones.
Considerations before building the coop
Beyond the essentials of size and climate, think about the overall design and functionality of the coop. Will it be a permanent fixture, or do you prefer a mobile coop that can be moved around your yard? Consider ease of access for cleaning and egg collection. A well-designed coop will have features that make these tasks simple and efficient. Think about aesthetics. While functionality is paramount, there is no reason why your coop can’t be visually appealing and complement your backyard. Consider the materials you’ll use and the overall look you’re aiming for. Look at some chicken coop designs before committing to a build. This can provide inspiration and help you visualize the final product. By carefully considering all of these factors, you can choose a design that meets your needs and helps create a happy and productive environment for your chickens.
Location & Space

Choosing the right location for your omelette chicken coop is critical. It affects your chickens’ health, safety, and happiness, as well as your convenience. The best location is typically a flat, well-drained area. This will help prevent water from pooling around the coop, which can lead to dampness and disease. Make sure the spot receives a mix of sun and shade. Chickens need sunlight for vitamin D production, but they also need shade to escape the heat, particularly during the hottest parts of the day. Consider the prevailing winds. Position the coop to offer some protection from strong winds, which can chill the chickens and make them uncomfortable. The area should be easily accessible to you. You’ll need to get to the coop regularly for feeding, watering, cleaning, and collecting eggs. A location close to your house will make these tasks easier. Consider potential predators. Keep the coop away from areas that might attract predators, such as tall grass or bushes, and ensure the surrounding area is secure.
Ensure your coop complies with local zoning regulations and homeowner association rules. Some areas have restrictions on the size, location, and appearance of chicken coops. Neighborly considerations are also important. Place the coop far enough from your neighbors to minimize noise and odor. Avoid placing the coop near any areas where your chickens’ activities could disturb your neighbors. Make sure the coop is large enough. Provide enough space for your chickens to move around comfortably, both inside the coop and in their outdoor run. The recommended space per chicken can vary. The layout should be designed for easy access to all parts of the coop for cleaning and maintenance.
Local Regulations and Permits
Before you start building your omelette chicken coop, it’s essential to familiarize yourself with local regulations and permit requirements. This step is crucial to ensure that your coop is legally compliant and that you avoid potential fines or issues down the line. Contact your local city or county planning department to inquire about zoning regulations related to backyard chickens and coops. These regulations can cover various aspects, including the allowed size of the coop, the minimum setback distances from property lines, and any restrictions on the number of chickens you can keep. You may also need to obtain a building permit for your coop. The permit process typically involves submitting your coop plans and specifications for review. The planning department will assess whether your design meets all the necessary building codes. Your homeowner’s association (HOA) might have its own rules. These rules can be more restrictive than local regulations. Reviewing your HOA guidelines before starting construction is essential.
Understanding these regulations will help you design and build a coop that meets all the necessary legal requirements, ensuring a hassle-free experience. Make sure you adhere to all the regulations. You may need to make adjustments to your design to meet the local rules. Failing to comply with these regulations can result in fines or even the requirement to dismantle your coop. Keep all necessary documentation such as building permits, zoning approvals, and HOA approvals. These documents can be valuable if you ever have to address any issues or inquiries related to your coop. Remember to respect the rules, and ensure you are in compliance with all relevant laws and guidelines.
Materials and Tools
Selecting the right materials and tools is a key part of building a durable, functional, and aesthetically pleasing omelette chicken coop. The choice of materials affects the coop’s longevity, weather resistance, and overall safety for your chickens. Wood is a popular choice for coop construction due to its versatility and ease of use. Cedar, redwood, and pressure-treated lumber are excellent options, providing natural resistance to rot, pests, and the elements. Consider the use of metal for the roof, hardware cloth for the run, and secure latches and locks to keep your chickens safe. Choosing the right tools will make the construction process smoother, safer, and more efficient. You will need to measure, cut, fasten, and finish different materials. A comprehensive tool kit helps you complete each task effectively and with precision. If you are unsure about a certain tool, research the different types to ensure you choose the right one.
Essential Materials Checklist

- Lumber (for the frame, walls, and roof)
- Hardware cloth (for the run walls and any ventilation openings)
- Roofing material (e.g., asphalt shingles, metal sheets)
- Screws, nails, and other fasteners
- Hinges, latches, and locks
- Nesting boxes
- Perches (roosts)
- Chicken wire or fencing (for the run)
- Exterior-grade paint or sealant (to protect the wood)
- Wood shavings or straw (for bedding)
Necessary Tools
- Measuring tape
- Level
- Circular saw or handsaw
- Drill and drill bits
- Screwdriver
- Hammer
- Staple gun (for attaching hardware cloth)
- Safety glasses
- Work gloves
- Pencil or marker
- Clamps
Step-by-Step Omelette Chicken Coop Construction
Constructing your own omelette chicken coop involves several steps, from building the frame to adding the finishing touches. Planning is essential, so having detailed plans or a well-thought-out design will make the entire process easier. Start with a solid foundation. Your coop will last longer and be more secure if built on a level, stable surface. If the ground is uneven, you may need to build a raised platform or use concrete blocks. Safety is a priority, so wear safety glasses and work gloves to protect yourself from potential hazards. Follow your plans carefully. Measure twice and cut once. This helps ensure accuracy and prevent material waste. If you’re unsure about any step, consult with a more experienced builder or online resources.
Building the Coop Frame

Start by constructing the frame. This forms the basic structure of your coop. Cut the lumber according to your plans, then assemble the frame using screws or nails. Ensure that all corners are square, and the frame is level. Next, build the walls and roof frame, attaching them securely to the main frame. Reinforce the frame with additional supports as needed, especially for larger coops or areas exposed to strong winds. Consider the addition of a floor. If your coop will have a floor, install it at this stage. This will involve cutting and attaching floorboards to the frame. Make sure the floor is sturdy and level. At this stage, you should have a basic box-like structure representing the foundation of your coop.
Installing the Walls & Roof
Once the frame is complete, you can start installing the walls. Cut the wall panels to size, and attach them to the frame using nails, screws, or other appropriate fasteners. Ensure that the panels are securely attached and that there are no gaps or openings where predators might enter. After the walls are up, it’s time to install the roof. The roof protects your chickens from the elements. The design should provide sufficient overhang to protect the walls from rain and direct sunlight. You can use various roofing materials, such as asphalt shingles or metal sheets. Make sure that the roofing material is correctly installed, following the manufacturer’s instructions. This step includes adding any necessary insulation to the walls and roof to help regulate the coop’s temperature. Remember to add any windows or vents at this point as well.
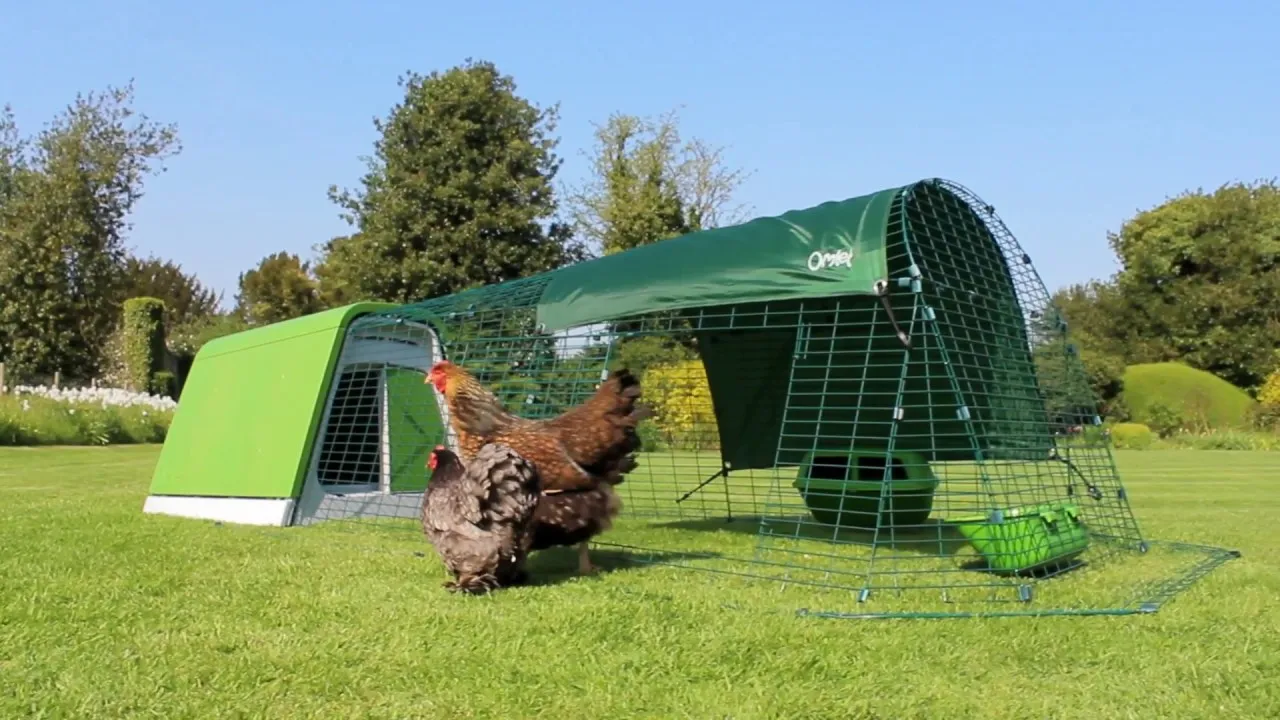
Creating the Chicken Run
A chicken run provides a safe outdoor space where chickens can roam, forage, and enjoy fresh air. Attach the hardware cloth or chicken wire to the perimeter of the run, ensuring it’s securely fastened to the frame and buried a few inches underground to prevent predators from digging underneath. Make sure the run is large enough for your chickens. A general rule of thumb is to allow at least 8-10 square feet of space per chicken in the run. Construct a secure gate for the run. The gate should have a sturdy latch or lock to prevent predators from entering. Consider adding a roof to the run. This will provide shade and protection from the elements, and help contain your chickens. Regularly inspect the run for any damage or weaknesses, such as holes in the wire or loose posts. Address any issues immediately to maintain the safety and security of your chickens.
Adding Features Inside

To create a comfortable and functional environment for your chickens, you need to add several internal features. Nesting boxes are essential for egg-laying. Provide one nesting box for every 3-4 hens. Place the nesting boxes in a quiet, secluded area of the coop. The boxes should be large enough for your chickens to comfortably sit and lay their eggs. Perches are essential for chickens to roost, especially at night. Install the perches at varying heights to provide the chickens with more comfortable options. Ensure the perches are sturdy and wide enough for your chickens to sit on comfortably. Provide feeders and waterers. Position these in a convenient location, away from the roosting areas, to prevent contamination of the food and water. Consider adding a dust bath area, which allows chickens to clean themselves. This area can be as simple as a shallow container filled with sand or soil. Add anything else that you think will improve the chickens quality of life.
Nesting Boxes
Nesting boxes are essential for egg-laying. They provide a safe and private space for hens to lay their eggs, encouraging them to lay in the coop. Make sure the boxes are the correct size for your chickens, providing enough space for them to comfortably sit and nest. Place the boxes in a quiet, secluded area of the coop, away from drafts and direct sunlight. This will make the hens feel safe and secure. Consider adding some soft bedding, such as straw or wood shavings, to the boxes to provide comfort and cushion for the eggs. Regularly clean the nesting boxes. Remove any soiled bedding and replace it with fresh material to maintain cleanliness and prevent disease. Check for eggs frequently. This will prevent eggs from breaking or being soiled and encourage the hens to continue laying in the boxes.
Perches
Perches are essential for chickens to roost, especially at night. They provide a safe and comfortable place for them to rest and sleep. Place perches at varying heights within the coop, providing the chickens with options. Ensure the perches are sturdy and made of a material that is easy for the chickens to grip, such as wood. Position the perches away from drafts and direct sunlight. Ensure they are easily accessible, and provide enough space for each chicken. Clean the perches regularly. Remove any droppings and replace with fresh material to maintain hygiene and prevent the spread of disease. Make sure the perches are strong enough to hold the weight of the chickens, and make any repairs or reinforcement as needed.
Ensuring Ventilation and Safety

Proper ventilation is vital to maintaining the health and well-being of your chickens. Good ventilation helps remove moisture, ammonia, and other harmful gases from the coop. Adequate ventilation also helps regulate temperature, keeping the coop cool in the summer and warm in the winter. You can install vents in the roof, walls, or both. Ventilation should be provided at the highest point of the coop. This helps exhaust heat and humidity, preventing them from building up inside. Make sure all openings are covered with hardware cloth to prevent predators from entering. A well-ventilated coop helps prevent respiratory problems and other health issues. Make sure the coop is designed to keep predators out. Use hardware cloth or solid walls. Secure all doors, windows, and latches with sturdy hardware.
Ventilation Strategies
Natural ventilation is the most efficient way to ventilate your chicken coop. This involves using strategically placed openings to allow air to circulate naturally. Install vents near the roof to allow hot air and moisture to escape. Place vents on opposite sides of the coop to encourage cross-ventilation. This will ensure that fresh air can circulate throughout the coop. Ensure adequate airflow. Prevent stagnant air, which can lead to the build-up of moisture and ammonia. Ensure that the coop is not overcrowded, as this can make it difficult to ventilate properly. Consider the climate in your area. In warmer climates, you may need to provide more ventilation than in colder ones. If natural ventilation isn’t sufficient, you can add fans to the coop to improve air circulation.
Pest Control & Security
Preventing pests and ensuring the safety of your chickens are critical aspects of coop design. Use hardware cloth or solid walls instead of chicken wire, which is easier for predators to break through. Bury the hardware cloth at least 12 inches underground to prevent predators from digging beneath the coop. Install sturdy latches and locks on all doors and windows, making sure they are secure. The best prevention is a well-built coop. Protect your chickens from rodents by using a tight-fitting lid on their feed containers and storing feed in a secure area. Regularly clean the coop. This will help eliminate pest attractants and reduce the risk of infestation. Be vigilant about checking for signs of pests, such as droppings, tracks, or damage to the coop. Treat any infestations promptly to prevent further damage. Consider using natural pest control methods, such as diatomaceous earth, to control pests and parasites.
Maintaining Your Omelette Chicken Coop

Regular cleaning and maintenance are essential to keep your coop in good condition and ensure the health and happiness of your chickens. A well-maintained coop provides a healthier and more comfortable environment for your chickens, reduces the risk of disease, and helps extend the life of your coop. A regular cleaning schedule helps prevent the build-up of waste, which can attract pests and lead to unpleasant odors. Regular maintenance can identify and address any problems before they become major issues. Regular cleaning reduces the risk of disease. Check for wear and tear, and make the necessary repairs promptly. Consistent upkeep minimizes the risk of costly repairs down the line.
Regular Cleaning Schedule
Create a cleaning schedule that suits your needs and your chickens’ needs. Remove any soiled bedding or droppings daily, ideally in the morning or evening. Once a week, perform a more thorough cleaning, removing all bedding, washing down surfaces, and disinfecting the coop. Replace the bedding regularly. This helps absorb moisture and prevent odors. A deep cleaning involves emptying the coop completely, washing down all surfaces with a poultry-safe disinfectant, and allowing the coop to dry thoroughly. Make sure to properly dispose of used bedding. Keep the coop clean will attract fewer pests and reduce the risk of disease. Regular cleaning keeps the coop fresh and comfortable.
Coop Maintenance & Repairs
Regular maintenance is essential to prevent small problems from becoming major issues. Inspect the coop regularly for any signs of wear and tear, such as loose boards, broken latches, or damaged roofing. Make repairs promptly. This can prevent further damage and ensure the safety and security of your chickens. Lubricate hinges and latches regularly. This ensures they operate smoothly. Inspect the coop for any signs of pests or rodents. Address any infestations promptly to prevent them from spreading. Seal any cracks or openings in the coop to prevent drafts and prevent predators from entering. Maintain the exterior of the coop. This includes painting or sealing the wood to protect it from the elements. A well-maintained coop will be durable, safe, and attractive.