Why Insulate Your Chicken Coop
Insulating your chicken coop is a crucial step in providing a comfortable and healthy environment for your feathered friends, regardless of the season. It helps regulate the internal temperature, protecting chickens from extreme heat in the summer and bitter cold in the winter. Beyond temperature control, insulation also contributes to energy efficiency and reduces the risk of moisture-related issues, creating a safer and more sustainable living space for your flock. This guide will walk you through the benefits and steps needed to insulate your chicken coop effectively.
Benefits of Insulation
Improved Temperature Regulation

The primary benefit of insulating your chicken coop is its ability to stabilize the internal temperature. In winter, insulation prevents heat from escaping, keeping the coop warmer and reducing the risk of frostbite and other cold-related illnesses. During summer, it helps to block the sun’s heat, keeping the coop cooler and preventing heat stress. This consistent temperature regulation ensures your chickens are comfortable year-round, leading to better health and productivity, including more consistent egg-laying.
Reduced Energy Costs
While you might not think of a chicken coop as a place for energy consumption, insulation can still help save money. By maintaining a more stable temperature, you may reduce the need for supplemental heating during the winter months. Even if you don’t use a heater, the reduced heat loss means your chickens will expend less energy trying to stay warm, indirectly improving their overall health and potentially reducing feed consumption. Insulation, therefore, contributes to a more cost-effective and sustainable approach to poultry keeping.
Protection from the Elements
Insulation also provides a barrier against the elements, not just temperature extremes. It can help to reduce drafts, which can chill chickens and make them susceptible to respiratory illnesses. Insulation also helps to minimize moisture buildup, which can lead to mold and mildew, creating an unhealthy environment. By creating a more controlled environment, insulation helps protect your chickens from the adverse effects of wind, rain, and humidity, contributing to their overall well-being and longevity.
Choosing the Right Insulation Materials

Selecting the appropriate insulation material is critical for the effectiveness of your chicken coop insulation project. Several options are available, each with its own advantages and disadvantages. Considerations include the climate you live in, your budget, ease of installation, and the overall safety of the chickens. Choosing a material that is non-toxic and resistant to pests is vital. Let’s explore some common types of insulation suitable for chicken coops, considering their characteristics and suitability.
Types of Insulation
Fiberglass Insulation
Fiberglass insulation is a popular and affordable option. It comes in rolls or batts and is relatively easy to install, making it a good choice for DIY projects. However, it’s essential to handle fiberglass with care, as it can irritate the skin and respiratory system. When using fiberglass, ensure it’s covered with a protective layer, like plywood or OSB, to prevent chickens from accessing it and to protect the insulation from moisture. Regular inspections are necessary to check for any damage and ensure the insulation remains effective.
Foam Board Insulation

Foam board insulation, such as polystyrene or polyurethane, offers excellent insulation properties and is relatively easy to install. It comes in rigid sheets that can be cut to fit the coop’s frame. Foam board is also resistant to moisture and pests, which is a significant advantage in a chicken coop environment. It’s crucial to seal all seams and edges properly to prevent drafts and moisture intrusion. Ensure the foam board is covered with a protective layer to prevent pecking and damage from the chickens.
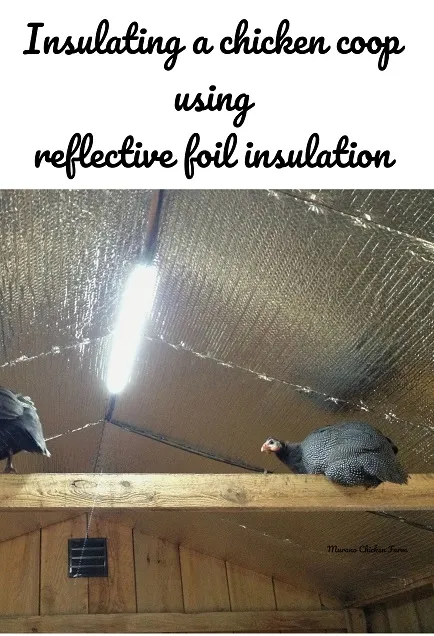
Spray Foam Insulation
Spray foam insulation provides a seamless and airtight seal, making it an excellent option for preventing drafts and moisture buildup. It conforms to irregular surfaces, making it suitable for coops with complex designs. While spray foam offers superior insulation performance, it’s typically more expensive than other options and often requires professional installation. Ensure the spray foam is non-toxic and safe for chickens, and be aware that it can be a messy process. Proper ventilation is essential during installation and curing.
Insulation Installation Steps
Proper installation is key to maximizing the effectiveness of your chicken coop insulation. The process involves several steps, from preparing the coop to sealing any gaps. Taking your time and following these steps carefully will ensure that your insulation project is successful and provides long-term benefits for your flock.
Preparing the Coop
Before you begin insulating, thoroughly clean the coop and remove any debris or loose materials. Inspect the coop for any existing damage, such as cracks or holes, and repair them before proceeding. Ensure the coop is dry, as moisture can reduce the effectiveness of insulation and lead to mold growth. It’s also a good idea to plan your insulation layout and measure the areas to be insulated to determine how much material you’ll need.
Measuring and Cutting Insulation
Carefully measure the areas you plan to insulate, such as the walls, roof, and floor. Cut the insulation material to fit, allowing for a snug fit within the coop’s frame. Use a sharp utility knife or a saw designed for the type of insulation you’re using. When working with fiberglass, wear appropriate personal protective equipment, including gloves, a mask, and eye protection. Precise measurements and cuts will help ensure an effective insulation barrier and minimize gaps.
Installing Insulation
Install the insulation material, following the manufacturer’s instructions. For fiberglass and foam board, fit the insulation snugly between the studs and rafters, ensuring there are no gaps. For spray foam, apply the foam evenly, filling all voids and sealing any cracks. Consider adding a vapor barrier to prevent moisture from entering the insulation, especially in areas prone to humidity. Once the insulation is in place, cover it with a protective layer, such as plywood or OSB, to prevent damage and protect the chickens.
Sealing Gaps and Cracks

Sealing all gaps and cracks is essential to prevent drafts and moisture from entering the coop. Use caulk or sealant to fill any small openings. For larger gaps, consider using expanding foam. Pay particular attention to areas around windows, doors, and the roof. A well-sealed coop maximizes the effectiveness of the insulation, keeping the internal environment stable and comfortable for your chickens. Proper sealing also reduces the risk of pest intrusion and moisture-related problems.
Ventilation Considerations
While insulation keeps heat in, it’s equally important to ensure proper ventilation in your chicken coop. Ventilation prevents the buildup of moisture and harmful gases, maintaining a healthy environment for your chickens.
Importance of Ventilation
Proper ventilation helps to remove moisture, ammonia, and other harmful gases produced by chicken droppings. Excess moisture can lead to mold and mildew growth, which can cause respiratory problems in chickens. Ammonia buildup can also irritate their respiratory systems. Ventilation ensures fresh air circulation, creating a healthier and more comfortable environment for your flock. Effective ventilation is just as critical as insulation to achieve a healthy coop environment.
Ventilation Strategies

Provide adequate ventilation by incorporating vents in the roof and walls of the coop. Position vents to allow for cross-ventilation, ensuring fresh air flows through the coop. Avoid placing vents directly above roosting bars, as this can create drafts. Consider using a ridge vent on the roof for continuous airflow. Ensure that vents are protected with wire mesh to prevent pests from entering. Regularly inspect and clean the vents to maintain proper airflow. The combination of insulation and ventilation results in the ideal environment.
Maintaining Your Insulated Coop
Once your chicken coop is insulated, it’s essential to maintain it regularly to ensure its long-term effectiveness and the health of your chickens. Regular inspections and addressing any issues promptly will help to keep your coop in optimal condition.
Regular Inspections
Conduct regular inspections of your insulated coop, at least twice a year, or more frequently in areas with harsh weather conditions. Check for any signs of damage to the insulation, such as tears, compressions, or pest infestations. Inspect the protective covering for any damage or signs of wear. Also, examine the ventilation system to ensure it’s functioning correctly. Early detection of any problems will allow for timely repairs, preventing more significant issues from developing.
Addressing Moisture Issues
Monitor the coop for any signs of moisture buildup, such as condensation or mold growth. If you find excessive moisture, investigate the cause and address it promptly. Improve ventilation if needed and repair any leaks in the roof or walls. Ensure the coop floor is dry by using absorbent bedding and changing it regularly. Addressing moisture issues will help prevent damage to the insulation and maintain a healthy environment for your chickens. Keeping your coop dry will extend the life of your insulation.
Conclusion
Insulating your chicken coop is a valuable investment that provides numerous benefits for both you and your flock. By following this guide, you can create a comfortable, healthy, and energy-efficient environment for your chickens, ensuring their well-being and productivity. From choosing the right materials to proper installation and maintenance, taking the time to insulate your coop will be worth the effort and provides years of benefits. By taking these steps, you’ll be well on your way to creating a happy and healthy home for your chickens.