Building a large chicken coop can be a rewarding project, providing a safe and comfortable home for your flock while also giving you fresh eggs daily. This guide will walk you through the five essential steps required to construct a spacious and functional coop. From initial planning stages to the final touches, we’ll cover everything you need to know to ensure your chickens thrive. Get ready to embark on a journey that will transform your backyard and provide you with the joy of raising your own chickens.
Planning Your Large Chicken Coop
Before you even touch a hammer, thorough planning is paramount. Proper planning sets the stage for a successful build, minimizing potential issues and ensuring your coop meets your chickens’ needs. This involves considering factors such as coop size, local regulations, and the best location for your structure within your property.
Determine Coop Size and Capacity
The size of your chicken coop directly influences the number of chickens you can comfortably house. A general rule of thumb is to allow at least 4 square feet of floor space per chicken inside the coop and 8-10 square feet per chicken in the run. Consider the breed of chickens you plan to keep, as larger breeds may require more space. Overcrowding can lead to stress, disease, and decreased egg production. Furthermore, think about future growth; it’s often wise to build a coop slightly larger than your current flock size to accommodate potential additions.
Consider Local Regulations and Codes

Building codes and local ordinances vary by location. Before starting your project, research your area’s specific requirements for chicken coops. This may involve permits, setbacks from property lines, and restrictions on coop size or materials. Ignoring these regulations can result in fines or even the need to dismantle your coop, so checking beforehand is crucial. Contact your local zoning department or building inspector to obtain the necessary information.
Choosing the Right Location for Your Coop
The location of your coop is important for both the chickens and your convenience. Select a spot that offers good drainage to prevent moisture buildup. Ensure the area receives adequate sunlight, particularly during the colder months, but also provides shade to protect chickens from overheating in summer. Consider proximity to your house for easy access when collecting eggs and providing food and water. Also, evaluate the surroundings for potential hazards like predators. A well-chosen location can significantly contribute to the health and safety of your flock.
Gathering Materials and Tools
Once you have a plan in place, the next step is gathering the necessary materials and tools. Having everything ready before you begin construction will streamline the process and reduce frustration. Make a detailed list of all required items, ensuring you account for every aspect of the coop, from the frame to the interior features.
Essential Lumber and Hardware

The choice of lumber and hardware is vital for the structural integrity and longevity of your coop. Pressure-treated lumber is recommended for the base and any areas exposed to the ground, as it resists rot and insect damage. For the frame and walls, consider using durable wood like cedar or redwood. You’ll also need various types of hardware, including screws, nails, hinges, latches, and wire mesh for the run. Choose materials that are weather-resistant and suitable for outdoor use, ensuring your coop stands up to the elements.
Necessary Tools for Construction
Equipping yourself with the correct tools will make the building process smoother and safer. Essential tools include a saw (circular saw or handsaw), a drill, a level, a measuring tape, a hammer, a screwdriver, and safety glasses. Additional tools that can be helpful include a staple gun for attaching wire mesh, a post hole digger if you’re building a permanent run, and a sander for smoothing rough edges. Safety gear, such as work gloves and a dust mask, should also be part of your toolkit.
Step 1 Building the Coop Frame
The frame is the skeleton of your chicken coop, providing the basic structure upon which everything else will be built. A sturdy frame is crucial for the stability and durability of your coop. This step involves constructing the base, walls, and potentially the roof frame. Ensure all measurements are accurate and that you use appropriate joinery techniques to create a solid foundation.
Constructing the Base and Walls

Start by building the base frame, ensuring it’s level and square. This frame will sit directly on the ground or on a prepared foundation. Next, construct the walls by attaching vertical studs to the base frame and then securing horizontal supports. Accurate measurements and plumb lines are critical for creating a straight and stable structure. Consider adding a slight angle to the walls for better water runoff. If using a pre-designed plan, follow the dimensions meticulously.
Reinforcing the Structure
Once the base and walls are up, reinforce the structure to enhance its durability. This might involve adding corner braces, diagonal supports, and bracing for the walls. These reinforcements will help the coop withstand wind, snow, and the general wear and tear. Ensure all joints are securely fastened with screws or nails, and double-check the stability of the entire frame before moving on to the next step. Proper reinforcement significantly extends the life of your coop.
Step 2 Installing the Roof
The roof protects your chickens from the elements, so choosing the right materials and installing it correctly is essential. The roof also plays a vital role in ventilation and temperature regulation within the coop. There are several roofing options available, each with its own advantages and disadvantages.
Choosing the Right Roofing Materials

Common roofing materials for chicken coops include asphalt shingles, corrugated metal, and wood. Asphalt shingles are relatively inexpensive and easy to install, while metal roofing is more durable and offers better protection against the elements. Wood roofing, such as cedar shakes, can add a rustic aesthetic but may require more maintenance. Consider factors like cost, durability, appearance, and the climate in your area when selecting your roofing material.
Securing the Roof to the Frame
Once you’ve chosen your roofing material, carefully attach it to the coop frame. This usually involves securing sheathing to the roof frame and then attaching the roofing material according to the manufacturer’s instructions. Ensure proper overlap and use appropriate fasteners to prevent leaks and ensure the roof’s longevity. Proper sealing around vents and any penetrations is also important. A well-installed roof will protect your chickens from rain, snow, and sun exposure.
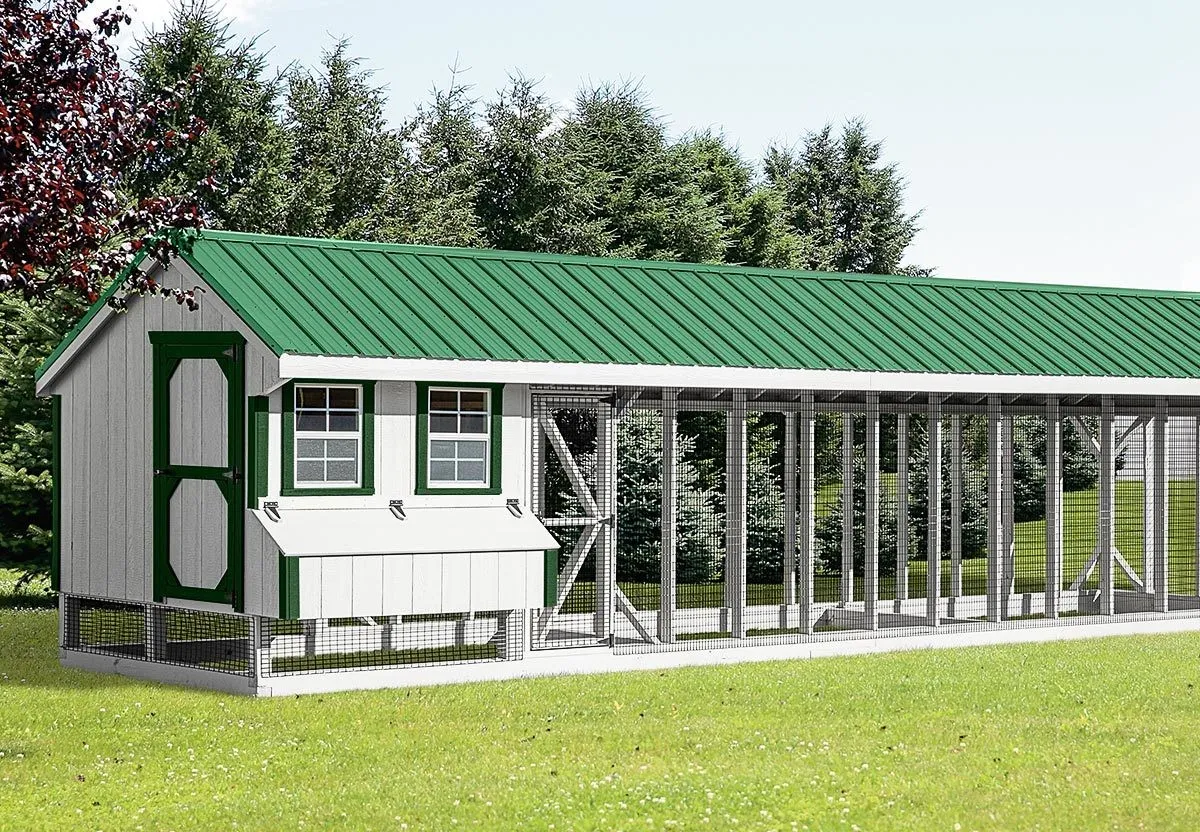
Step 3 Building the Chicken Run
A secure chicken run provides a safe outdoor space for your chickens to roam, forage, and exercise. Building a well-designed run protects your flock from predators while allowing them access to fresh air and sunshine. The size of your run should correspond to the number of chickens you have, allowing sufficient space for comfortable movement. The run’s construction is as vital as the coop itself.
Materials for the Run

The materials for your chicken run should be durable and predator-resistant. Use sturdy lumber for the frame and high-quality wire mesh for the walls and top. Bury the wire mesh at least 12 inches deep along the perimeter to prevent predators from digging under. Consider using hardware cloth, which has smaller openings than chicken wire, to provide greater protection against smaller predators. Ensure all edges of the mesh are securely fastened to prevent escapes or entry points.
Attaching the Run to the Coop
The chicken run should seamlessly connect to the coop, allowing your chickens easy access between the indoor and outdoor spaces. Attach the run to the coop frame securely, using hinges for a door that allows you to access the run for cleaning and maintenance. Ensure the connection points are sturdy and predator-proof. A well-integrated run and coop will provide your chickens with a safe and functional living environment, increasing their well-being and egg production.
Step 4 Creating the Interior
The interior of your chicken coop should be designed to meet your chickens’ specific needs, including nesting boxes for egg laying and roosting bars for sleeping. Careful consideration of the interior layout will ensure that your chickens have a comfortable and productive living space. A well-designed interior also makes cleaning and maintaining the coop easier.
Building Nesting Boxes

Nesting boxes should be placed in a quiet, dimly lit area of the coop, away from drafts. A general rule of thumb is to provide one nesting box for every three to four hens. Boxes should be large enough for the chickens to comfortably turn around. Line the boxes with soft, clean bedding like straw, hay, or wood shavings. This will encourage the chickens to lay their eggs in a safe and comfortable place and make egg collection easier.
Installing Roosts and Perches
Chickens naturally roost at night. Install roosting bars or perches at varying heights inside the coop. Provide enough space for each chicken to comfortably perch, typically about 8-12 inches of space per bird. Round or slightly flattened wooden poles are ideal for roosting. Position the roosts away from the nesting boxes to keep them clean and encourage the chickens to sleep in a designated area. Ensure there is adequate space between the roosts and the ceiling to prevent the chickens from getting trapped.
Step 5 Securing and Finishing Touches
Once the main structure and interior are in place, the final step is to secure the coop and add any finishing touches. This involves adding doors and windows and implementing measures to protect against predators. Taking care of these details will ensure that your coop is not only functional but also safe and attractive.
Adding Doors and Windows

Install doors and windows to provide ventilation and access for both you and your chickens. The coop door should be secure and easy to open and close, with a latch that prevents predators from entering. Windows allow for natural light and ventilation, but they should be covered with wire mesh for protection. Ensure all openings are well-fitted and properly sealed to prevent drafts and keep predators out. Consider adding a ramp for easy access to the coop.
Protecting Against Predators
Predator protection is essential for the safety of your flock. Use sturdy materials and secure all openings. Bury wire mesh around the perimeter of the coop and run to prevent digging predators from entering. Ensure the coop has a solid floor or a layer of wire mesh. Use secure latches on doors and windows. Consider adding additional features, such as an automatic door opener or a predator-resistant fence, to further protect your chickens. Regularly inspect the coop for any signs of damage or potential entry points.
Maintaining Your Large Chicken Coop
Maintaining your large chicken coop is key to ensuring its longevity and the health of your chickens. Regular cleaning, inspections, and preventative measures will keep your coop in top condition. Consistent maintenance will also extend the life of your investment and provide a comfortable environment for your flock.
Building a large chicken coop is a significant undertaking, but the rewards are well worth the effort. By following these five steps, you can create a safe, comfortable, and functional home for your chickens. Remember to plan thoroughly, choose the right materials, and prioritize security. With careful attention to detail, your coop will provide years of enjoyment and fresh eggs. Enjoy the process and the satisfaction of providing a great home for your flock. Happy building!