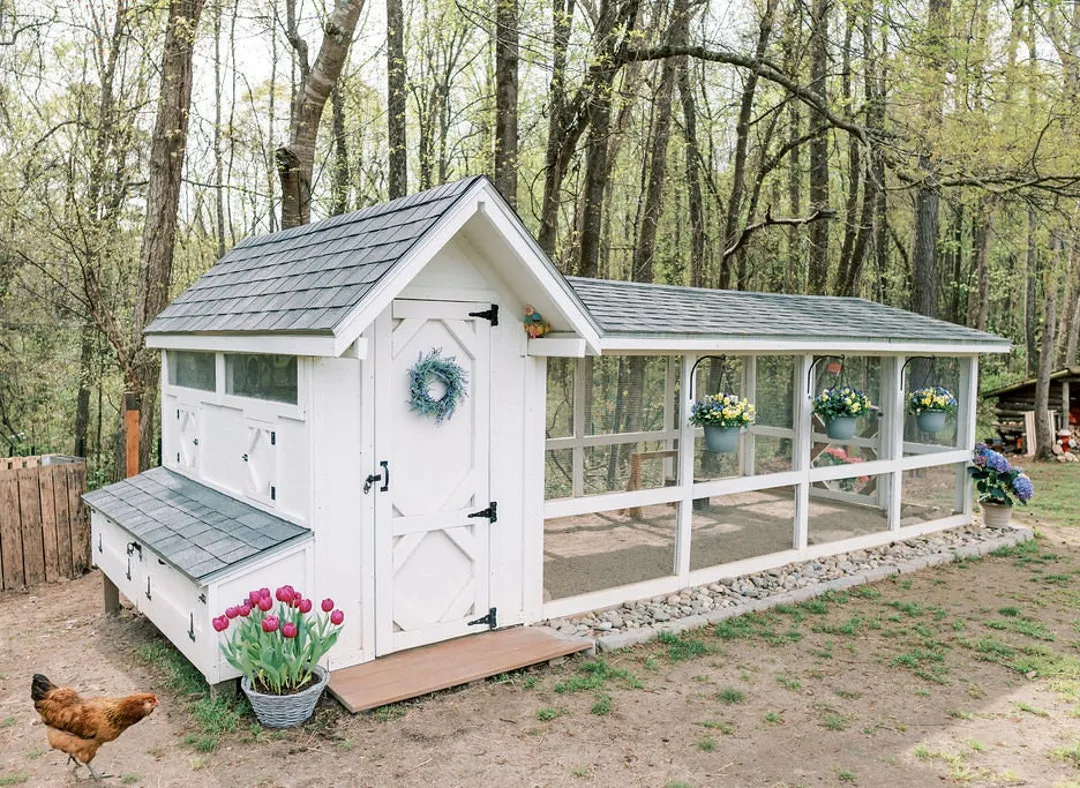
Planning Your Walk-In Chicken Coop
Building a walk-in chicken coop is a rewarding project that provides your flock with a safe, comfortable, and spacious home. However, the success of your coop hinges on careful planning. Before you even think about hammering a nail, you need to consider several factors to ensure your coop meets your chickens’ needs and fits seamlessly into your property. Proper planning saves time, money, and prevents potential issues down the line.
Choosing the Right Location
The location of your walk-in chicken coop is paramount. Consider ease of access for daily chores, proximity to your house (for convenience), and the overall layout of your yard. Avoid low-lying areas that might flood during heavy rains. Also, consider local zoning regulations and homeowner association rules that might impact coop placement. Accessibility to water and electricity (if needed) is also essential.
Considerations for Sunlight and Shade

Chickens need both sunlight and shade. Ideally, the coop should receive some direct sunlight, especially in the morning, to help with warmth and vitamin D production. However, ensure there’s adequate shade available, especially during the hottest parts of the day. Trees, strategically placed shade cloth, or the coop’s design itself can provide this crucial relief from the sun. Improper sun exposure can lead to stress and health issues.
Assessing Ground Conditions and Drainage
The ground beneath your coop should be stable and well-draining. Poor drainage can lead to muddy conditions, which attract pests and contribute to health problems for your chickens. Consider the soil type and the slope of the land. If the area doesn’t drain well naturally, you might need to install a drainage system, such as a gravel base or French drain, to keep the coop dry and hygienic. This is extremely important for the health of your chickens.
Determining the Size and Capacity
The size of your walk-in chicken coop should be determined by the number of chickens you plan to keep. Overcrowding can lead to stress, disease, and behavioral problems such as feather pecking and aggression. You must provide adequate space for each bird to thrive and maintain a healthy lifestyle. Planning for future expansion is also wise if you anticipate adding more chickens later.
Estimating Space per Chicken

A general rule of thumb is to allow at least 4 square feet of floor space per chicken inside the coop. However, for larger breeds or if you live in a climate where chickens spend a lot of time indoors, you may want to increase this to 6-8 square feet per bird. Also consider the amount of outdoor space available in the run as this will affect the coop size needed. Ample space is essential for the well-being of your flock.
Calculating Overall Coop Dimensions
Once you know how many chickens you’ll house, calculate the overall dimensions. Don’t forget to factor in the height of the coop to allow for comfortable headroom for you when cleaning and tending to the chickens. The shape of the coop also influences how space is used. A rectangular shape is generally the most efficient, making it easy to divide space and organize the interior. Think about the future and how you can adjust the coop later.
Gathering Materials
Choosing the right materials is critical to building a durable, safe, and functional walk-in chicken coop. The materials you select will impact the coop’s longevity, its ability to withstand the elements, and its effectiveness in protecting your chickens from predators. Consider your budget, the climate in your area, and the availability of materials when making your choices. Proper planning will also help minimize waste and streamline the building process.
Essential Building Supplies

The essential supplies include lumber for the frame, roofing materials (such as asphalt shingles or corrugated metal), hardware cloth or wire mesh for the run, screws, nails, hinges, latches, and paint or sealant to protect the wood. The quantity of each material will vary depending on the size of your coop. Create a detailed list before you start, and don’t forget tools like a saw, drill, hammer, and measuring tape.
Wood vs. Alternative Materials
Wood is a popular choice for its ease of use and affordability. However, choose rot-resistant wood like cedar or redwood, or use pressure-treated lumber for the base. Consider alternative materials like metal or composite siding for added durability and low maintenance. Some builders incorporate recycled materials to minimize costs and environmental impact. Think about the long-term and if you want something that will last decades.
Tools You’ll Need
Gathering the right tools will make the building process much smoother. You’ll need a saw (circular saw, hand saw, or reciprocating saw), a drill, a hammer, a measuring tape, a level, a square, and safety glasses. Having a staple gun for attaching hardware cloth is also helpful. Depending on your chosen design, you may need additional specialized tools. Safety always comes first, so invest in quality tools and follow all safety instructions.
Securing Your Coop

Protecting your chickens from predators is one of the most important aspects of building a walk-in chicken coop. Predators such as foxes, raccoons, coyotes, and even domestic pets pose a constant threat. A well-secured coop minimizes the risk of attacks and ensures the safety and well-being of your flock. This requires careful attention to detail and robust construction methods.
Predator-Proofing Your Coop
Predator-proofing begins with a solid foundation. Bury hardware cloth or wire mesh around the perimeter of the coop, extending it outward and inward to prevent digging predators from gaining access. Ensure all doors and windows are securely latched. Use sturdy, predator-resistant materials throughout the coop. Regularly inspect the coop for any signs of damage or potential entry points and repair them promptly.
Hardware Cloth and Mesh Guidelines
Hardware cloth is far superior to chicken wire for predator protection. Choose hardware cloth with small mesh openings (1/2 inch or smaller) to prevent predators from reaching through. Use heavy-gauge wire to prevent animals from tearing or chewing through the material. Attach the hardware cloth securely using staples or screws, and overlap the edges to eliminate any weak points. Make sure the mesh is properly installed throughout the coop.
Protecting Against Digging Predators

Digging predators are a common threat. Bury hardware cloth at least 12 inches deep around the perimeter of the coop. Bend the hardware cloth outward at the bottom to create an L-shape, making it difficult for predators to dig under. You can also install a concrete foundation, but this is more expensive. Regular inspections of the base are important to identify any spots that need to be reinforced.
Building the Coop Structure
The structural integrity of your walk-in chicken coop is essential for its longevity and the safety of your chickens. A well-built coop should withstand the elements, including wind, rain, and snow. Careful attention to framing, roofing, and door/window installation ensures that your coop remains a secure and comfortable haven for your flock. The following will help you to build a coop that will stand the test of time.
Framing the Walls and Roof
Start with a sturdy frame. Use pressure-treated lumber for the base and framing studs. Ensure the frame is square and level before attaching the wall sheathing. For the roof, choose a design that suits your climate and aesthetic preferences. Consider the slope of the roof, as this impacts water runoff and snow load. The framing must be done correctly to ensure the structure’s stability and resistance to the weather.
Step-by-Step Guide to Wall Construction

First, build the wall frames on the ground, ensuring the corners are square. Then, lift the frames into place and attach them to the base. Use nails or screws and check for level and plumb. Once the frames are up, attach sheathing (plywood, siding, etc.). Overlap the seams and use weather-resistant fasteners. Consider adding insulation to the walls for temperature regulation. Proper construction ensures a durable structure.
Roofing Options and Installation
Choose roofing materials based on durability, cost, and aesthetic appeal. Asphalt shingles are a common choice, but metal roofing offers greater longevity. Ensure proper underlayment to prevent leaks. Follow the manufacturer’s instructions for installation, paying attention to overlap and flashing around vents and chimneys. A well-installed roof protects the chickens from the elements and extends the life of your coop.
Installing Doors and Windows
Doors and windows are essential for ventilation, light, and access. Choose sturdy doors with secure latches to prevent predators from entering. Install windows with hardware cloth or wire mesh to allow for airflow while keeping chickens safe. Ensure that doors and windows fit tightly, and caulk around them to prevent drafts and moisture penetration. Properly installed doors and windows are crucial for both security and comfort.
Creating Interior Features

Once the basic structure is complete, you can focus on the interior features that will make your walk-in chicken coop a comfortable and functional home for your chickens. This includes designing and building roosts, nesting boxes, and incorporating features for ventilation and lighting. A well-designed interior promotes the health and well-being of your flock.
Designing Roosts and Nesting Boxes
Roosts provide a place for chickens to sleep and rest, while nesting boxes are where they lay their eggs. Design roosts with rounded edges and place them at different heights to accommodate the chickens’ preferences. For nesting boxes, provide one box for every 3-4 hens. Ensure the boxes are easily accessible and clean. A comfortable and functional interior will keep the flock happy.
Optimal Placement for Roosts
Place roosts away from the walls and under the roof to provide shelter. The height of the roosts can vary, but a common height is 2-4 feet above the ground. Ensure adequate space between roosts to prevent crowding and competition. Consider the ease of cleaning when positioning the roosts. Proper placement increases comfort and avoids potential injuries.
Nesting Box Dimensions and Accessibility
Nesting box dimensions should be approximately 12x12x12 inches. Ensure they are well-ventilated and protected from drafts. Provide a comfortable nesting material, such as straw or wood shavings. Place the boxes in a quiet and secluded area of the coop. Ensure easy access to the boxes for both the chickens and for egg collection. Proper nesting boxes are essential for egg production.
Implementing Ventilation and Lighting
Ventilation is essential for removing moisture and ammonia, which can cause respiratory problems. Install vents near the roof to allow warm, moist air to escape. Consider adding a roof vent or a ridge vent. Lighting is also important for chicken health and egg production. Provide natural light through windows, and supplement with artificial lighting during the winter months. Proper ventilation and lighting promote health and increased productivity.
Ensuring Proper Airflow
Adequate airflow is critical for maintaining a healthy environment. Ensure vents are positioned to allow for cross-ventilation. Avoid placing vents directly above roosts to prevent drafts. Check for signs of condensation and adjust ventilation as needed. Consider using a fan for increased ventilation in warmer climates. Good airflow promotes a healthy and clean environment for the chickens.
Lighting Options for Coop Health
Chickens need 14-16 hours of light per day for optimal egg production. Provide natural light through windows, and supplement with artificial lighting during the winter months. Use low-wattage LED bulbs designed for poultry, and consider a timer to regulate the light cycle. Proper lighting supports egg production and overall health. Consider a red light during winter months.
Final Touches and Maintenance
Once your walk-in chicken coop is built, the work isn’t quite done. Regular maintenance is essential to keep the coop clean, safe, and comfortable for your chickens. This includes regular cleaning, waste management, and making necessary repairs. Proper care will prolong the life of your coop and keep your chickens happy and productive.
Regular Cleaning and Waste Management
Regular cleaning is essential for preventing disease and keeping the coop odor-free. Remove droppings, soiled bedding, and spilled feed regularly. Choose a suitable bedding material, such as wood shavings or straw, and replace it as needed. Use appropriate cleaning products and disinfectants. Proper waste management also includes composting chicken manure, which can be used as fertilizer.
Best Practices for Cleaning
Clean the coop at least once a week, or more often if needed. Remove droppings and replace the bedding. Use a coop-safe disinfectant to clean surfaces and remove any build-up of grime. Always follow the product instructions and allow the coop to dry completely before returning the chickens. Thorough cleaning helps to prevent the spread of disease.
Waste Disposal and Composting Methods
Chicken manure is a valuable fertilizer. Compost it before use in your garden. The composting process breaks down the manure and eliminates pathogens. You can use a compost bin or pile. Ensure adequate ventilation and turn the compost regularly. When properly composted, chicken manure provides nutrients and improves soil structure. This is great for the environment and for your garden.